Adding and Formatting Graphics
| Adding graphics can enliven your Web pages, and slow them to a crawl when people try to view them on the Internet. How you use them is up to you; when creating pages, do refer to information sources on design and on how to maximize visual interest while minimizing load time. Graphics are pretty much the same throughout the program; they're already covered in the StarWriter documentation in Inserting Graphics on page 274. This section covers graphics information specific to Web, or that's common enough to put here, too. Adding a GraphicYou can add graphics three ways:
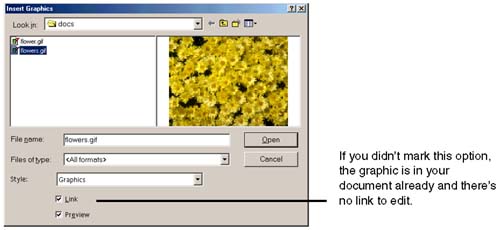
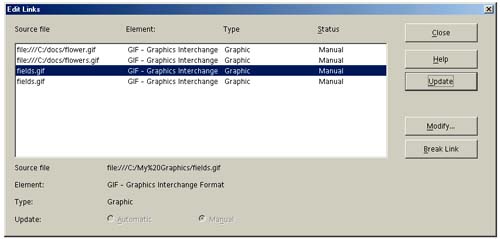
InsertingChoose Insert > Graphics and navigate to the graphic you want. The resulting HTML source will look something like this: <IMG SRC="file:///home/solveigh/graphics/beans.gif" NAME="Graphic2"> Practice good HTML practices and change the link to a relative one; if the document and image will be in the same directory, just change it to the following, and change the name if you want as well. <IMG SRC="beans.gif" NAME="Graphic2"> Note You can click the Properties button in the Insert Graphics window if you want to set properties like wrapping, the graphic name, etc. Information about using the Graphics window and the graphics object bar is included in Inserting Graphics on page 274. Pasting and Inserting via Another FileChoose Insert > File and select the file, containing graphics, to insert. All graphics in the inserted file will be saved with the document. The HTML source will look something like this: <IMG SRC="sv302303.jpg" NAME="Graphic1" > The name of the graphic is generated automatically, and the file is saved as a JPG. Note Each time you save the document, the graphic will be saved again under a different automatically generated name. If you save five times. for example, you'll have five JPG graphics in the folder with your HTML document, with various automatically generated names . This can add up, so use pasting or insertion via another document judiciously. Changing Links to Graphics or Other Documents in a DocumentIf you moved one or more graphics or OLE objects (such as spreadsheets or drawings) to a different location, you can update the links in your document using the Edit Links window in Figure 15-17. You can also use this window to just check where your graphics are coming from. Figure 15-17. Linking to a graphic when inserting it so that your document just points to it in its original location Note This window is to modify linked objects, not objects that you just inserted. If the Links option in the Edit menu is grayed out or not displayed, it means that all the objects in your document were copied there and there are no links to modify. Figure 15-17 shows the Link option that had to be marked when you inserted objects, in order to have links to edit using this procedure.
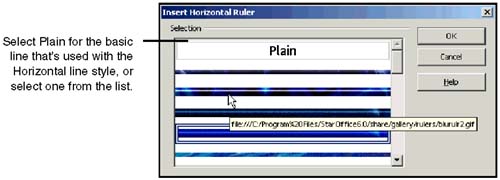
Inserting a Horizontal LineYou can use the Horizontal line style for a simple line, or choose Insert > Horizontal Line to select a graphical line (Figure 15-19). Figure 15-19. Inserting a graphical horizontal line You can resize the inserted graphical line, but not reposition it. Setting Graphics PropertiesOnce you've added the graphic, you can use the graphics properties tools to edit it as necessary. Properties are illustrated in Figure 15-20. Figure 15-20. Inserting and formatting graphics Information about using the Graphics window (right-click the object and choose Graphics) and the graphics object bar is included in Inserting Graphics on page 274. |

EAN: 2147483647
Pages: 407