Creating New HTML Files
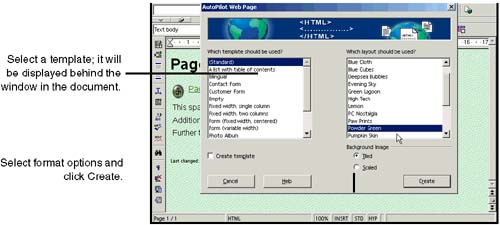
| The program has extensive setup options that let you pick default values for any new HTML files you create or open . Before you begin, see HTML Document Options on page 434 and Absolute and Relative Paths, and Fixing Broken Links on page 138. Note If you want your documents to be read by a browser other than Web, be sure to test your HTML documents in that browser before you distribute them. Web text formatting, especially multiple levels of bulleting, doesn't always translate well. In addition, if you edit the document with another HTML editor, the odds increase that the formatting you originally applied will be changed when you view the file again, in Web or another browser. Creating a New Blank HTML DocumentChoose File > New > HTML Document. This creates a blank document with the usual styles, including Heading 1 through Heading 6, List Contents, and Horizontal Line. It also has, by default, a header containing the full path to the file, date, time, and document title. To change either, see Using Headers and Footers on page 467. Creating a New HTML Document Based on a TemplateYou can access templates through File > AutoPilot > Web page. Note Templates from www.ooextras.org are included in the CD that comes with this book. You can also get old StarOffice 5.2 templates at http://wwws.sun.com/software/star/staroffice/5.2/templates/. All template links as well as templates created by the authors are available at: http://www.getopenoffice.org/templates.html To create templates, see Creating and Modifying Styles and Templates on page 451. Using AutoPilot
Checking What Template Your Document Is Based OnIf your document is acting weird and you want to make sure you created it based on the right template, choose File > Properties and click the General tab. The template used by the document is displayed at the bottom of the window. Changing Defaults for New DocumentsYou can change the default font (not the font size) for Standard, Heading, List, Caption, and Index styles. Choose Tools > Options > Text Document > Default Font. Select the defaults you want. Don't select the Current heading only option if you want this to apply to all subsequent documents. To change the attributes of styles that appear in each new document you create, or to add styles, see Styles on page 453. Extensive file and template information is also included in Writer, since Writer and Web have very similar functions. See Creating and Modifying Styles and Templates on page 451, and Styles on page 453. Changing Existing Documents to HTMLYou can get virtually anything you create or import into HTML format. Exporting Presentations and DrawingsYou can easily convert Impress and Draw documents to HTML. See Creating an HTML Version of Your Presentation on page 733 for more information. Saving Files in HTML FormatYou also can choose File > Save As to save in an HTML format. Calc, for instance, has the HTML (Calc) format. Publishing HTML Files With Embedded DocumentsYou can insert a spreadsheet, Writer document, or other file in an HTML document, and post the HTML document on the Web. Opening any Text File in HTMLSelect the file in Beamer and choose Open With, then select HTML or HTML (Writer). The program will give you an error message sometimes, though not consistently, when you do this. If it happens, just sigh and open the file, then use Save As to pick the format you want. Saving a Writer File in HTMLYou can easily convert Writer files, or any file you can open in Writer, to HTML. (If you need to get a document into Writer, the best way is to save it in .RTF format, then choose File > Open in OpenOffice.org.)
Note The document icon in the task bar will change to the HTML icon, but you won't see the HTML-specific toolbars and menu commands until you close the file and reopen it. It doesn't work to choose File and then select the name of the file, to reopen ityou have to close it, then choose File > Open to open it as a true HTML file. Opening an HTML DocumentBefore you start opening files, it's a good idea to set options for opening Web pages created using other browsers. See HTML Document Options on page 434. Choose File > Open to open another HTML file. What OpenOffice.org HTML Is LikeTo see the source, choose View > Source in a Web document. When you Save As HTML in Writer, you only get the Web (Writer) option, which is not in fact actual HTML. Not even if you make sure you add an HTML file extension. One main tipoff is that the View > Source option is not available. They often look the same way when viewed in a browser, but not always. The HTML is created, in Writer and again even if you paste the same content into a new HTML page, very lazily with lots of <style> tags. If you like your HTML clean, don't rely on the program. However, it's a decent place to start, especially if you have a lot of tables to make. The tables come out relatively well. Figure 15-3 through Figure 15-5 show the HTML output for a sample file:
Figure 15-3. Document viewed in Netscape Exporting the HTML Source CodeChoose View > HTML Source, then choose File > Export Source. The HTML you get is dependent on HTML compatibility setup options; see Setting Up How the Program Reads and Exports HTML Files on page 142. |
EAN: 2147483647
Pages: 407
- Using SQL Data Definition Language (DDL) to Create Data Tables and Other Database Objects
- Using Data Control Language (DCL) to Setup Database Security
- Working with Comparison Predicates and Grouped Queries
- Retrieving and Manipulating Data Through Cursors
- Working with SQL Database Data Across the Internet