Using INSERT
INSERT (Inside Security Rescue Toolkit) is designed to fit on a credit-card-sized CD, so when you boot it, don't expect anything fancy. Whereas Knoppix is based on KDE, the K Desktop Environment, a feature- and eye-candy-rich GUI (some would say too much, but not me!), INSERT is instead built around the FluxBox window manager. As such, it's bare bones, with no obvious K menu to click on to get started. The solution? Right-click on the bare desktop, and menus of sorted security tools open up before your eyes, ready for use.
In addition to the possible strangeness of FluxBox, realize that INSERT contains mostly command-line-based apps. For example, don't expect Firefox, or even Mozilla; instead, you get the links-textmode Web browser to use. This isn't necessarily a bad thing, but INSERT is most definitely designed for folks who already know their way around Linux and the terminal.
Although it's a small package, INSERT manages to pack a lot of tools into the mix. The distro's focus is on rescuing a damaged system, so there are tools for data recovery, virus scanning, forensics, and more. The full list of software included in this distro can be found at http://inside-security.de/applicationlist.html.
To get INSERT, head to http://sourceforge.net/projects/insert/, follow the Download link and grab the 50MB ISO image in either English or German. Once it's on your computer, burn the ISO to either a credit-card-sized CD if you have one or to a regular CDR/W if that's all you have. Both will work just fine. Boot from your new CD, and INSERT loads.
INSERT is a good, lightweight Knoppix-based distro centered on recovery and analysis. For more information about the program, be sure to visit the project's home page, at http://inside-security.de/insert_en.html, or the Freshmeat page about INSERT, at http://freshmeat.net/projects/insert/.
| Note | If you find anything to be a bit confusing in INSERT, visit http://ubcd.sourceforge.net/insert/ostart.html and look through the long list of hints. The answer to your question can probably be found there, along with a tip for using the default Web browser links, a way to download and install Firefox, a method for installing INSERT to run in RAM so that you can burn CDs, and how to configure your network cards. |
Unfortunately, there does not seem to be a forum or any other public help available at this time. It is hoped that this will change because a high-quality project such as INSERT deserves a place where users can come together online and help each other.
Scanning for Viruses with ClamAV
If you think a machine might be infected with any of the countless viruses that now scamper about the Internet, it's not a difficult matter to check for them and then do something about the little beasties if any are found. INSERT comes with a free anti-virus checker — ClamAV — and it does a good job.
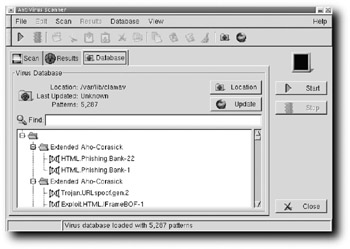
To run the ClamAV tool, right-click on the Desktop and select Applications → Security → Virus scanner GUI avscan — super user. When it opens, click on the Database tab, shown in Figure 8-15.

Figure 8-15: Update ClamAV's anti-virus database.
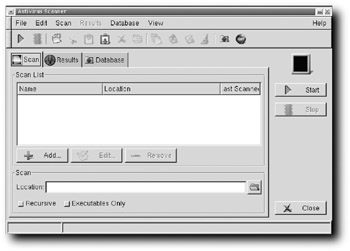
The first thing to do is update the AV database so that Clam can detect the latest nasties. Click the Update button, and Clam connects via the Internet to download any new patterns (in one case, Clam went from the capability to recognize 5,287 virus patterns to seeing more than 6,143!). When the process has finished, the screen indicates the last update time and the new number of virus signatures. Now select the Scan tab, shown in Figure 8-16.

Figure 8-16: Tell ClamAV where you want to scan for viruses.
To give ClamAV something to scan, open a root terminal by right-clicking on the Desktop and then choosing Terminal session → Rxvt — super user. When the shell opens, enter mount /mnt/hda2 (or whatever partition you use) to mount the partition on the hard drive that holds your data.
Now that the partition is mounted and therefore available to ClamAV, return to the program, and click the open folder icon just to the right of the Location text box. Select /mnt/hda2 and click the Select button. At the bottom of the Scan tab, check both Recursive (so the scan looks at every folder on /mnt/hda2) and Executables Only (so the scan doesn't waste its time on text files and the like). Click the Start button, and go for a cup of coffee. You could continue to work on other things, of course, but you might as well leave the computer alone so it can focus on one task.
As soon as you click Start, ClamAV switches to the Results tab. If anything is flagged, it shows up here. Just to give you an idea about how much time ClamAV needs to run, a 30GB partition on a 2GHz Pentium 4 with 512MB of RAM takes about five minutes or so (no viruses were flagged, but of course it was a Linux machine).
ClamAV is a good tool to have available for virus detection and cleanup. It's really easy to run it in scripts using its command-line tools, but that's left as an exercise for you.
| Note | For more information on ClamAV, check out the project's home page, http://clamav.net/, where you can access a wide variety of information, documentation, a wiki, and a whole lot more. |
Reading and Writing NTFS Partitions
Out of the box, INSERT comes with support for an incredible variety of filesystems, including Ext2, Ext3, Minix, ReiserFS, JFS, XFS, FAT, DOS, NFS, SMBFS, NCPFS, UDF, UFS, HFS, and HFS+. Nowadays, however, if you're using INSERT to rescue a damaged Windows machine, you need support for at least reading partitions formatted with NTFS. Fortunately, INSERT supports that filesystem as well. You can definitely read data from an NTFS volume; if you're feeling brave, you can also write to that volume.
| Caution | If you're going to write to an NTFS-formatted volume, either back that data up first or commit yourself to not caring much if everything gets corrupted and goes bye-bye. |
To read and write NTFS, use the Captive virtual driver, which requires certain files from a Windows XP install. If you've booted INSERT on a Windows XP box, just copy C:\ WINDOWS\system32\ntoskrnl.exe and C:\WINDOWS\system32\drivers\ntfs. sys to /var/lib/captive. If you haven't booted over Windows XP, you'll need to copy those files from another machine onto your computer, using either a USB flash drive or the network. In fact, if you plan to use INSERT (or any of the other distros in this chapter that support reading and writing to NTFS) a lot, you'll probably want to keep copies of those Windows drivers on some storage mechanism so that you can get to them anytime.
If you just don't have a Windows box around, you can download Windows XP Service Pack 1 from http://download.microsoft.com/download/9/7/6//xpsp1a_en_x86_CHK.exe, save it, and then extract the files you need. Keep in mind that it's a 144MB download and rather a pain, so it's much easier to find those drivers, copy them to a USB flash drive, and keep it close by.
Now that the Windows drivers have been copied to the correct location, run the following in a terminal window (this assumes that you're trying to mount /mnt/hda1, which is your Windows partition formatted with NTFS; if it's not, adjust as necessary):
# mkdir /mnt/hda1 # mount /dev/hda1 /mnt/hda1 -t captive-ntfs # ls /mnt/hda1
That last command should show you the contents of your Windows partition. You can now read and write to the NTFS partition. Be careful!
There is a script on INSERT that somewhat automates this process: /usr/sbin/use captive. If you don't want to use Captive manually, try running that script first. For further info on Captive, visit the project's home page at http://jankratochvil.net/project/captive/. Captive is no longer under active development by the original author, but others have evidently taken up the cause and are still working on it. If you Google for "captive ntfs," you'll find a lot of other good resources as well.
Changing a Windows Administrator Password
Now that you have read/write access to a Windows NTFS partition, you might as well do something cool with it, such as change the Administrator's password — without having to know the original password.
To change the password, you need to know where the SAM database file is. On Windows XP, it's located at C:\Windows\System32\Config\SAM; for Windows 2000, look at C:\ WINNT\System32\Config\SAM. Assuming a Windows XP machine, you'd run the following command:
# chntpw /mnt/hda1/Windows/System32/Config/SAM
Enter the new password you want to use, click OK, and you're finished. Now the Administrator on that box has a new password. Pretty easy, eh?
| Tip | If you want to learn how to change the passwords of other users, take a look at man chntpw or visit http://home.eunet.no/~pnordahl/ntpasswd/. |
Testing Your System's RAM
Sometimes a computer acts flaky, but it has nothing to do with the software at all. One user's Linux laptop, for example, constantly locked up on him, with no apparent cause. He tried three or four different distros, with no discernable change — eventually, and sporadically, his laptop would lock up, no matter what apps he was running at the time. He finally emailed a local Linux users group and asked for help. Another user suggested what perhaps should have been obvious: bad RAM.
To test that hypothesis, the first user booted INSERT and then ran Memtest as follows:
# memtest all -l /mnt/hda1/memtest.log
This told Memtest to look at all available memory and to log to a file on a mounted drive. (If you don't want to use a logfile, you can leave that off and STDERR would instead be used.)
Memtest can take a long time to run, depending on the amount of RAM you have and the speed of your machine, so you need to be patient. Start it and then leave the computer alone. Don't try to use the machine for anything else, or you'll just prolong the agony.
After running Memtest, the user did indeed find that one of his DIMMs was bad. He contacted the vendor for a free replacement, popped it in, and his problems were solved. Insanity was staved off again, all thanks to INSERT and Memtest.
| Tip | For more on Memtest (although there's really not a lot to the program), try running man memtest or refer to its home page, http://.memtest86.com/. |
Tracing That Route
Sometimes your network connection is slow as all get out and you can't figure out why. Traditionally, two of the first tools a network-savvy user runs is ping, which tells you whether a machine is up and running, and traceroute, which informs you of the path packets are taking from your machine to another. INSERT comes with a cool little software program that combines the two functionalities into one: mtr.
For example, suppose I noticed a slowdown getting to my Website, http://granneman.com. To check, I run the following command:
$ mtr http://www.granneman.com
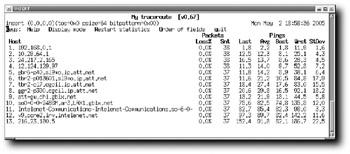
Within a few seconds, I get the output shown in Figure 8-17.

Figure 8-17: Mtr hard at work, pinging constantly along the route to my host.
mtr figures out the route from my laptop to my Web server, and then begins constantly pinging every step along the way, giving me an up-to-the-second look at the network path from point A to point B. It's actually kind of hypnotic, watching the changes endlessly cycle by …
| Note | If you want to learn more about mtr (it, too, is a pretty simple little program), use man mtr or visit http://bitwizard.nl/mtr/. Another good way to learn what the program can do is to run it, and then press H for the in-program help. |
EAN: 2147483647
Pages: 118