SAP BW Administrator Workbench
In Chapter 2, you learned about the SAP BW object at a higher level. Here you learn that such objects communicate with each other as well as how they are defined and maintained in SAP BW using the Administrator Workbench.
The SAP BW main menu (transaction RS00) consists of two groups of transactions: SAP R/3 BASIS Administration and SAP BW Administration, as shown in Figure 7-1.
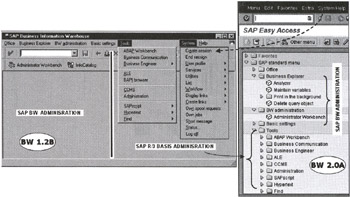
Figure 7-1: SAP BW Main Menu. The Menu on the Left is for SAP BW1.2B, and the Menu on the Right is for SAP BW 2.0A.
Notice that in SAP BW 2.0, the Administrator Workbench layout has been changed. Instead of tabstrips on the top for individual categories of Objects, you see objects in the tree format, as shown in Figure 7-1. The ScreenCam movie SAPGUI_BW20_vs_BW12B.SCM on the CD-ROM gives you a visual tour of the Administrator Workbench in SAP BW 1.2B and BW 2.0A.
The typical SAP R/3 BASIS administration tasks are listed on the right side of the main menu, and the SAP BW-related activities are listed on the left. The Business Explorer and the BW Administration options are shown in Figure 7-2.
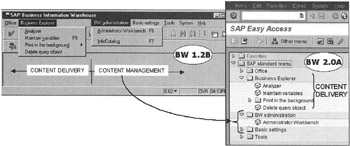
Figure 7-2: SAP BW 1.2B Administrator Workbench.
The SAP R/3 BASIS tasks are the same as for SAP R/3 OLTP BASIS administration, such as installing software, software patches, database administration and monitoring operations, and user administration.
The SAP BW administration activities are related to SAP BW analytical applications design, implementation, and administration, such as defining data load structures, scheduling loading data in SAP BW data objects, and monitoring analytical applications-specific data objects.
SAP BW Content Delivery Functions of the Administrator Workbench
The SAP BW Administrator Workbench is functionally divided into two groups of menus-Content Delivery and Content Management, as shown in Figure 7-2.
The content delivery functions are responsible for creating, managing, and delivering information to end users. The Business Explorer is the primary menu option for managing content delivery functions. The Business Explorer enables you to manage analytical applications and associated objects to support the content delivery function of SAP BW. The Analyzer takes you out of the SAPGUI interface and into the Business Explorer Analyzer (Excel) to develop queries, reports, and other analytical applications. The Delete query object option enables you to remove queries from the SAP BW instance. Here you also maintain variables for queries to obtain user input and pass that input to the SAP BW OLAP processor.
For example, if you want to analyze product revenues from two fiscal periods, you define two variables (variables in SAP BW are like parameters associated with a characteristic); for example, Begin_FY and End_FY. You use these variables to define filters in your query for calendar year. Upon execution of the query, the user is prompted for Begin_FY and End_FY before fetching data from the database. You learn more about defining and using variables in SAP BW in Chapter 11, "Analyzing SAP BW Data."
SAP BW 1.2B supports batch printing, which enables you to print long or common reports in the background. You learn more about developing queries and working with Business Explorer Analyzer and batch printing in Chapter 11.
The Administrator Workbench is a data warehouse development, maintenance, and operations environment to manage content in the data warehouse. It is here that you construct InfoCubes, manage metadata, and define transformation rules needed to qualify data for the InfoCubes. From the Administrator Workbench, you schedule and monitor data load activities that pull data from data sources to populate InfoCubes.
The Administrator Workbench, as shown in Figure 7-3, consists of five key data warehouse objects (tabstrips), titled InfoCubes, InfoObjects, ODS, InfoSources, and Source systems. This Administrator Workbench view is called Startup view. In SAP BW 2.0, instead of tabstrips, you have to select such objects from a drop-down menu, as shown in Figure 7-3.

Figure 7-3: SAP BW Administrator Workbench (Transaction RSA1). The Top Section Shows the SAP BW 1.2 Administrator Workbench with Tabstrips to Manage Object Types. The Bottom Shows the SAP BW 2.0A Administrator Workbench. The Only Major Difference is that in BW 2.0A, You Select the Object Type From a Drop-Down Menu.
In Figure 7-3, the default view is set to Source systems. Anytime you open the Administrator Workbench, you see this view. However, once source systems have been defined in SAP BW, you seldom need to view the source system's tree. InfoCube or InfoSource view is more appropriate as the Startup view for the normal development process.
To change the Administrator Workbench startup view, select Settings, Startup view, as shown in Figure 7-4. Here you set the Administrator Workbench Startup view to InfoCubes. This is the default view when you launch the Administrator Workbench.
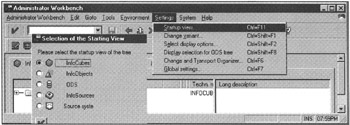
Figure 7-4: SAP BW Administrator Workbench-Changing the Startup View.
| Note | Most of the data warehouse construction process in SAP BW 1.2B and BW 2.0A is quite similar. From here on, I limit my discussion to SAP BW 1.2B. Only when the two are significantly different in functionality or operations will I include SAP BW 2.0A references. |
At each step in the InfoCube construction process, the Administrator Workbench displays several icons indicating object states. Due to screen-display limitations, you may display only those objects in which you are interested, as shown in Figure 7-5. To change display options, select Setting, Select display options from the Administrator Workbench.
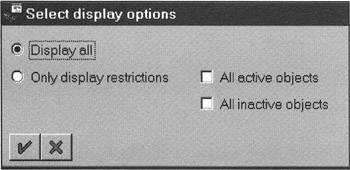
Figure 7-5: SAP BW Administrator Workbench-Selecting Display Options.
The Administrator Workbench is further divided into two functional groups. One is for the application design and development environment where you design all objects leading to construction of an InfoCube, and the other is for the operational environment where you schedule data extraction jobs, monitor data loads, and change the management environment, as shown in Figure 7-6.
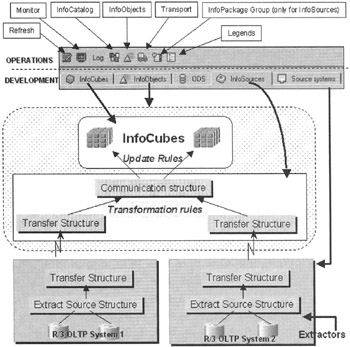
Figure 7-6: SAP BW Administrator Workbench-Operations and Development Environment and its Relationship with the SAP BW 1.2B Staging Process.
| Note | Notice that Figure 7-6 illustrates one-to-one correspondence between an InfoSource and the data source. In SAP BW 2.0, the InfoSource is now broken into two objects-DataSource and InfoSource. However, the overall staging process remains the same in BW 1.2B and BW 2.0A. |
Chapter 2 describes the SAP BW staging process at a higher level. In this chapter, you learn more about the staging process and how the Administrator Workbench facilitates this process.
Source Systems
SAP BW data sources are divided into five classes, as shown in Figure 7-7. Notice that one SAP BW instance can be a source to another BW instance. This SAP BW-to-SAP BW linkage can support several data marts to form an integrated enterprise data warehouse.
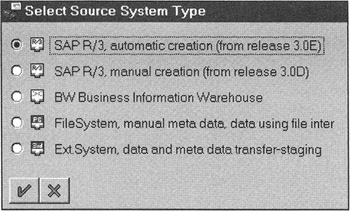
Figure 7-7: Classes of Data Sources for SAP BW.
You can also load data in SAP BW using common flat files such as XLS, CVS, Fixed Length, and Tab Delimited. The third-party data extraction tools provide additional flexibility to populate data in SAP BW using Staging BAPI. Loading data using flat files and third-party tools in SAP BW is discussed in Chapter 14, "Integrating Third-Party Products with SAP BW," and Chapter 15, "Integrating Third-Party Data Access Products with SAP BW."
Defining an SAP R/3 as a Data Source System in SAP BW
Based on SAP BW and SAP R/3 versions and patches, the actual screens and menu paths may change. Consult the SAP BW Installation Guide on the steps to define RFC/Logical destinations.
In SAP BW 1.2B Patch 10, follow these steps to create a new source system in SAP BW:
-
Launch the SAP BW Administrator Workbench.
-
Go to the Source systems tab. You will see the present source system in SAP BW in a tree format.
Note Before you define a new SAP R/3 data source in SAP BW, you need to set up a network level communication link between them. This requires maintaining an RFC destination and basic ALE setting in the source SAP R/3 for SAP BW and in SAP BW for SAP R/3. Verify that the SAP BW administrator has already confirmed that RFC connections are defined between these systems and that ALE workflow in the source system is also set up for SAP BW.
-
Select the Source systems folder, in the Source system tree root node, and right-click. From the context menu, click Create Source System.
-
Select the source system type of your choice (as shown in Figure 7-7). In SAP BW 1.2B Patch 10, you have two methods, automated and manual, to create a new SAP R/3 data source definition in SAP BW. In the automated method, you provide source SAP R/3 instance information (application server name, system ID, system number, and login user number) and system defines, and verify needed communication components in both systems.
This example uses the second option, the manual source creation method, to complete the connection setup process.
-
Enter the source name (which is actually an RFC destination defined in SAP BW-transaction SM59 or customizing) and its description, as shown in Figure 7-8.
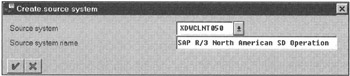
Figure 7-8: Creating a Source System in SAP BW. The Source System is the Logical Name Assigned for a Remote Connection.Note The technical name for the source system is XDWCLNT050. It is a combination of source Instance System Identifier and CLNT, client number. In this example, XDWCLNT050 means that the Source instance System ID (normally known as SID) is XDW, and the client from which to get data is 050.
SAP suggests this naming convention to name data sources in SAP BW. However, though this scheme works for SAP products, it fails when defining non-SAP data sources. For example, there are no SID or client numbers for flat files and data sources that use third-party data loading tools.
I suggest using a meaningful naming scheme that applies equally to SAP and non-SAP data sources.
-
Referring to Figure 7-8, click the green check mark to accept this entry. The assumption is that XDWCLNT050 is a new source system, and your system manager has not defined this source in SAP BW. You will define this new RFC destination (transaction SM 59), as shown in Figure 7-9.
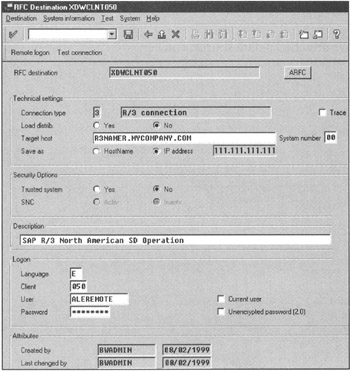
Figure 7-9: Defining an RFC Definition in SAP BW for SAP R/3 as a Data Source. -
Enter the target host, system number, and description of this source system. To connect to the source system, you need a valid account. Enter a client number, user name (for example ALEREMOTE), and password that will be used to log on to the SAP R/3 instance and extract data for SAP BW. SAP recommends defining a user, ALEREMOTE, in SAP BW and SAP R/3 data sources with sufficient privileges to perform ALE tasks. After entering user account information, save this entry.
-
Click Test Connection to verify the RFC destination (see Figure 7-10). The status message on the bottom left of the window displays Connecting XDWCLNT050 followed by the connection time statistics window. Click the green left arrow to go back to the RFC Destination window.
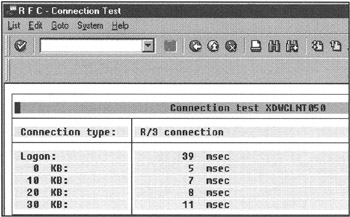
Figure 7-10: RFC Destination Connection Verification. -
Exit the RFC Destination window. Now SAP BW makes the connection to the source system and generates IDOC basic types, port descriptions, partner agreements, and so on. After successful ALE setup for the new source system, the newly defined source system appears in the Source System Tree, as shown in Figure 7-11.
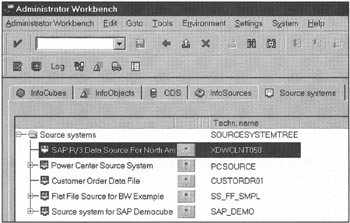
Figure 7-11: Source Systems Tree in the Administrator Workbench to Show Data Sources Connected to SAP BW.
Once you have attached a data source, you can collect information about metadata and common business data that resides in a source system. To see source system options, right-click the data source name. A pop-up menu displays available options, as shown in Figure 7-12.
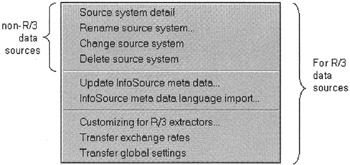
Figure 7-12: Maintaining Data Sources in SAP BW, Such as Updating InfoSource Metadata from Source R/3 to SAP BW or Enhancing SAP-Provided Data Extractors.
The metadata and data load techniques depend on the data source type. In the case of SAP R/3 as a data source, metadata load is automatic by selecting the Update InfoSource metadata option. You learn about metadata load methods in the next section.
InfoObjects
InfoObjects are the basic entities defined in SAP BW. They become the foundation of the metadata repository in SAP BW. The metadata repository is shared across all InfoCubes.
InfoObjects are grouped in the following classes:
-
Characteristics used to view data for analysis, such as material, customer, and region
-
Key figures that represent measurements, such as product inventory and revenue
-
Time characteristics to view data at different time periods, such as year and fiscal period
-
Units such as quantity and currencies
-
Data package characteristics to track groups of data for audit and version controls
An InfoObject can have several attributes to describe its behavior in SAP BW. For example, material has attributes such as material number, material description, and material family.
InfoObjects are building blocks of analytical applications in SAP BW. For example, to do sales analysis, you use several InfoObjects, such as material, customer, sales organization, time, unit of measure, and key figures, such as units sold, margin and total order amount. As part of SAP BW business content, common InfoObjects are added to the SAP BW repository. The following lists the three possible versions of InfoObjects that exist in SAP BW:
-
D: SAP Delivered version. The original content reserved for SAP; however, customers can use such objects as templates or copy them in an active SAP BW client.
-
M: Revised version. This is an InfoObject that is under revision. This could be a copy of an SAP delivered InfoObject under an active SAP BW client or a new InfoObject being defined by the customer.
-
A: Active version. This is an InfoObject that meets all specified rules and is ready for use in the SAP BW active client.
Before you use InfoObjects, you need to transfer needed InfoObjects from SAP version (D) to an active SAP BW client, and then activate.
You are not limited to only the SAP BW defined InfoObjects. You can create custom InfoObjects for your own applications. For example, you may need to define a set of new InfoObjects to describe your custom data files to load data in SAP BW.
The InfoObject's tabstrip in the Administrator Workbench shows the existing InfoObjects tree structure, as shown in Figure 7-13.
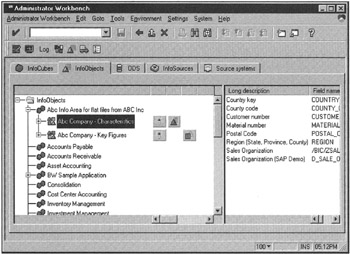
Figure 7-13: Managing InfoObjects in the Administrator Workbench.
Under the InfoObjects tree folder, you define the InfoArea (subject-oriented objects such as orders and invoices), followed by the InfoObject catalog, and then the individual InfoObject within the InfoObject catalog.
One method to create or edit an InfoObject is to click the InfoObject icon ![]() in the Administrator Workbench menu. This takes you to the InfoObject maintenance screen (see Figure 7-14), described in the next section.
in the Administrator Workbench menu. This takes you to the InfoObject maintenance screen (see Figure 7-14), described in the next section.
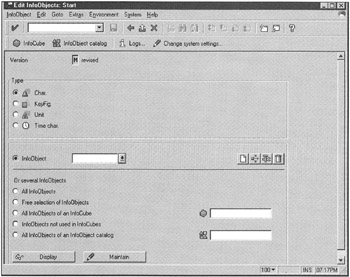
Figure 7-14: Maintaining InfoObjects in SAP BW 1.2B.
Another method to maintain an InfoObject is to use the InfoObject tree structure, as shown in Figure 7-13. The InfoObject tree structure allows you to group InfoObjects under an InfoArea (subject area such as Accounts Payable, Sample Application, or Human Resources). Within an InfoArea, you group individual InfoObjects under InfoObject catalogs (such as characteristics and key figures). The logical grouping of InfoObjects serves no purpose other than organizing InfoObjects under logical names, which then are later used to reference InfoObjects collectively. InfoObjects are stored in an InfoObject repository and exist independently of InfoCubes.
Creating a new InfoObject requires a good amount of business analysis work that defines its behavior in SAP BW. Typical questions, besides standard data types, are what attributes this InfoObject needs. Does it require master data? Does it need hierarchies? How will the end user interact with this new InfoObject? These topics are covered in great detail in Chapter 12, "SAP BW-Defining Custom InfoCubes."
All types of InfoObjects (characteristics, key figures, units, and time characteristics) are maintained within the Administrator Workbench. In the following section, you see how to maintain characteristics. For other types of InfoObjects, the process is very similar.
InfoObjects: Characteristics
Take a look at the 0MATERIAL InfoObject structure. Note that MATERIAL is prefixed by a zero. This means it is an SAP-provided object. All SAP-defined basic InfoObjects defined in SAP BW are zero prefixed. There are several paths to get to the InfoObject Maintenance window. A simple way to get to the InfoObject Edit window is to click the InfoObject icon ![]() in the application menu bar (not in the InfoObjects tabstrip), as shown in Figure 7-13.
in the application menu bar (not in the InfoObjects tabstrip), as shown in Figure 7-13.
This takes you to the Edit InfoObjects window, as shown in Figure 7-14.
Here you can list all characteristics, key figures, units, or time characteristics by selecting the appropriate radio button. Then click the InfoObject drop-down box. For example, if you want to select all characteristics, select the Char radio button and click the InfoObject drop-down box. A list of available InfoObjects appears, as shown in Figure 7-15.
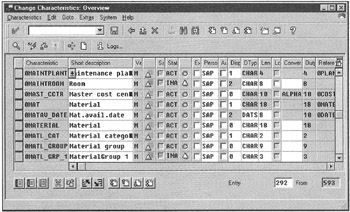
Figure 7-15: Characteristics in SAP BW 1.2B.
Figure 7-15 shows the technical name, description, current version, activation state, and data type of characteristics defined in SAP BW. This list is very useful for seeing the status of InfoObjects and processing them in a batch fashion. For example, while viewing the InfoObjects list, you may notice that several InfoObjects are inactive. Select an inactive InfoObject and click the Activate icon.![]() This activates all selected InfoObjects.
This activates all selected InfoObjects.
Select 0MATERIAL from this list (refer to Figure 7-15) and click the Display button. This displays a detailed window to describe all properties of the 0MATERIAL InfoObject. As shown in Figure 7-16, InfoObject properties are classified in five groups: General, Master data/texts, Hierarchy, Attributes, and Compounding.
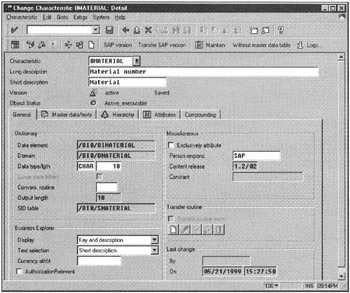
Figure 7-16: Maintaining Individual InfoObjects in SAP BW 1.2B.
Due to metadata changes in the master data structures, the InfoObject maintenance window has some changes. A new tabstrip has been added to capture Display attributes for Business Explorer and Geographic Information System data mapping.
General Metadata
Under the General tabstrip, you see most common metadata definitions of the InfoObject (see Figure 7-16). Note that a few fields are already filled in with values. In this example, you see /BI0/0IMATERIAL in the data element field. This is the name of the MATERIAL InfoObject in the data dictionary-SAP R/3 basis metadata management repository.
Master Data and Text Tables
SAP BW supports a multi-language environment. However, you need to set up language data objects specific to an InfoObject. The Master data/texts tabstrip shows table names in which master data and associated text is stored, as shown in Figure 7-17.
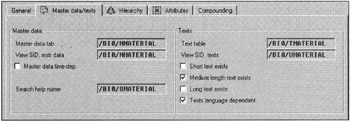
Figure 7-17: Assigning Master Data and Text Elements to an InfoObject.
With SAP BW's multi-language functionality, end users can analyze data and generate reports in the language of their choice. The language preference is established when an end user logs on to an SAP BW instance. Suppose two sales managers log on to the same SAP BW instance. One manager selects English, and the other selects German. Both managers are looking at the same sales analysis query to see product sales for the quarter. The person who chose English sees the product family description for printers as Printer, and the person who chose German sees the product family as Druker. Moreover, with multi-currency support in SAP BW, both can see product revenues in local currencies. This powerful multi-language and multi-currency implementation is quite suited to today's global business climate.
In earlier data warehouse models (William H. Inmon's data warehouse theory), the master data was assumed to be a static data entity, meaning that master data does not change in a data warehouse. However, in today's world the master data often changes. Such change is identified as slowly changing dimensions.
To manage changes in the master data, you can make master data elements time dependent when defining an InfoObject.
In the Master data/texts tabstrip, select the master data time-dependent check box. This makes master InfoObjects time dependent. Again you see several table names that store text-related information that SAP BW assigns and creates automatically.
| Note | Time dependencies require additional system resources to update an InfoCube and to fetch data from SAP BW for the end user's queries. Make sure that such time dependency is necessary for business analytical applications. If business requires reporting on only the most current state of data, do not implement time-dependent master data. However, when the business community wants to see accurate analytical data at the time it was collected, only then implement time-dependent master data. For example, suppose a new general manager wants to see sales revenue by sales area during the past two years grouped by months, regions, and sales organizations to benchmark which sales organization structure generated the most revenue. During those two years, the sales organization was reorganized several times. To analyze such product sales data correctly, you must time-stamp the sales organization hierarchy and the associated product sale transaction data. With this master data time-stamping, you can accurately analyze data that reflects the state of the organization and the generated revenues. To add complexity to this analysis, during those two years, product hierarchies may have been changed, which also could have affected product revenues. This is where multidimensional analysis plays a major role in such analytical applications as profitability and financial analysis. |
Hierarchies
SAP BW supports robust hierarchy structures. You have several options to assign one or more hierarchies (internal or external) to an InfoObject. Hierarchies are assigned to an InfoObject through the InfoObject maintenance window, as shown in Figure 7-18.
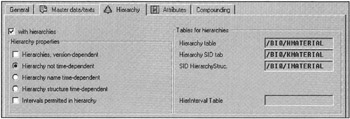
Figure 7-18: Maintaining an InfoObject and Assigning Hierarchies.
SAP BW supports four types of hierarchies, as listed here:
-
Version-dependent hierarchy. Such types of hierarchies have the same name but support several versions. A product hierarchy is an example where a planned product hierarchy is usually different than the actual product hierarchy.
-
Time-dependent hierarchy name. The time-dependent hierarchies are valid only within a given time period. In today's business climate where business reorganizations are very common, the organizational hierarchies for a business unit may change several times in a year. This is when you would use a time-dependent hierarchy.
-
Time-dependent hierarchy structure. For these kinds of hierarchies, the actual items in a hierarchy change for a fixed time period. The name and version of the hierarchy still remain the same. Such time-dependent hierarchy structures are common for sales and marketing packages for seasonal product campaigns.
-
Hierarchy intervals. The hierarchy interval permits grouping together a range of logically grouped objects under one hierarchy node. This type of hierarchy is common in product sales analysis. If you want to analyze product revenues by class, you build a product hierarchy in such a way that nodes represent a range of product groups. For example, one node represents products P100 to P200 while a second node represents products P300 to P500. This logical grouping is ideal when analysis is to be done at different hierarchy levels. This type of hierarchy is best suited for executive information systems where information has to be processed and presented at very summarized levels.
Hierarchies provide a powerful method for visual data navigation and data aggregation at an object hierarchy level. Selecting a hierarchy model requires extensive modeling effort to evaluate what works best for your business analysis needs.
Note that hierarchies are shared across all InfoCubes. Dimension tables point only to an InfoObject hierarchy structure. An InfoObject can have multiple hierarchies. Like any other object, hierarchies support active and inactive versions. If you use object hierarchies in SAP R/3, you can bring them directly to SAP BW. Moreover, you can always manually define a hierarchy structure in SAP BW, and then load hierarchies in SAP BW using flat files.
Chapter 12 discusses defining and implementing hierarchies.
InfoObject Attributes
InfoObject attributes provide detailed descriptions on characteristics associated with an InfoObject. Figure 7-19 shows the attributes of the 0MATERIAL InfoObject. Attributes in a master data table are also referred to as navigational attributes that support data navigation capability.
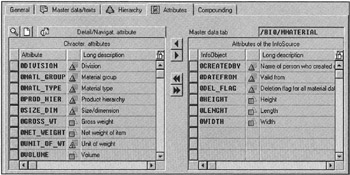
Figure 7-19: Assigning Attributes to an InfoObject.
Like the master data, attributes are shared across all InfoCubes. Deciding when to set a navigational attribute depends on how end users want to analyze data. The data modelers need to understand how end users plan to view and analyze data before setting navigational attributes. The use of large numbers of navigational attributes (see Figure 7-20) can lead to poor query performance. Chapter 12 discusses SAP BW data modeling techniques in detail.
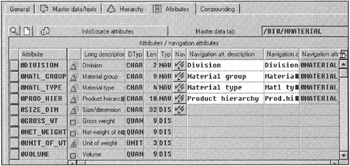
Figure 7-20: Navigational Attributes of an InfoObject.
Compounding
The compounding feature enables data warehouse designers to build a relationship between one or more InfoObjects to give more meaning for evaluation. For example, you might want to evaluate the characteristics of Vendor in connection with Material. Here, you create compound characteristics Vendor to Material, as shown in Figure 7-21. With this link between Material and Vendor established, you have access to Vendor InfoObjects in queries that reference Material. It simplifies the end-user data analysis task.
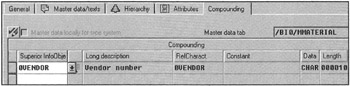
Figure 7-21: Building Compounding Functionality for an InfoObject.
Compounding should be used as an exception because it can result in poor performance. The preceding scenario can easily be handled in an InfoCube by using Material and Vendor dimensions.
Key Figures
The process for defining key figures is similar to that for characteristics. However, because key figures are measures of some entity, they differ in data types and include mathematical attributes. The Key Figures maintenance window has three tabstrips-Type/unit, Aggregation, and Other attributes, as shown in Figure 7-22.
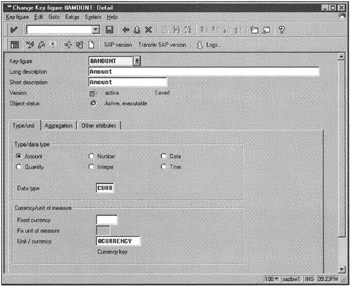
Figure 7-22: Defining Basic Data Types for a Key Figure.
SAP BW supports five types of key figures: amount, quantity, number, integer, date, and time. You specify such types in the Type/unit tabstrip.
The Aggregation tabstrip is used to define evaluation methods for a key figure. Four methods (summation, minimum, maximum, and no aggregation) are used by which key figures are aggregated in the Business Explorer. You can also specify how a key figure is aggregated in the Business Explorer with regard to an exception characteristic that is optionally provided in the aggregate reference characteristics field, as shown in Figure 7-23.
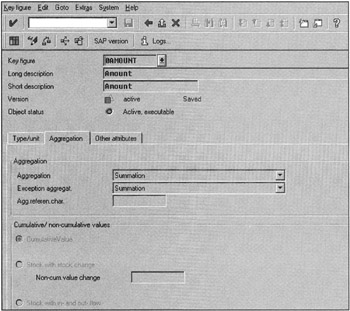
Figure 7-23: Defining an Aggregation Scheme for a Key Figure.
The Other attributes tabstrip is used to define how data is displayed in the Business Explorer. The display attributes, such as decimal places and display text selections (short or long), are selected in that window.
Time Characteristics
Time is the most important dimension in data warehousing. Every data analysis is time-based such as revenues today, this quarter, yesterday, this year, last year, and on and on. For this reason, SAP requires you to have at least one time dimension in an SAP BW InfoCube. SAP provides a set of predefined time characteristics as part of Business Content. With SAP BW 1.2B Patch 12, you cannot create your time characteristics. SAP provides the following nine time characteristics:
-
Calendar day (0CALDAY)
-
Calendar week (0CALWEEK)
-
Calendar month (0CALMONTH)
-
Calendar quarter (0CAL QUARTER)
-
Calendar year (0CALYEAR)
-
Fiscal year variant (0FISVARNT)
-
Fiscal year (0FISCYEAR)
-
Fiscal period (with year) (0FISPER)
-
Fiscal period3 (without year) (0FISPER3)
Figure 7-24 shows how calendar-year time characteristics are defined in SAP BW.
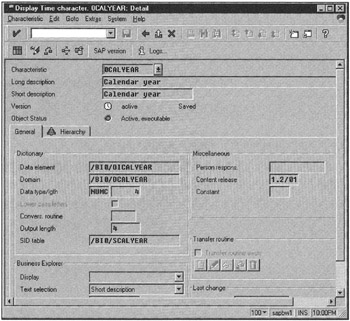
Figure 7-24: Definition of Calendar Year (0CALYEAR) Time Characteristics.
Unit of Measure Characteristics
Any key figure defined in the fact table has to be measured against some unit of measure, such as sales amount per product unit sold or amount in currency units. SAP BW supports two types of units: quantity and currency. The unit characteristics are used as a reference point in InfoCube facts. For example, a currency characteristic in the fact table is of document or local currency type. Similarly, the sales amount in a fact table often refers to per unit sold. Figure 7-25 shows the definition of 0BASE_UOM characteristics.
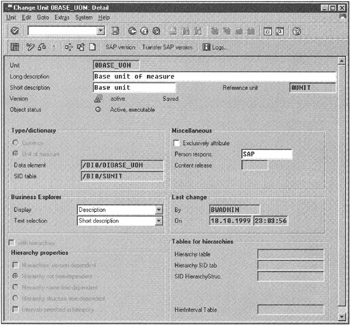
Figure 7-25: Definition of Unit of Measure, 0BASE-UOM InfoObject.
| Note | By now you may have noticed that some fields in the InfoObject screens are automatically filled in with text values prefixed by /BIC/ or /BI0/. This is the SAP BW object's naming scheme for customer created objects. Object names prefixed with /BI0/ are SAP defined objects for SAP BW. BIC stands for Business Information Warehouse Customer Defined Object, and BI0 for SAP Reserved Object. |
This section looks at the 0MATERIAL InfoObject. From a database point of view, the system generated several tables to capture all the detailed information on 0MATERIAL. A few such tables are listed in Table 7-1; these tables are specific to managing the 0MATERIAL InfoObject definition. Note here that you do not need to define these tables using SQL. SAP BW automatically created these tables.
| Table Name | Description |
|---|---|
| /BI0/MMATERIAL | Master data |
| /BI0/TMATERIAL | Text data |
| /BI0/HMATERIAL | Hierarchy |
| /BI0/SMATERIAL | Master data IDs (SID table) |
| /BI0/IMATERIAL | SID structure of hierarchies |
| /BI0/KMATERIAL | Conversion of hierarchy and SID |
| /BI0/JMATERIAL | Material interval hierarchy |
| /BI0/NMATERIAL | Attributes and SID relationship |
| /BI0/UMATERIAL | View of text and SID tables |
Working with the InfoObjects Tree
InfoObjects tree allows you to group InfoObjects in logical groups, called InfoAreas. The benefit of InfoAreas is that when you reference an InfoArea, all InfoObjects assigned to an InfoArea become visible to you. Working with the InfoObjects tree requires the following three steps:
-
Create/maintain an InfoArea.
-
Create/maintain InfoObject catalogs.
-
Create/maintain an InfoObject.
SAP BW gives you several paths to perform all the preceding tasks. Figure 7-26 shows paths you can take to manage the InfoObjects Tree structure.
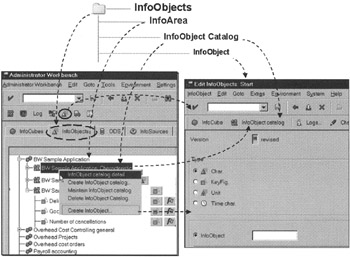
Figure 7-26: Managing InfoObjects in SAP BW 1.2B.
Creating an InfoArea
To maintain an InfoObjects tree, right-click the InfoObject catalog line of the InfoObjects tree (see Figure 7-27) and select Create InfoArea. You are prompted for the InfoArea technical name and its description. Click the green arrow to save InfoArea information.
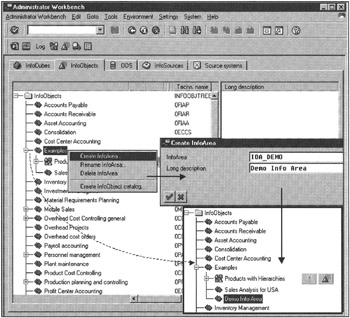
Figure 7-27: Creating an InfoArea, Demo Info Area, to Group Analytical Applications for Product Demonstration.
When back in the Administrator Workbench window, make sure to click the Refresh icon ![]() in the Application menu. You must refresh the screen to see the InfoArea you have just created in the InfoObjects Tree, as shown in the bottom right of Figure 7-27.
in the Application menu. You must refresh the screen to see the InfoArea you have just created in the InfoObjects Tree, as shown in the bottom right of Figure 7-27.
Creating an InfoObject Catalog
InfoCatalog usually consists of two types of objects: characteristics and key figures. To create an InfoObject catalog, select an InfoArea, right-click, and select Create InfoObject catalog, as shown in Figure 7-28.
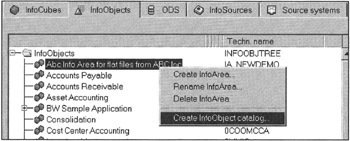
Figure 7-28: Creating a New InfoObject Catalog.
Now you need to define InfoObjects with an InfoCatalog. In the Create InfoObject Catalog window, select the appropriate radio button to identify the type of catalog, characteristic or key figure, as shown in Figure 7-29. Click the green arrow to accept your entry. This takes you to the Edit InfoObject Catalog window.
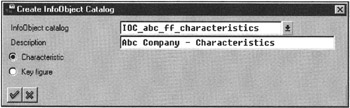
Figure 7-29: Defining Characteristics for an InfoObject Catalog.
The edit window has two sections. The bottom-right section displays existing InfoObjects as templates, and the bottom-left section displays the InfoObject structure of your InfoObject catalog. Initially, the structure area is empty when creating a new InfoObject catalog.
To assign an InfoObject in the InfoObject catalog, select one or multiple InfoObjects displayed as templates, on the right, and press the left-arrow button. This copies the selected InfoObject definitions in the InfoObject catalog, as shown in Figure 7-30.
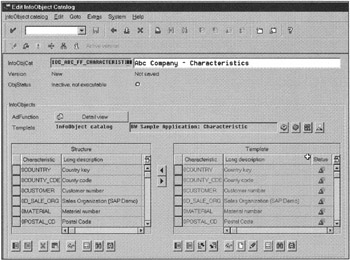
Figure 7-30: Editing an InfoObject Catalog for Characteristics.
By default, all available InfoObjects are displayed as templates. This can be a very large list, and it can be time consuming to find the InfoObjects you need. For this reason, you can narrow the list of InfoObjects by selecting all InfoObjects in an InfoSource, InfoCube, another InfoObject catalog, or by specifying a criterion. This is achieved by using the icons on the right of the Template type selections. Figure 7-30 shows an InfoObject catalog named "BW Sample Application: Characteristic"; it is used as a template to define the characteristic structure for a new InfoObject catalog.
To verify that all individual InfoObject definitions are correct and active, click the Check icon ![]() . Then click the Activate icon
. Then click the Activate icon ![]() to activate and save the InfoObject catalog. The window's status message line displays any activation errors or success messages. When activation is successful, the Object status is changed to green, indicating that it is active and executable.
to activate and save the InfoObject catalog. The window's status message line displays any activation errors or success messages. When activation is successful, the Object status is changed to green, indicating that it is active and executable.
Exit from the Edit InfoObject Catalog window to go back to the Administrator Workbench. Here you see the InfoObject catalog in the InfoObjects Tree structure.
Repeat the same steps to create another InfoObject catalog for the key figures associated with the InfoArea, as shown in Figure 7-31.
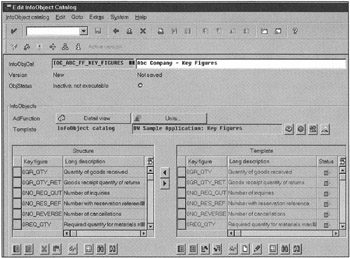
Figure 7-31: Editing an InfoObject Catalog for Key Figures.
For key figures, you also need to specify units of measure. Check and activate the key figures InfoObject catalog and go back to the Administrator Workbench. You will see both InfoObject catalogs listed under your InfoArea. Expand the InfoObject catalog for characteristics and see individual InfoObjects that build an InfoObject catalog structure. By selecting an individual member InfoObject-for example, Customer Number-you will see all attributes of that InfoObject, as shown in Figure 7-32.
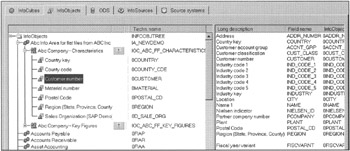
Figure 7-32: Viewing InfoObject Details of an InfoObject Catalog.
InfoSources
An InfoSource is a logical view of information and the business rules that transform data coming from a source system to the business analysis view needed to construct an InfoCube. Each InfoSource can be assigned to one or more source systems. You can also think of an InfoSource as a collection of rules and transformations needed to stage data in SAP BW.
As discussed in Chapter 2, the scope of the InfoSource has been changed in SAP BW 2.0A. As shown in Figure 2-10, the InfoSource is divided into two sets of objects: DataSource and InfoSource. This breakdown makes SAP BW much more flexible in defining and managing InfoSources that require data from several source systems.
Before creating or maintaining InfoSources, you must have at least one source system defined in SAP BW. If your source system happens to be SAP R/3, InfoSources for transaction and master data are automatically pulled in SAP BW using the Source System tree, as shown in Figure 7-33.
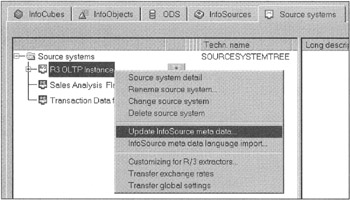
Figure 7-33: Importing InfoSource Metadata in SAP BW From an SAP R/3 Data Source.
After updating InfoSource metadata, you see a list of InfoSources in the InfoSource Tree.
To create a new SAP R/3 InfoSource, select the InfoSources Tree in the Administrator Workbench and right-click. Select Create application component (see Figure 7-34).
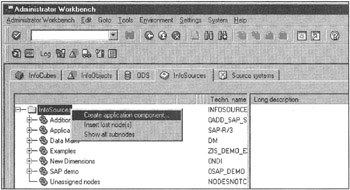
Figure 7-34: Creating New Application Components to Set up an InfoSource.
You define individual InfoSources within an application component area. The following lists the two classes of InfoSources:
-
Transaction data
-
Master data/text/hierarchies
The transaction data and master data InfoSources behave differently from one another in SAP BW. For transaction data InfoSources, you associate one InfoSource with one or more source systems. For master data InfoSources, you associate source systems through an InfoObject.
InfoCubes
InfoCubes are the heart of SAP BW analytical data stores. An InfoCube is SAP BW's equivalent of a logical data mart. A cube consists of characteristics and key figures. The updated rules define how an InfoCube is populated. The InfoCubes tabstrip of the Administrator Workbench is used to define all steps needed to build an InfoCube.
The InfoCubes allow you to view information from different angles. Profitability Analysis, Sales Analysis, and Cash Flow Analysis are just a few common multidimensional analytical applications. For example, you have an InfoCube with five dimensions (Sales Organization, Customer, Product, Time, Unit of Measure) and three indicators (Cost, Margins, Units Sold).
In this sales analysis InfoCube, senior management is interested in revenue by year, and the sales district manager is interested in monthly sales analysis by product line, by customer, and unit sold.
Suppose you have 10 sales representatives, 20 product lines, 1,000 customers and are looking at them for two years' worth of data. You have 14.4 million ways (10 sales rep x 20 products x 1,000 customers x 3 indicators x 48 months) to view this data. Without multidimensional technology, doing such extensive analysis would not be possible. The sales InfoCube can provide summary-level information for senior management as well as for the district sales manger, depending on dimensions selected and the level of aggregation information.
The first step in the design of an InfoCube is multidimensional modeling. This assures that needed characteristics and key figures are fully understood and all rules to compute key figures are well defined. The multidimensional modeling process is discussed in detail in Chapter 12.
The InfoCube Tree, as shown in Figure 7-35, shows an InfoCube Tree structure. First you create an InfoArea, and then you create InfoCubes under the InfoArea. The purpose of an InfoArea is to group subject-oriented InfoCubes together, somewhat like a group of subject-centric data marts. Figure 7-35 shows the Sales and Distribution InfoArea that consists of the Customer InfoCube. In the future, one can define additional InfoCubes related to sales and distribution such as Deliveries.
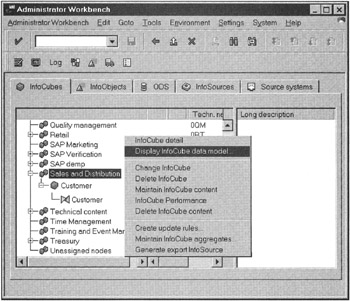
Figure 7-35: Sales and Distribution InfoArea and Associated InfoCubes.
Viewing an InfoCube Data Model
To view the data model of an InfoCube, select an InfoCube and right-click. This displays several options, as shown in Figure 7-35. Select Display InfoCube data model. The data model displays all dimensions, their attributes, key figures, and navigational attributes defined in a selected InfoCube, as shown in Figure 7-36.
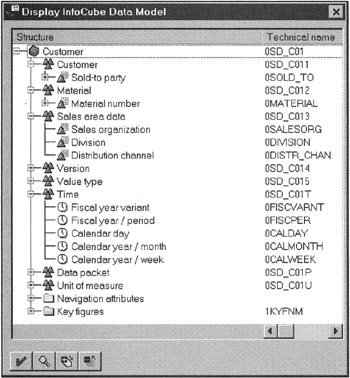
Figure 7-36: SAP's Customer InfoCube Data Model.
This is a quick way of displaying the structure of an InfoCube. The InfoCube shown in Figure 7-36 has eight dimensions named Customer, Material, Sales area data, Version, Value type, Time, Unit of measure, and Data packet. The last three dimensions are automatically assigned, but the rest are assigned by the user when defining the InfoCube.
Viewing an InfoCube Definition
To view the structure of an InfoCube to see how dimensions, key figures, and navigational attributes are defined in an InfoCube, select an InfoCube and right-click. Then select Change InfoCube. This opens the Edit InfoCube window, as shown in Figure 7-37.
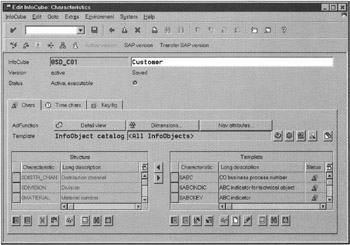
Figure 7-37: Definition of SAP's Customer InfoCube Data Model.
The Edit InfoCube window is where you actually start to construct the physical structures of an InfoCube. It has three tabstrips. The Chars (Characteristic) tabstrip (shown in Figure 7-37) is used to select characteristics and to define dimensions and navigational attributes. The Time chars. (Characteristic) and Key fig. (Figures) tabstrips enable you to select or define time periods and key figures needed for your analysis.
Instead of searching through hundreds of InfoObjects to select a few for your InfoCube, you can use templates to build InfoCubes. Templates are a predefined collection of objects, such as InfoObjects, InfoObject catalogs, and InfoCubes. After selecting a template, you simply transfer objects from the Template list to the InfoCube Structure by clicking the left-arrow buttons between the Template and Structure lists (refer to Figure 7-37). Because you are transferring the object definitions to the InfoCube, this view is called the Transfer view. However, when you click the Detail view button, you see more information on data definitions associated with each characteristic.
To define or view the dimensions for an InfoCube, click the Dimensions button. This shows you all dimensions defined in an InfoCube, as shown in Figure 7-38.

Figure 7-38: Defining Dimensions for an InfoCube and Assigning Characteristics to the Dimensions.
Figure 7-38 shows that the Customer dimension is mapped to Sold_to party characteristics, and the Material dimension is mapped to Material number. Another method for dimensions assignment is to view the dimension assignment in a tree fashion; click the Grphcl assgnmnt (graphical assignment) button in the Options group. This displays dimension assignments in a very readable fashion, as shown in Figure 7-39.
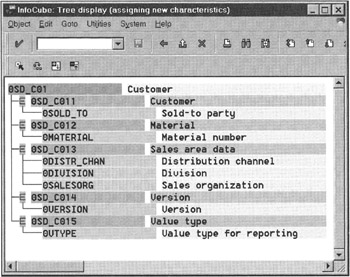
Figure 7-39: Graphical View of Dimension Assignments for an InfoCube.
So far you've looked at the Characteristics tabstrip to see how characteristics and associated dimensions are defined. The process for defining time characteristics and key figures is very similar to that of defining characteristics in the InfoCube. In the Edit InfoCube window (see Figure 7-37), click the Time chars and Key fig tabstrips, respectively, to define time characteristics and key. You see available InfoObjects on the right. Transfer needed time characteristics and key figures in the Cube model. Then save the InfoCube.
Viewing InfoCube Content
The best way to view an InfoCube's contents is to write a query and verify if the numbers are correct. However, in the development and operations environment, you may want to review loaded data in SAP BW directly from within the Administrator Workbench to verify if the data has been loaded correctly. To do so, select an InfoCube, right-click, and select Maintain InfoCube content (refer to Figure 7-35). This opens the InfoCube content window, as shown in Figure 7-40. Another method to view data from an InfoCube is to run the LISTCUBE transaction to list content from an InfoCube.
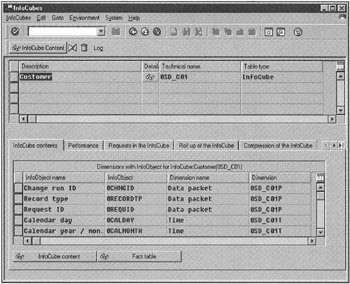
Figure 7-40: Viewing InfoCube Content.
This window has six tabstrips. The first, InfoCube contents, shows a list of all objects defined in the selected InfoCube. Click InfoCube content or the Fact table button. Both list the fact data content, but the data selection criterion is different. Using the InfoCube content button is preferred because it provides you with more options to select data sets from an InfoCube. The Fact table button only lists data from the fact table, including the dimension columns in the fact table.
The Performance tabstrip displays the database-specific options, such as InfoCube index verification. The other tabstrips provide information on data load statistics. You learn more about these areas later in this book.
| Team-Fly |
EAN: 2147483647
Pages: 174