Stock Connection Managers
| Integration Services ships with a number of stock connection managers. In general, Microsoft developed connection managers that were needed to support the components and tasks they were creating, so the list is fairly long. The following sections contain a brief introduction to and a brief discussion about each of the stock connection managers. Note Connection managers are one of the component types in Integration Services that are extensible, meaning third parties can also create custom connection managers. Therefore, by the time you read this, the list of available connection managers might have grown even longer. The ADO Connection ManagerThe ActiveX Data Objects (ADO) Connection Manager is for accessing ADO objects, such as a recordset, and is provided for custom tasks written using VB6 or that support legacy applications that use ADO. You should not use this connection manager unless you need to support legacy applications or components. Setting Up the Connection ManagerThe configuration steps for the ADO Connection Manager are the same as for the OLEDB Connection Manager. Please see "The OLEDB Connection Manager" section later in this chapter for more information. The ADO.NET Connection ManagerThis connection manager type is used to create connections to a broad class of data access providers called managed providers. They are called managed providers because they were written using .NET technology, commonly called managed code. The ADO.NET Connection Manager is the most flexible of all the database connection managers because it also supports the new managed provider model while still providing backward compatibility with OLEDB and ODBC with the managed provider for OLEDB providers. ADO.NET is gaining great momentum of availability and support. Currently, there are a limited but steadily increasing number of native ADO.NET managed providers. The combination of emerging managed providers and OLEDB support make ADO.NET broadly useful and a preferred connection type for your packages. Setting Up the Connection ManagerTo set up the ADO.NET Connection Manager, select the ADO.NET option from the context menu in the Connection Managers window. The Configure ADO.NET Connection Manager dialog box opens, as shown in Figure 10.4. Figure 10.4. Use the Configure ADO.NET Connection Manager dialog box to create a new ADO.NET Connection Manager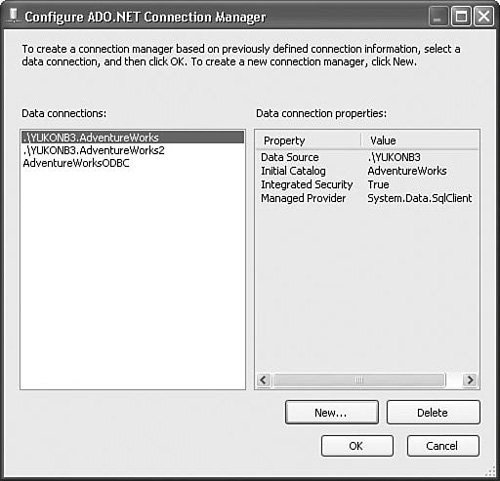 Tip The designer keeps track of connections you've previously created and places those in the left pane of the Configure Connection Manager dialog box. These are tracked in the Registry. On most machines, the designer stores them in the following Registry key. Tip HKCU\Software\Microsoft\VisualStudio\8.0\Packages\{GUID}\Settings\Data\Connections Regardless of the connection type, the settings are cached in this location. Information about ADO.NET, ODBC, and OLEDB connections you've previously created is saved here to make it easier to re-create similar connections. Because these are stored in the Current User key, they are only visible to you or someone logged in under your account. They are not part of the project or solution. Figure 10.5 shows the Connection Manager dialog box that opens when you click on the New button in Figure 10.4. This is where you tell the connection manager which ADO.NET provider to use, specify the server name, and give credentials. Essentially, this is where you build connection strings. Figure 10.5. Use the Connection Manager dialog box to build the connection string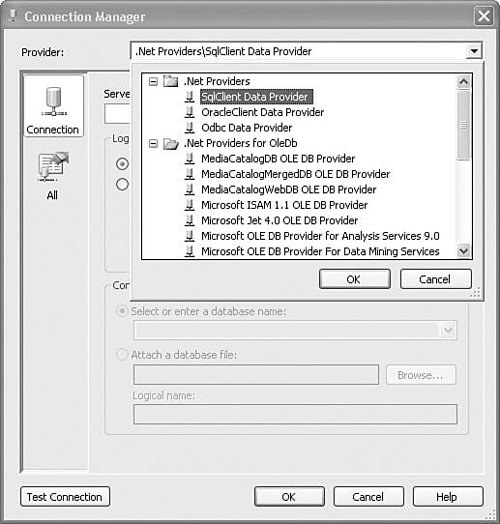 Figure 10.6 shows the All tab of the Connection Manager dialog box. Figure 10.6. Use the All tab to set advanced connection string settings The Connection Manager dialog box gives you ultimate control over the settings for the connection. For example, you can turn on MultipleActiveResultSets (MARS), choose the network library, change the packet size and the connection timeout, modify the pooling behavior, turn on encryption, and specify the initial catalog. These are all things you can do in the connection string directly as well. Note The All tab displays all the connection string settings for the connection manager. Those settings that are displayed in bold have been modified and show up in the connection string. Those setting shown in nonbold fonts use the default setting and do not appear as part of the connection string. The Excel Connection ManagerThe Excel Connection Manager is provided as a simple way to access Excel spreadsheets. The connection manager is an alternative to the more complex setup of the OLEDB Connection Manager using the Jet OLE DB Provider. In many cases, the Excel Connection Manager is all you'll need and the ease of configuration makes it a cinch to set up. If you need to have finer control of the Excel range and so forth, the OLEDB Connection Manager is a better option. Setting Up the Connection ManagerSetting up the Excel Connection Manager is quite simple. Figure 10.7 shows the Excel Connection Manager dialog box. Choose the correct Excel version and then browse to the file. If the first row in the spreadsheet has column names, you can select the First Row Has Column Names check box, which comes in handy when working in the Data Flow Task. Figure 10.7. Use the Excel Connection Manager to access Excel spreadsheets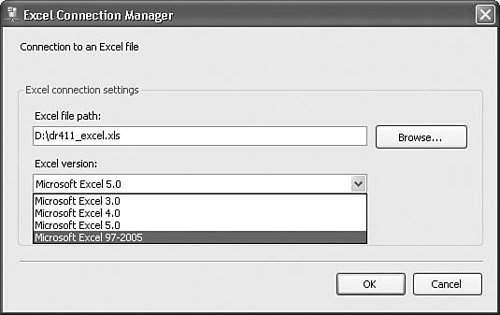 PeculiaritiesThe Excel Connection Manager doesn't have a Test Connection button. Using the OLEDB Connection Manager for accessing Excel files, you can get the satisfaction of clicking the Test button and getting the success message. Because there is no Test Connection button, there is no way to get errors until actually running the package or task that uses it. For example, if you choose the wrong Excel version, you won't know until you actually run a package containing a component that uses the connection manager. Also, the Excel Connection Manager doesn't allow you to select Excel ranges. Although you can hack the connection string to do so, it's just easier to use the OLEDB Connection Manager if you need to select a range.
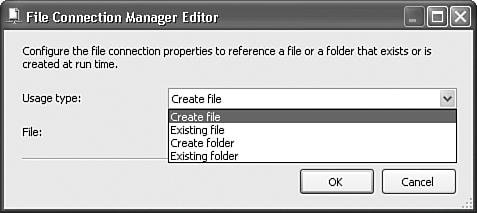
Following are the steps to set up the OLEDB Connection Manager to access Excel files.
Tip Also, if you're struggling to get the data out correctly, you might want to try the IMEX=1 setting in the Extended Properties property as well. This tells the driver to read all "intermixed" columns as text. A typical Extended Properties value might be: Excel 8.0;IMEX=1;HDR=Yes If you use the connection in the Data Flow Task, you can convert the columns as needed using the Data Conversion transform. If you use the connection manager in the Data Flow Task with an OLEDB or Excel source adapter, the adapter designer allows you to select the table (Excel Worksheet) in a drop-down list. If you want to use the connection manager in the SQL Task, you can use a query to retrieve the data. The query takes the following form: SELECT * FROM [SheetName$FromCellName:ToCellName] So, a typical select statement might be: SELECT * FROM [NewContacts$A51:K1005] to retrieve the columns from A through K, rows 51 to 1005. Or simply SELECT * FROM [NewContact] to retrieve all the available populated rows and columns. Note You can find more information about this in the Knowledge Base article 257819 at http://support.microsoft.com. The File Connection ManagerThe File Connection Manager is for specifying the name of one file or file system folder. As you can imagine, the File System Task depends on the File Connection Manager heavily, but other components and tasks use this connection manager as well. Setting Up the Connection ManagerSetup for this connection manager is simple. Specify the usage type and the file or folder name. The usage type only affects validation. When the task or component that is configured to use the File Connection Manager validates, it can also validate that the usage type is correct on the File Connection Manager. The File Connection Manager supports fully qualified file and folder paths as well as UNC paths. Figure 10.8 shows the File Connection Manager Editor. Figure 10.8. Use the File Connection Manager Editor to access files and folders ValidationThe File Connection Manager validates when the package validates. If the usage type is "Existing File" or "Existing Folder" and the file or folder is not available, the File Connection Manager fails validation. Tip Sometimes, a file is only available after the package has partially run. For example, you might FTP some files from a server and then want to access them later in the package. In this case, the File Connection Manager fails validation because the file isn't available. To make this scenario work, you can use the DelayValidation property to postpone validation until the very last moment. The Flat File Connection ManagerLike the File Connection Manager, the Flat File Connection Manager is also for specifying the name of one file. However, it also provides flat-file column information for clients. The Flat File Source Adapter relies heavily on this connection manager to define the file type, columns, and column names for flat files. Setting Up the Connection Manager: GeneralTo create a new Flat File Connection Manager, right-click on the Connection Manager window and select the New Flat File Connection Manager option from the context menu. The Flat File Connection Manager Editor shown in Figure 10.9 opens with the General tab selected. Figure 10.9. Use the General tab to specify the location of the flat file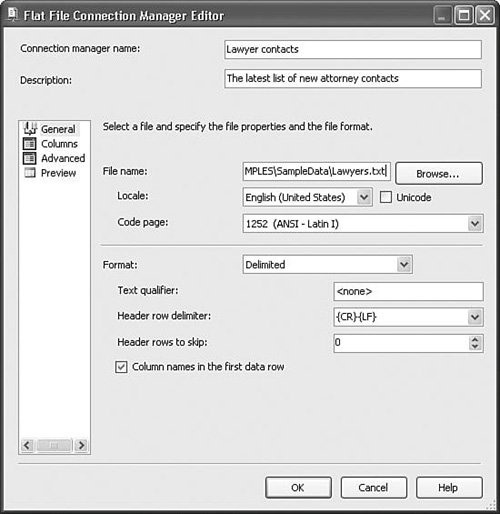 The General tab is where you specify the flat file location, locale, code page, and other critical file-level settings. The following sections provide a description of each of these settings. FilenameThis is the fully qualified name of the file you want to load. LocaleThe Locale drop-down box lets you select the locale the source connection and adapter will use. The locale setting affects the way Integration Services converts string data. For example, it influences date-to-string conversions. IS would convert the date Monday, May 17, 2004, to the short-date format 17/5/04 in the English/New Zealand locale but 04/5/17 in the English/South Africa locale. The Flat File Connection Manager locale defaults to the default locale of the machine on which the designer is running. If you change the locale, the Flat File Connection Manager Editor attempts to make life a little easier and selects the default code page for that locale. Code PageThe code page isn't bound by the locale setting, however, and you can select any code page using the Code Page drop down. Also, if you check the Unicode check box, the editor disables the Code Page options because they're not needed for Unicode. FormatThree formats are available: Delimited, Fixed Width, and Ragged Right.
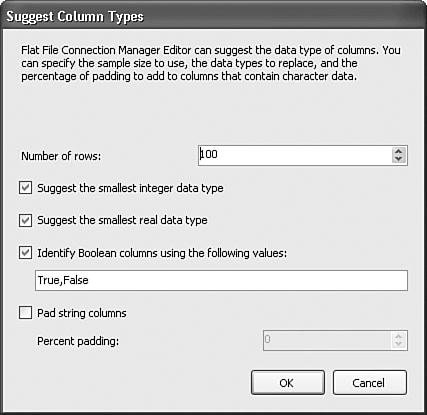
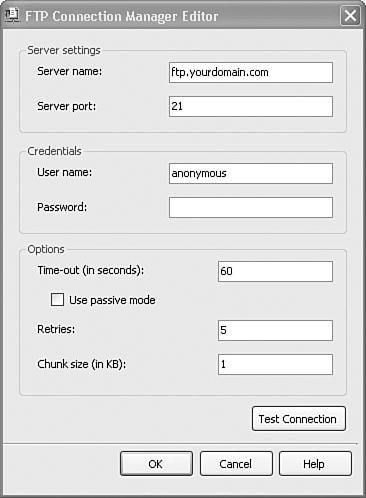
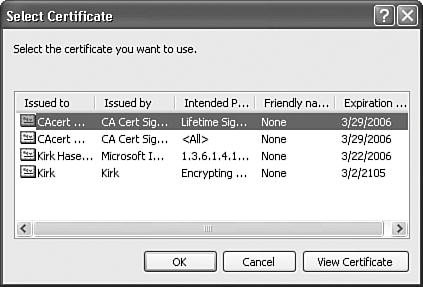
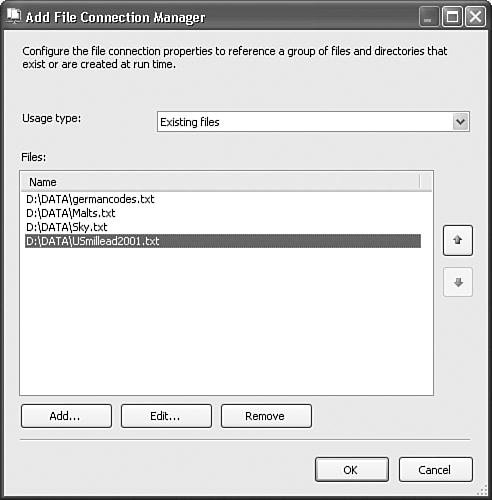
Text QualifierOften, a string contains a character that can be confused for a delimiter. For example, if you specify the format as delimited and the delimiter as a comma, any comma found within a string is interpreted as a delimiter and confuses the flat file parser. The text qualifier specifies what character the file uses to indicate the beginning and end of a string. Typically, the character is a double quote or single quote, but other characters can be used as well. Header Row DelimiterSome flat files, particularly those from legacy systems such as mainframes and so on, use a different delimiter for the header row than for the rest of the rows. This setting lets you specify the delimiter. If it is the same as for regular rows, specify that. The default is {CR}{LF}. Header Rows to SkipSome flat files have extra data at the top of the file, such as borders made of the '_' or '=' characters, file creation date, owners, source of origin systems, and so on. These rows of information typically do not conform to the same format as the rest of the data in the flat file and, thus, confuse the flat file parser. You can use the Header Rows to Skip setting to essentially ignore such rows. Column Names in the First Data RowThis check box specifies that the first row contains the names of the columns and essentially ignores the row when retrieving the actual data rows. However, when clients access the Flat File Connection Manager, they can use the names. For example, the Flat File Source Adapter uses these names in its designers to label columns. If this option is selected, the Flat File Adapter starts at the second row when counting the number of header rows to skip. For example, if you set Header Rows to Skip to 2 and check the Column Names in the First Data Row option, the Flat File Source Adapter skips a total of three rows when retrieving data from the flat file. Setting Up the Connection Manager: ColumnsAfter you set the source file and format, you can set up the columns by clicking on the Columns tab. Depending on the format you selected, the Columns dialog box is different. DelimitedIf you select Delimited format, the Columns dialog box appears as shown in Figure 10.10. Figure 10.10. The Columns dialog box shows columns based on the settings on the General tab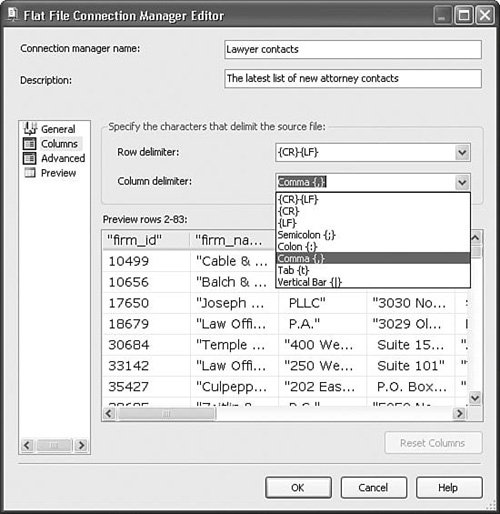 Notice that you specify the delimiter on this tab in the Column Delimiter drop down. If the delimiter you're using isn't available in the drop down, you can directly type in the delimiter character. The default delimiter is the comma. You can also change the row delimiter. This is the character or character combination the flat file parser uses to determine the end of a row. Caution Even though it is called a row delimiter, it is really just the last column delimiter. The Flat File Connection Manager only counts columns. If the row delimiter comes in the wrong order, the Flat File Connection Manager does not reset its read position to the start of the next row and the columns are read out of sync. Fixed WidthIf you selected Fixed Width format, the Columns dialog box appears as shown in Figure 10.11. Figure 10.11. Use the Columns dialog box to set the row and column widths The first step to configuring the fixed width columns is to set the row width. You can set the row width by directly typing it, if you know it, into the Row Width Edit box, or by dragging the red row width line to the end of the first row. Next, to establish each column width, click on the ruler control at the start of each column. This sets the column width for each column. You can delete a column width line by either double-clicking it or right-clicking it and selecting Delete from the context menu. Caution Be careful with fixed-width flat files. If one column is missing for one row, the rest of the rows will be offset and you'll end up with things like state abbreviations in zip code columns. Fixed-width flat files are an extremely fast way to import data, but if they are not formatted correctly, the flat file parser will get confused. Ragged RightThe setup for ragged right columns is identical to fixed width except, instead of setting the row width, you set the row delimiter in the Row Delimiter drop down. The default is the {CR}{LF} character combination. Setting Up the Connection Manager: AdvancedThe Advanced tab lets you add new or delete existing columns, modify the settings for each column, and suggests column lengths. Figure 10.12 shows the Advanced tab of the Connection Manager dialog box. Figure 10.12. Use the Advanced tab to directly set column properties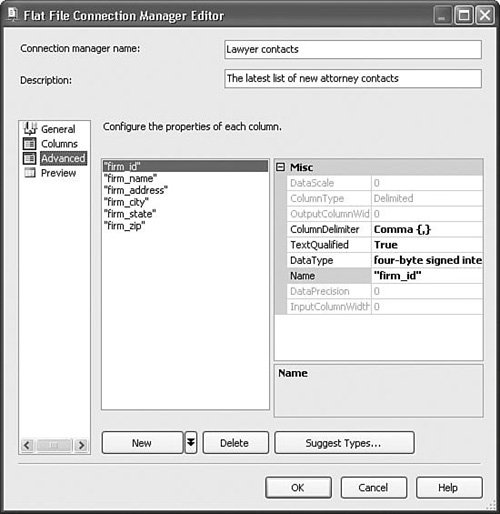 The Suggest Types button is a handy feature that tells the Flat File Connection Manager to attempt an educated guess at the type and other attributes of each column. Because flat files are text, the Flat File Source Adapter considers all columns as text, even those columns that are obviously numbers to a human viewer. The default width of each column is also 50. There are a lot of good reasons to change these settings. Columns that are wider than necessary slow down the Data Flow Task and generate larger files. You'd also like to have columns that are dates treated as dates, integers treated as integers, and so forth. The Suggest Types button does a pretty good job of figuring out what the type of a given column is, but occasionally it gets the type wrong. For those cases, you can manually modify the column types using the column property grid on the right side of the dialog box. Figure 10.13 shows the Suggest Column Types dialog box with the default settings. Figure 10.13. The Suggest Column Types dialog box lets you configure how column metadata is suggested The Number of Rows setting tells the type discovery algorithm how many rows to use when discovering types. For very large files, you might want to increase this number so that the sample rows are statistically significant. It's possible that the first 100 rows for one column appear as numbers. For example, the Zip Code column might be all numbers for the first half of the file because they're all U.S. ZIP Codes. Further into the file, the column might contain ZIP Codes for other countries that contain letters. The type discovery algorithm incorrectly guesses the ZIP Code column type in this case. The Suggest the Smallest Integer Data Type and Suggest the Smallest Real Data Type settings instructs the algorithm to use the smallest integer or real type that holds the maximum value found in the column up to the number of rows specified in the Number of Rows setting. For example, if the value of the largest integer found in a column was 42, this setting instructs the algorithm to select a 1-byte integer, but if the value of the largest integer found was 342, a 2-byte integer would be required because a 1-byte integer can only hold values up to 255. The Identify Boolean Columns Using the Following Values setting tells the algorithm to set the type of a column to Boolean if it contains the strings specified. The defaults are TRUE and FALSE but could also be TREU and FALSCHE. The Pad String Columns setting adds spaces to the columns up to the percentage specified. This is useful in cases in which you're concerned that a column might not be large enough to hold the longest values or to allow for potential column width growth. Setting Up the Connection Manager: PreviewAfter setting the column properties, you're ready to look at the data preview in Figure 10.14. Figure 10.14. Use the Preview tab to view the data columns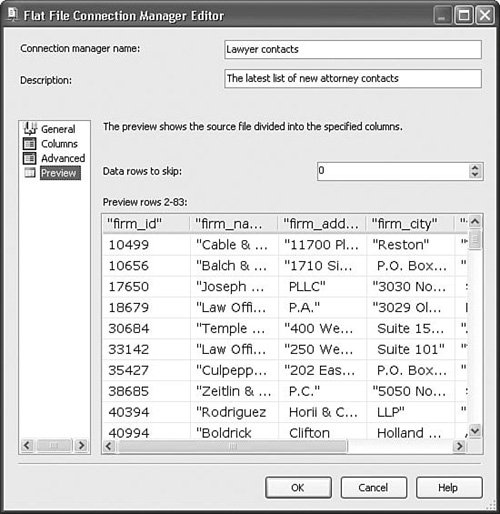 This tab doesn't provide much functionality other than some peace of mind that you've got all the settings right. Use the Data Rows to Skip setting to specify how many rows to skip after the header. Note that this is different than the Header Rows to Skip setting. The total rows skipped are the sum of the number of header rows and data rows skipped. The FTP Connection ManagerThe FTP Connection Manager provides a connection to an FTP server but also provides all the FTP-related functionality for Integration Services. For example, when the FTP Task downloads a file, the actual work occurs in the FTP connection. Uploading files, creating and deleting folders, enumerating lists of files on the FTP server, and so on all happen within the FTP Connection Manager. The reason that the FTP Connection Manager contains all the FTP functionality instead of the FTP Task is because the IS team wanted to enable custom task writers to be able to use FTP. If the code for accessing FTP servers were in the FTP Task, this would not be possible. Setting Up the Connection ManagerFigure 10.15 shows the FTP Connection Manager Editor. Passive mode instructs the FTP Connection Manager to only allow FTP responses to requests it sends. In some cases, this setting enables FTP connections through corporate firewalls that won't otherwise succeed. Figure 10.15. Use the FTP Connection Manager to connect to a remote FTP server The HTTP Connection ManagerThe HTTP Connection Manager implements the full HTTP functionality for Integration Services. The IS team created the HTTP Connection Manager to support the Web Services Task, but other tasks can use it as well. See Chapter 24, "Building Custom Tasks," for a custom task that uses this connection manager. Setting Up the Connection ManagerFigure 10.16 shows the HTTP Connection Manager Editor. Figure 10.16. Use the HTTP Connection Manager to connect to a website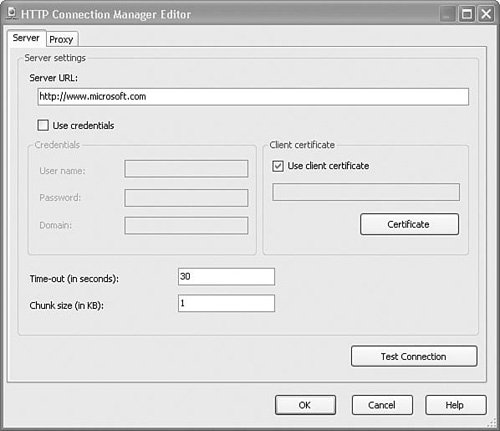 Note If you specify the root without an explicit filename, the HTTP Connection Manager operates on the default page. To target specific files or pages, you'll need to add their path and name as follows: http://support.microsoft.com/kb/257819 There are two tabs on the dialog box. On the Server tab, you specify the settings to connect to the HTTP server. The Server URL is the full URL to the file you want to access. For HTTP pages that require credentials or a certificate for authentication, you can provide them here. If you check the Use Client Certificate check box, the dialog box enables the Certificate button. Click the Certificate button to choose the certificate from the Select Certificate dialog box shown in Figure 10.17. Figure 10.17. Select the certificate using the Select Certificate dialog box On the Proxy tab, you can configure settings for working with a proxy. The Proxy tab is shown in Figure 10.18. Figure 10.18. Use the Proxy tab to configure proxy settings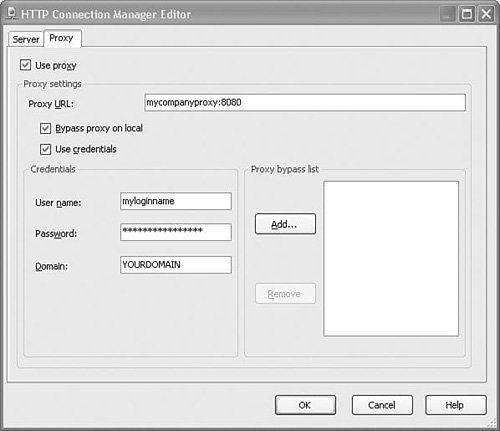 The Proxy URL specifies the address for the proxy, which is typically on Port 8080. Some proxy software configurations require that you log in. The Credentials settings allow you to enter your credentials so you can do so. The Proxy Bypass list is provided as a way to bypass the proxy for certain, typically internal, addresses. Tip The HTTP Connection Manager returns a native COM object when clients call its AcquireConnection method. This makes it difficult to use it in the Script Task. See Appendix C, "Tips, Tricks, and Gotchas," for an easy way around this and to use the Script Task to retrieve files using the HTTP Connection Manager. The MSMQ Connection ManagerThe MSMQ Connection Manager provides a way to centrally configure settings for accessing an MSMQ queue. Multiple MSMQ Tasks in the same package can use the same MSMQ Connection Manager to access the same queue. This connection manager returns an instance of a .NET object defined in System.Messaging called appropriately enough, MessageQueue. The MSMQ Task knows how to use this object to access features and services of MSMQ. Figure 10.19 shows the MSMQ Connection Manager Editor. For more on how to set up this connection manager, see the MSMQ Task discussion in Chapter 8, "The Stock Tasks." Figure 10.19. Use the MSMQ Connection Manager to connect to MSMQ The Microsoft Analysis Services Connection ManagerThe Analysis Services Connection Manager is how Analysis Services Tasks connect to Analysis Services servers. Figure 10.20 shows the Add Analysis Services Connection Manager Editor. An interesting feature of this connection manager type is that it can connect to an existing Analysis Services project in the same solution to populate cubes as well as an Analysis Services server. The connection to an Analysis Services project is only valid in the designer. Figure 10.20. Use the OLAP90 Connection Manager to connect to Analysis Services Setting Up the Connection ManagerTo set up this connection manager, you can type in the connection string for the Analysis Services server directly, or you can click the Edit button, which opens the Connection Manager dialog box for Analysis Services shown in Figure 10.21. Figure 10.21. The Connection Manager dialog box for Analysis Services automatically selects the OLEDB provider for Analysis Services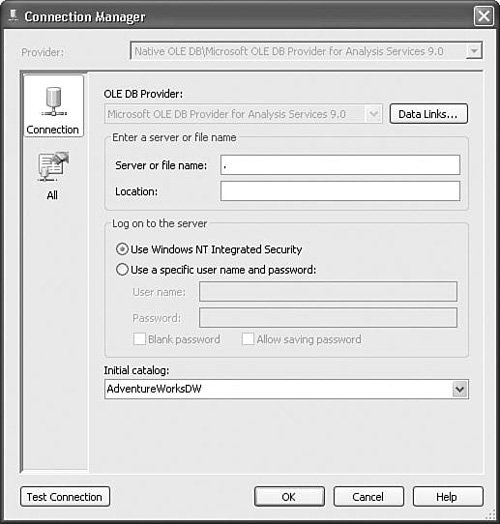 If you choose to create a connection to an Analysis Services project in the same solution, the designer populates the Analysis Services project drop down with the AS projects in the solution. The MultiFile Connection ManagerThe MultiFile Connection Manager makes it possible to access multiple files from the same connection manager in succession. The MultiFile Connection Manager supports filename lists as well as wildcard names. Although most operations on multiple files can be done with the Foreach Loop using the ForEach File Enumerator, there are occasions when it's convenient to retrieve more than one file within the same execution of a task. The MultiFile Connection Manager returns the fully qualified name of a different file each time a client task or component calls AcquireConnection until it returns all the filenames, and then it returns NULL. Setting Up the Connection ManagerFigure 10.22 shows the Add File Connection Manager dialog box with some files already selected. To add more, click the Add button. To remove a file or files, select the files and click the Remove button. The Edit button lets you select a new file to replace the currently selected file. Figure 10.22. Use the MultiFile Connection Manager dialog box to easily select multiple files After you've selected the files, the ConnectionString property contains the list of strings separated by the pipe (|) character. For example, the list of files selected in Figure 10.22 is represented in the ConnectionString as: D:\data\USmillead2001.txt|D:\data\germancodes.txt|D:\data\Malts.txt|D:\data\Sky.txt You can also use the ? and * wildcards to specify files. The dialog box doesn't provide a way to build a connection string with wildcards, so you have to directly enter them into the ConnectionString in the property grid. For example, to access all the .txt files in the D:\data folder, type the following into the ConnectionString property: D:\data\*.txt The MultiFlatFile Connection ManagerThe MultiFlatFile Connection Manager is useful for building Data Flow Tasks that need to process more than one flat file. The Flat File Source Adapter is designed to take advantage of the MultiFlatFile Connection Manager. The Flat File Source Adapter attempts to acquire the name of another flat file to process and continues to do so until no more flat files are available before setting the end-of-file flag on the data flow. This capability comes in handy for efficiently processing data contained in multiple flat files. Caution Each flat file must have the exact same schema for this to work.
Setting Up the Connection ManagerThe setup for this connection manager is virtually identical to the way you set up the Flat File Connection Manager with one exception: When you click the Browse button for the MultiFlatFile Connection Manager, the Open dialog box allows you to multiselect files. The Flat File Connection Manager does not. Like the MultiFile Connection Manager, you can also use the wildcards ? and * to implicitly select multiple files. The ODBC Connection ManagerThe ODBC Connection Manager is provided to support the long-established ODBC data access standard and the multitude of ODBC drivers. Note Integration Services ships with an ADO.NET Source Adapter for the Data Flow Task that may be used to access ODBC sources through ADO.NET ODBC providers, but not an ODBC Destination Adapter. Hopefully, an ODBC Destination will be available soon. Setting Up the Connection ManagerThe key to setting up ODBC Connection Managers is the DSN. DSN is short for Data Source Name. Data Source Names provide a way to connect to a database through an ODBC driver and contain information such as the database name, database driver, directory, UserID, and password. After you have a DSN for a particular database, you can simply select that DSN whenever you create a connection to the database. There are three types of DSNs:
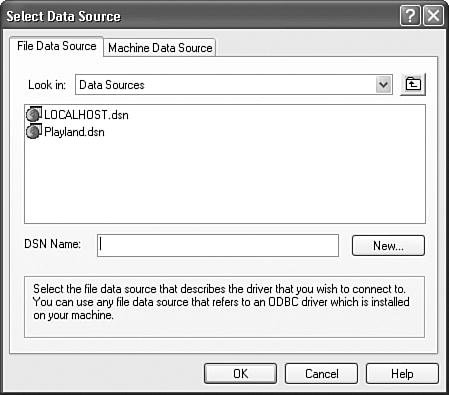
Tip System and User DSNs are stored in the Registry. System DSNs are stored in the HKLM key under SOFTWARE\ODBC\ODBC.INI. User DSNs are stored in the HKCU key under SOFTWARE\ODBC\ODBC.INI. Although they can be stored anywhere in the file system, file DSNs are typically stored in the %Program Files%\Common\ODBC\Data Sources folder. Installed ODBC drivers are stored in HKLM under SOFTWARE\ODBC\ODBCINST.INI. You can create new ODBC DSNs with the ODBC Data Source Administrator Control Panel applet shown in Figure 10.23. Figure 10.23. Use the ODBC Data Source Administrator to create new DSNs To get to this dialog box, select Administrative Tools from the Start menu or go to the Control Panel, Administrative Tools and select the Data Sources (ODBC) Control Panel application. You can also create file and system DSNs using the ODBC Connection Manager dialog box. To get there, right-click on the Connection Managers window, and then select New Connection. Then, select ODBC for the Connection Manager type, and click the Add button. The Configure ODBC Connection Manager shows a list of available DSNs, if any have already been created on the machine. You can select one of the existing DSNs in the list or create a new one with the New button. Figure 10.24 shows the Connection Manager dialog box for ODBC. You have the option of choosing an existing user or system DSN or creating a new one. To create a new one, you select the Use Connection String option and click the Build button. Figure 10.24. Use the Connection Manager dialog box to select or create a DSN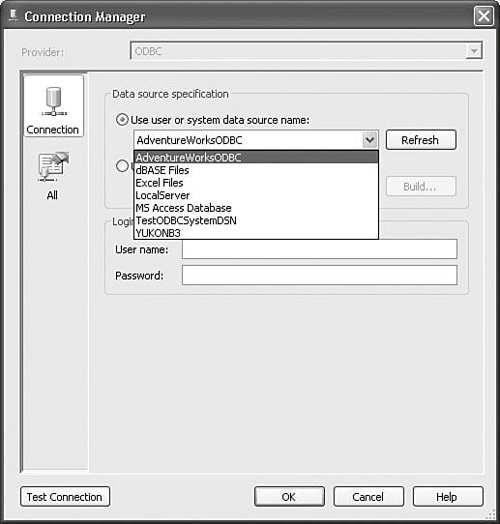 Figure 10.25 shows the Select Data Source dialog box that opens. Figure 10.25. Use the Select Data Source dialog box to choose a file data source When you select the data source, the connection string it contains is placed in the connection string for the connection manager you are currently creating. The OLEDB Connection ManagerThe OLEDB Connection Manager is for accessing data using OLEDB data access components. OLEDB is the default access method for Integration Services and is currently the most predominant data access method. Many important data access drivers are OLEDB providers. With the advent of managed providers, however, this will likely change in the near future. Setting Up the Connection ManagerTo set up the OLEDB Connection Manager, select it from the context menu in the Connection Managers window. Figure 10.26 shows the OLEDB Connection Manager dialog box with the provider list showing the SQL Native Client selected. After you've selected the provider you want to use, specify the server and database name. Figure 10.26. Select the provider from the OLEDB Connection Manager dialog box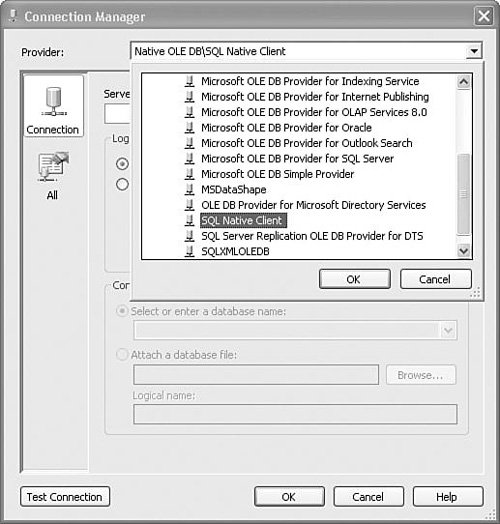 The OLEDB Connection Manager dialog box also lets you specify a connection to a database in a database file. When the connection manager attempts to connect to the database in the file, it first attaches it to the local server. Note The connection manager does not detach the database, even after the package has completed execution or if you close the designer.
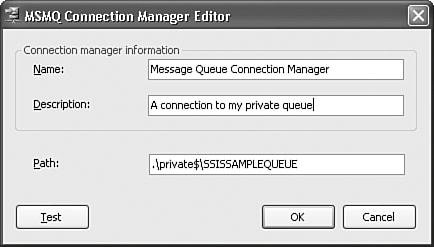
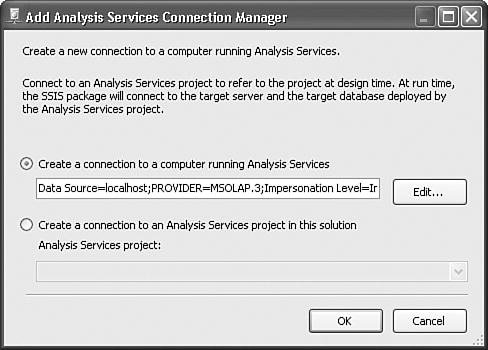
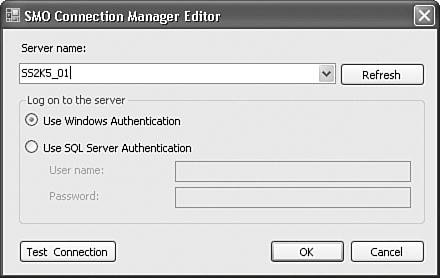
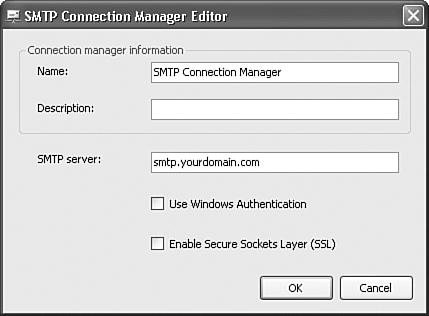
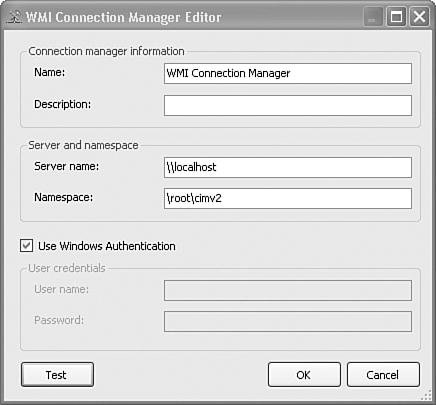
The SMOServer Connection ManagerSMO is the acronym for SQL Management Objects and is the new API for managing SQL Server objects, such as databases, tables, and logins. The SMO Connection Manager is pretty simple and provides a way to use SMO objects in the control flow. Setting Up the Connection ManagerTo create a new SMOServer Connection Manager, select the SMOServer connection type from the Add SSIS Connection Manager dialog box. Figure 10.27 shows the SMO Connection Manager Editor. Figure 10.27. Use the SMO Connection Manager Editor to access SQL Server objects For the server name, enter the name or instance name of the server you need to access. Select the authentication method you want to use and you're done. The SMO Connection Manager returns a Microsoft.SqlServer.Management.Smo.Server object when clients call its AcquireConnection method. Tip The Microsoft.SqlServer.Management.Smo.Server object is a managed object, so you can easily use it in the Script Task if needed. The SMTP Connection ManagerThe SMTP Connection Manager provides a central location for specifying an SMTP server address. The Send Mail Task is based on SMTP and uses this connection manager. Setting Up the Connection ManagerThe SMTP Connection Manager is probably as simple as they come. Whatever you specify for the SMTP server string is what it returns from its AcquireConnection method as the connection string. Figure 10.28 shows the SMTP Connection Manager Editor. Figure 10.28. Use the SMTP Connection Manager Editor to specify the SMTP server name The WMI Connection ManagerThe WMI Connection Manager provides a way to specify a connection to the WMI service on a machine. WMI is the acronym for Windows Management Instrumentation and provides a powerful set of tools and features for discovering, describing, and querying network resources. The two WMI tasks use the WMI Connection Manager. This connection manager returns an instance of a .NET object defined in System.Management called ManagementScope. The WMI Tasks know how to use this object to access other features and services of WMI. Setting Up the Connection ManagerFigure 10.29 shows the WMI Connection Manager Editor with the default server name and namespace. Most of the work you will do with WMI will be in the default namespace. The server name might change if you are attempting to query remote machines. To find out more about WMI and how to use it in Integration Services, see Chapter 8. Figure 10.29. Use the WMI Connection Manager Editor to connect to the WMI service |

EAN: 2147483647
Pages: 200