The Workflow Tasks
| The workflow tasks are used to accomplish simple and common workflow so they are commonly used in most packages. DTS users will likely be most familiar with these tasks because many of them are rewritten incarnations of DTS tasks, with the exception of the WMI Data Reader, WMI Event Watcher, File System, Execute DTS 2000 Package, and Web Services Tasks that are new in Integration Services. Workflow tasks perform the mundane grunt work of packages, such as moving files, checking for storage space, or sending email, and they form the backbone of any Extract, Transform, and Load (ETL) or other data integration workflow.
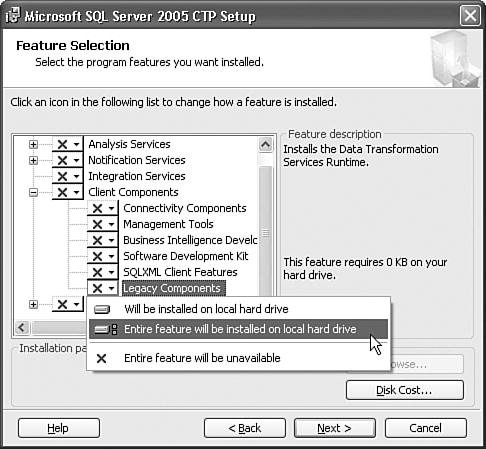
Execute DTS 2000 Package TaskThe Execute DTS 2000 Package Task is briefly discussed in Chapter 3, "Migrating from DTS," as are the reasons it ships with Integration Services. To review, this task is provided to help bridge the path when migrating from Data Transformation Services to Integration Services. Because the architecture of Integration Services is so different from DTS, few legacy DTS packages will successfully migrate and run in Integration Services. This task provides a "half" migration step so that legacy packages can be run side by side with newer Integration Services packages. Even limited interaction between the two is possible such that existing investment in DTS packages is not lost when upgrading to Integration Services. The Execute DTS 2000 Package Task is installed as part of the legacy components. To ensure you will have this task available, select the Legacy Components option in the advanced section of SQL Server setup. Figure 8.2 shows the proper selection to make. This option installs the task and the Data Transformation Services components. If you do not have this task available, you can run SQL Server setup again and select this option to install it. Figure 8.2. Install the legacy components to ensure the task is available
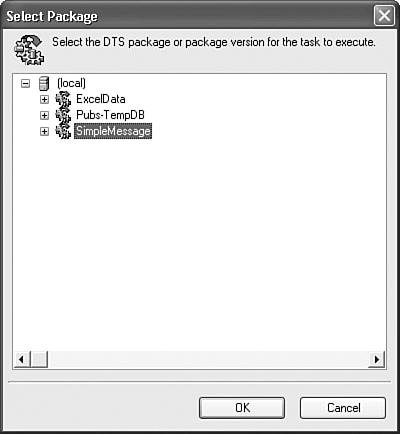
If you want to have the user interface available, you must install SQL Server side by side with an existing install of SQL Server 2000 with DTS installed. You need to have a DTS 2000 package already built before you can use this task. Alternatively, you can refer to the tip later in this chapter about creating a new DTS package inside the hosted DTS designer. The package can reside in any of the DTS supported locations, such as SQL Server or in a DTS structured storage file. Also, packages can be embedded in an Execute DTS 2000 Package Task in an Integration Services package. Setting Up the Execute DTS 2000 Package TaskFigure 8.3 shows the task user interface for the Execute DTS 2000 Package Task with the default settings. Drop the task onto the designer and double-click it to bring up the task UI. You might notice that the task UI resembles the task UI for the DTS Execute Package Task. The two are functionally very similar. Figure 8.3. The task UI allows you to configure the location of the package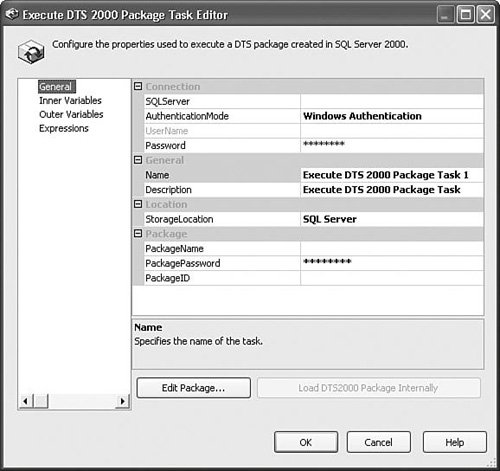 SQL Server PackagesThe StorageLocation property describes from where DTS should load the package. It is the key setting because some of the other available properties change based on this selection. So, you'll want to set this property before setting any of the others. Setting the StorageLocation property to SQL Server indicates that the package is stored in a SQL Server 2000 instance. After you've set the server name, you can click on the ellipsis button in the PackageName property and browse the available packages on the specified server in the Select Package dialog box shown in Figure 8.4. After you've selected a package and closed the Select Package dialog box, the PackageName and PackageID properties should be populated with the name and ID of the package you've selected. Figure 8.4. The Select Package dialog box allows you to browse available packages
Note The available properties for Meta Data Services are the same as for SQL Server. Structured Storage FileSelecting Structured Storage for the StorageLocation property changes the available properties to those shown in Figure 8.5. Figure 8.5. Structured Storage packages require a filename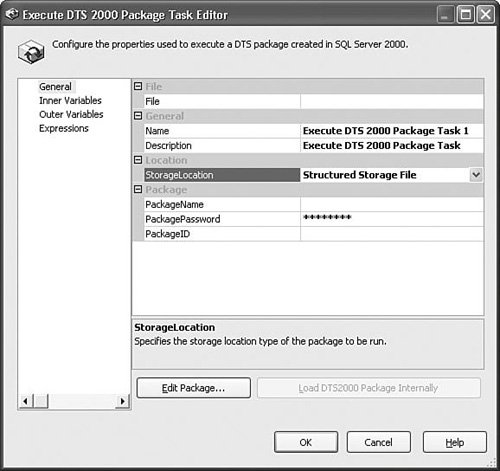 Instead of specifying server connection information, you need only to specify the fully qualified filename of the structured storage file on the file system. The file must have the .dts extension for the Browse dialog box to recognize it as a DTS package. Embedded in TaskThis is an interesting option because it removes all notions of a separate package. When set, the DTS package is embedded inside the IS package. To use this setting, you must first select the package from another location, such as Meta Data Services, SQL Server, or from a structured storage file as described previously. When the package is selected, the Load DTS 2000 Package Internally button is enabled. Clicking on that button then embeds the DTS package inside of the IS parent package. You can continue to edit the package at will and it's possible to subsequently save the package to a different location as well. Embedding packages in this way makes it easier to move the parent and child packages together and eliminates connectivity issues with legacy systems containing the DTS child package. The only drawback here is that, depending on the size and number of the embedded packages, your parent package disk size can grow substantially larger. Inner VariablesIf you're familiar with the way inner and outer variables work in the Execute Package Task in DTS, you already know how they work for this task. Inner variables are a way of adding a variable to the child packages' global variables. The value for inner variables is statically defined in the UI. At execution time, the Execute DTS 2000 Package Task creates a new variable at package scope on the child package with the static value specified. The variable is only temporary and is not visible to the child package at design time. Outer VariablesOuter variables are important for allowing legacy DTS packages to integrate well with IS packages. Outer variables allow the parent package to pass in an IS variable that can be used in the DTS environment. To see outer variables in action, open the package called ExecDTS2KPackage.dtsx in the S08-StockTasks sample solution. It uses an outer variable to pass in a message that the child DTS package displays in a message box. Custom BreakpointsTwo custom breakpoints are available for this task:
Task-Specific Peculiarities or Nonstandard SettingsThis task is fairly complex because, after all, it's essentially the DTS 2000 tasks, designer, and other features all wrapped up and embedded into one IS task. The Edit Package button allows you to open the package in the DTS 2000 designer where you have full access to virtually every feature in the DTS 2000 designer. Tip Creating a new DTS package with the Execute DTS 2000 Package Task is possible. If you have an existing package, you can simply open it and save it to a different name. If you don't have an existing DTS package available, you can create one by creating a temporary file and opening it as though it was a DTS package and then save it to a different name. Here are the steps:
One reason you might want to do this is if you're refactoring existing packages. Perhaps there is some logic in one part of a DTS package you want to remove and replace with an SSIS package and you want to retain the other parts of the package. Or, perhaps you want to separate an existing DTS package into multiple packages. This is a quick-and-easy way to create new DTS packages for such purposes.
File System TaskThe File System Task is used to copy, create, delete, rename, move, rename, and attribute files and directories in the file system.
The Operation property is a key setting for this task and changing it changes the setting of other available properties. There are nine available operations. Some operations require a source and destination, as Table 8.1 shows.
Setting Up the File System TaskTo see a simple package that uses the File System Task, open the package called FileSystem.dtsx in the S08-StockTasks sample solution. It copies and renames a file and then deletes it with a subsequent File System Task. Figure 8.6 shows the setup for copying the file. Notice that the specified operation is Copy File and that the task references two file connection managers. The SourceConnection specifies the connection manager the task will use to find the file to copy. The DestinationConnection specifies the connection manager the task will use to determine where to copy the file and what to name it. Doing the copy this way is similar to using the Copy command in the command prompt: copy c:\filename.txt c:\newlocation\newfilename.txt Figure 8.6. The File System Task can copy and rename files in the same operation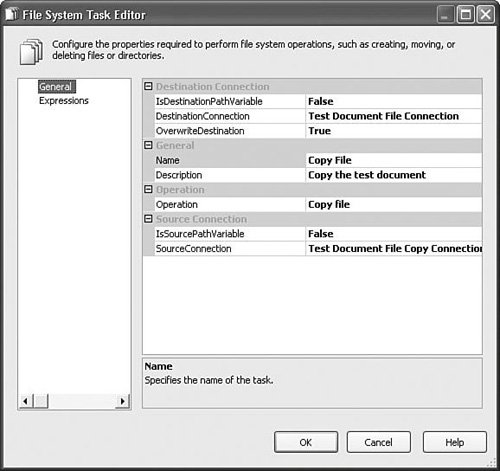
Send Mail TaskThe Send Mail Task makes it possible to generate and send email from the package. This is helpful for alerting you to certain events such as package completion or errors. To use the Send Mail Task, you need to have access to an SMTP server. Most SMTP addresses are in the form smtp.domain.extension and look similar to SMTP.MyDomain.org. Setting Up the Send Mail TaskIf you're familiar with common email programs, the Send Mail Task will seem quite familiar. The four properties that need to have values are the SMTP Connection Manager, a From email address, a To email address, and a message in the MessageSource property. Figure 8.7 shows some pseudosettings for the Send Mail Task. Figure 8.7. The Send Mail Task uses the SMTP protocol to send email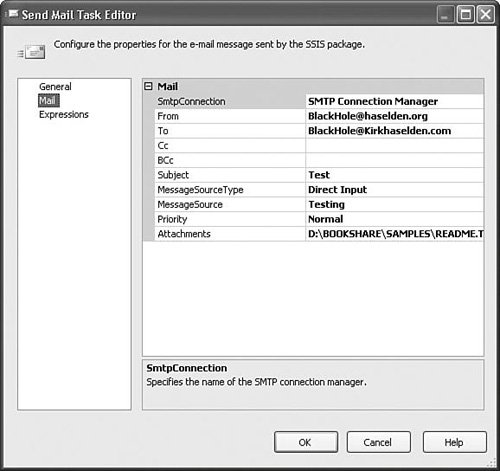 The SmtpConnection property holds the name of the SMTP Connection Manager the Send Mail Task uses to communicate with the SMTP server. The To property holds the address of the email recipient and can contain multiple email addresses. The To property must contain a valid email address. The optional CC and BCC properties can also contain multiple email addresses. The Subject property is not required, but should be included and contains a description of the contents of the email. The Priority property sets the priority of the email, which some email clients use to prioritize email. The Attachments property contains a list of fully qualified filenames of files to attach to the email. The MessageSourceType property directs the task from where it should retrieve the message body. Three options are available for this setting:
Tip Multiple To addresses are separated by commas. Multiple attachments are separated with the pipe character ('|'). If one of the specified attachments is not found, the task fails validation. Figure 8.8 shows the SMTP Connection Manager Editor. The option to use Windows Authentication is valid when sending email through Exchange Server and might be required if the Exchange Server does not allow unauthenticated SMTP connections. The option to enable Secure Sockets Layer (SSL) encrypts the email messages using SSL. Figure 8.8. The SMTP Connection Manager holds the address to the SMTP server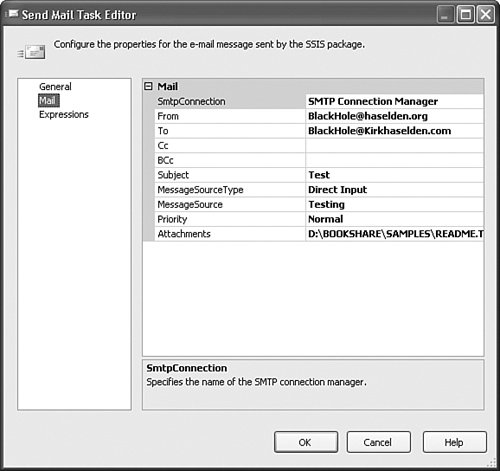 Custom BreakpointsOne custom breakpoint is available for this task:
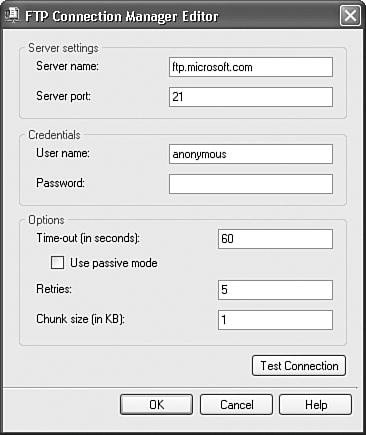
FTP TaskThe FTP Task is used to move files between local and remote machines using the File Transfer Protocol. It's a dependable and secure way to noninteractively download or upload files. Although newer technologies have come along, the FTP Task is the old standby that will likely remain relevant for years to come. Other operations, such as creating local or remote folders and deleting local and remote files and folders are also available with the FTP Task. The FTP Task is installed with Integration Services and you don't need to do anything special to make it available. For the remote operations, the FTP Task communicates with a remote server, so you need to have access to an FTP server for all remote operations. Setting Up the FTP TaskTo see a simple package that uses the FTP Task, open the package called FTP.dtsx in the S08-StockTasks sample solution. It downloads a command-line utility called soon.exe that's useful for generating AT execution schedules. The first thing to do when setting up the FTP Task is to configure the FTP connection. Figure 8.9 shows the General tab of the FTP task UI where you set the FtpConnection property. If you don't already have an FTP Connection Manager, you can create one by selecting New Connection from the drop down. Figure 8.9. Configure the FTP connection on the FTP Task General tab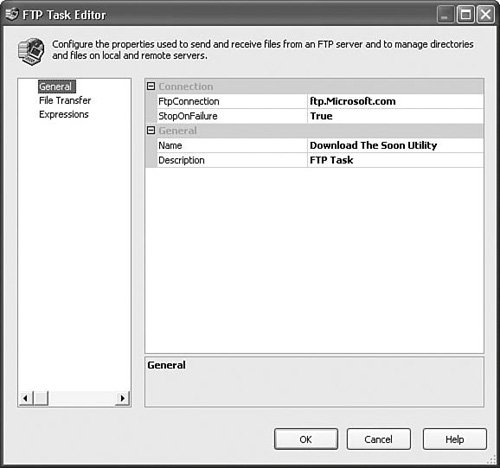 The FTP Connection Manager holds the address for the FTP server. Figure 8.10 shows the UI for the FTP Connection Manager. The most important setting on the connection manager is the FTP server name. The User Name and Credentials are also needed if your server doesn't support anonymous access. The Server Port default is port number 21. Likely, you should not have to change that. The Passive setting is useful in environments with a firewall. Passive mode is considered safer because it ensures the FTP Task initiates all communication rather than from the FTP server or other outside program. The Retries setting configures the number of times the FTP Connection Manager retries to establish a connection before giving up. The Timeout setting configures how long the FTP connection waits before giving up on a connection attempt. The Chunk Size setting configures how much data is transported in one FTP packet. The Test Connection button causes the FTP Connection Manager to attempt a connection with the server and shows a message box with the results. Figure 8.10. Configure the FTP Connection Manager
The file transfer settings are on the File Transfer tab shown in Figure 8.11. The key setting for the FTP Task is the Operation property. Begin by setting the Operation so that the other properties will be available. In the sample package, the FTP Task is configured to download a utility from the Microsoft.com FTP site. Figure 8.11. Configure the file transfer settings on the File Transfer tab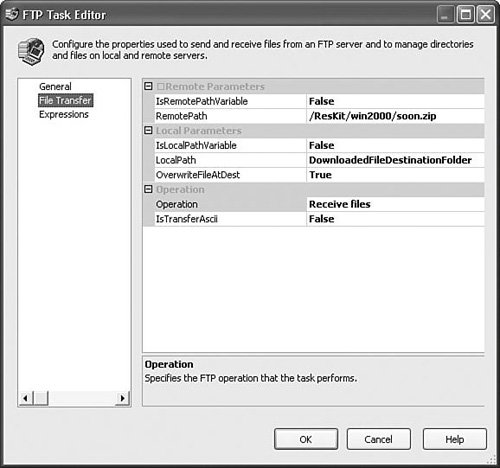 Tip It is strongly recommend that you do not use the FTP Task for local file operations; rather, you should use the File System Task because it is better suited to local file system operations. Also, it can be confusing when viewing a package with an FTP Task that isn't doing an FTP operation. The local operations will likely not be supported in future versions. They are artifacts left over from earlier FTP Task designs and do not present any advantages over using the File System Task. Wildcards SupportedThe FTP Task supports wildcards for remote operations but not for local operations. The * character can be used to indicate entire names. For example, in the sample FTP package, you could change the RemotePath to /ResKit/win2000/*.zip to download all zip files in the remote directory. When the RemotePath is changed to /ResKit/win2000/T*.zip, the FTP Task downloads all the utilities that start with the letter 'T,' including tracedmp.zip, toolhelp.zip, timethis.zip, and so on. The ? character can be used for more surgical file filtering. This is useful in cases in which your files are named with a particular naming convention. For example, you might have a naming convention in which the number of letters in the name is always constant, but certain parts of the name change. You might have a group of files named with the prefix of "Cases" and the suffix of the date such that you have filenames that look like this: Cases02042004, Cases05222005, Cases10032005 To only retrieve the files from October, 2005, you can use the ? character to define the RemotePath as follows: "/Cases/Cases10??2005
Message Queue TaskThe MSMQ Task is useful for transferring information between packages or other MSMQ client applications and synchronizing workflows. MSMQ is very versatile and can be used for many purposes, some of which are included in the following list:
If you're not familiar with MSMQ, many excellent references are available. Unfortunately, the scope of this book doesn't allow for great detail about MSMQ here. To use the MSMQ Task, you must be sure Message Queuing is installed on the machine on which the package with the MSMQ Task will run. To install Message Queuing, launch the Add/Remove Programs Control Panel and select Add/Remove Windows Components. Figure 8.12 shows the Windows Components Wizard dialog box you use to install Message Queuing. Click the Message Queuing option if it isn't already selected, and then click the Next button to complete the installation. Figure 8.12. Use Add/Remove Windows Components to install Message Queuing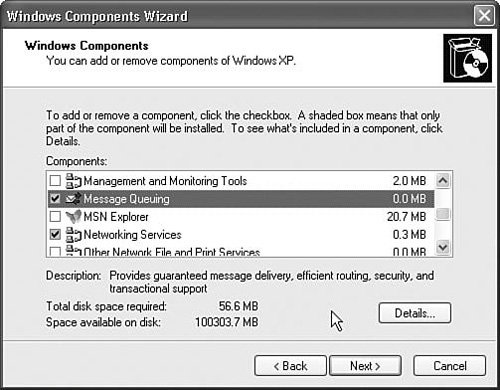 To use the sample packages, you'll also need to create a queue. You can do that by launching the Computer Management console shown in Figure 8.13. Right-click on the Private Queues node, click New, and then click Private Queue. Name the private queue SSISSAMPLEQUEUE. Notice also that the Label column at the upper-right of the window shows the path to the queue. This is the path that you'll enter into the Path property of the MSMQ Connection Manager. Also notice the Number of Messages column. MSMQ has the option of leaving messages in the queue. As you'll see in the sample package, this can be useful when you want to have more than one MSMQ client, like the MSMQ Task, reading from the queue. Figure 8.13. Use the Computer Management Control Panel to create queues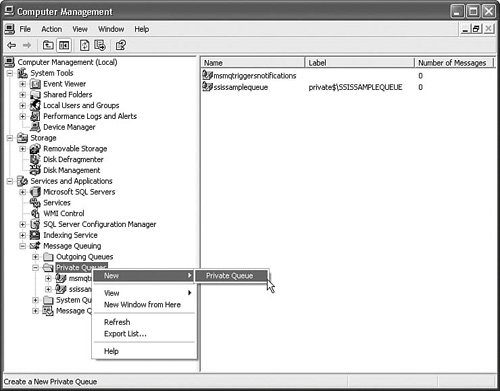 Setting Up the MSMQ TaskThe MSMQ Task has two primary modes, Send and Receive. You set the mode in the task UI on the General tab in the Message property. Two options are provided: Send Message and Receive Message. The default is Send Message. Changing the Message property changes the Send tab to the Receive tab with all the appropriate properties for configuring the task to receive from the queue. Send ModeIn Send mode, the MSMQ Task places data in the queue to be retrieved by another MSMQ client at some future time. To set the task to Send mode, set the Message property on the General tab to Send Message. This is the key setting for the MSMQ Task. After being set, you need to create an MSMQ Connection Manager. Select the MSMQConnection property and select New connection. The MSMQ Connection Manager UI is displayed, as shown in Figure 8.14. Figure 8.14. The MSMQ Connection Manager requires a path to the queue
The MSMQ Connection Manager requires one setting, the path. The path is what tells the MSMQ Task where to access the queue. You build a path with the computer name and queue name. Following are some examples of a path: MyComputerName\PRIVATE$\MyQueueName MyComputerName\MyQueueName .\PRIVATE$\MyQueueName .\MyQueueName The final two paths use the shorthand '.' to indicate that the queue is on the local computer. Figure 8.14 shows the MSMQ Connection Manager UI using a private path to point to a queue on the local computer. A private queue is not registered with directory services and so isn't visible to other machines. Private queues are typically more performant due to reduced overhead. After you've entered the path, you can click on the Test button to check if the connection manager is correctly configured. After the MSMQ Connection Manager is set up, you can set up the rest of the task. Send mode has three options for where to retrieve the message, as shown in Figure 8.15:
Figure 8.15. The MSMQ Task supports three message types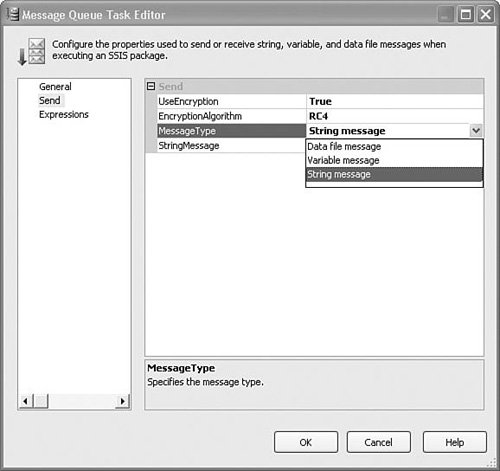 ReceiveWhen in Receive mode, the MSMQ Task needs an MSMQ Connection Manager as well. MSMQ Connection Managers can be shared between multiple MSMQ Tasks if needed without issue. Figure 8.16 shows the MSMQ Task when in Receive mode and the MessageType options drop down. Figure 8.16. The MSMQ Task supports four message types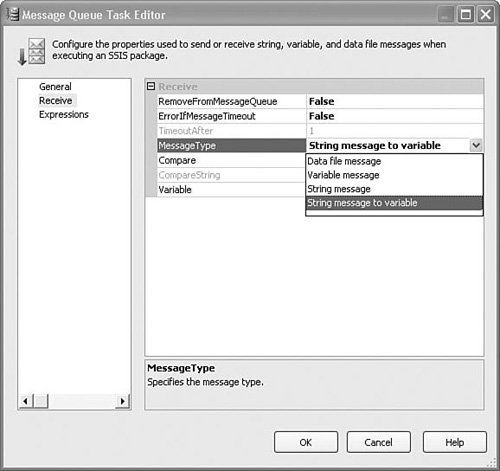 Figure 8.16 shows the four message type options for Receive mode:
In the S08-StockTasks sample solution, two sample packages use the MSMQ Task. One package uses an MSMQ Task to place a string in the queue and then two other MSMQ Tasks retrieve the string and display it in message boxes. The second package also waits on the queue for the string and displays it and then cleans up the queue. This sample shows a number of ways the MSMQ Task can be used:
To run the packages, load both into the designer. Select the MSMQ2.dtsx package so that it shows in the designer. From the Debug menu, select the Start Without Debugging menu item or press [Ctrl+F5]. This starts the package running in a separate process so you can see both packages running simultaneously. Then, start the MSMQ.dtsx package by pressing [F5]. There is a short wait so you can see the impact it has on the tasks in the package. Note that the Receive MSMQ Tasks start, but don't complete. They are waiting for the queue to fill with the string that the Send MSMQ Task is about to send. The other package also has an MSMQ Receive Task that is waiting for data to become available in the queue. The Script Task waits for approximately five seconds and then sends a string to the queue; you should see three message boxes displaying that string. The final MSMQ Task, Clear MSMQ String, removes the string from the queue. These packages are very instructive; try changing around the settings a bit to see how the different tasks interact with the other packages and with each other. Custom BreakpointsTwo custom breakpoints are available for this task:
The WMI TasksWindows Management Instrumentation (WMI) is a powerful and comprehensive standards-based management technology for Microsoft Windows operating systems. WMI is an implementation of the Distributed Management Task Force's (DMTF) Web-Based Enterprise Management (WBEM) initiative. WBEM is a set of open, industry-defined specifications for managing and controlling enterprise-computing environments. Using WMI, you can manage, control, and monitor your entire enterprise inventory of hardware, configurations, networks, servers, services, and applications. You interact with WMI via the scripting language called WMI Query Language (WQL), which is a subset of ANSI SQL with some modifications to support WMI requirements. For the most part, the limitations are in the level of complexity the WQL parser supports certain keywords. WQL provides similar flexibility and power in the management space that SQL does in the database space, allowing the client to finely control the information retrieved from WMI. Keywords such as SELECT, WHERE, and HAVING will be familiar to SQL users. There are other WQL keywords with which the average SQL user will likely be unfamiliar, such as REFERENCES OF, ASSOCIATORS OF, KEYSONLY, and __CLASS. For more detailed coverage of WMI and WQL, search Microsoft MSDN and TechNet. WMI is a collection of objects that represent settings and properties of everything in, around, and connected to your network. Things like disk drives, applications, services, BIOS settings, and removable media are all represented in WMI by instances of classes. You can build web pages that track your network and all the machines on it. You can write applications that can control machines remotely, alert you to problems with the network, and so on. And now, with the WMI tasks, you can build network and machine awareness and interaction into your packages. There are three types of queries in WMI:
WQL queries are generally composed of four elements, as shown in Table 8.2.
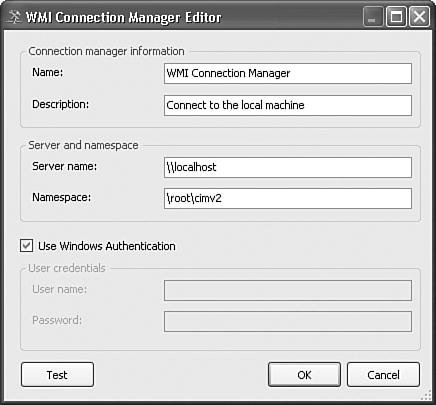
Using WMITools and DocumentationWMI provides so much information. There are few data points or properties on your network or machines that you cannot get from WMI. The problem is how to wade through all the classes and instances and namespaces to get at the one piece of information you want. What you need is tools, and Microsoft provides a wealth of tools, resources, and documentation if you know where to look. There are helpful references and tools on the Microsoft download site at http://www.microsoft.com/downloads. Search for "WMI Extensions" to find the Visual Studio Server Explorer plug-in that you can use to traverse the WMI object tree. There is a tool called WMI Browser that is useful for learning more about WMI namespaces and classes and building queries. To download WMI Browser, do a search for "WMI Browser" on the Microsoft download website. The Scriptomatic tool included on the book CD in the TOOLS folder is very useful for learning more about the namespaces and classes on your machine or for generating and testing scripts and queries you can use in your code, web pages, or packages. WBEMTest, available in the WMI SDK and also downloadable from the Microsoft download site, is another utility that is useful for doing ad hoc queries and searching for specific classes. Finally, a command-line tool is available on all Windows XP machines called WMIC. You can use it to explore WMI namespaces, classes, and properties. These tools make it much easier to browse, explore, and, most importantly, discover information that's stashed away in the bowels of WMI. One last resource that should not go unmentioned is Alain Lissoir's excellent WMI-focused website: http://www.lissware.net. Alain is the program manager for WMI technologies at Microsoft and has written prodigiously about WMI. This site contains many boilerplate scripts, pointers to other resources, lots of samples, links to other web pages, and tools. If you're going to be using the WMI tasks, this is one website you should definitely bookmark. The WMI tasks are installed by default with Integration Services. WMI is also available on all the operating systems SQL Server supports, so there should be no issues with using the WMI taskspoints or properties on your network or machines that on any of those platforms. The WMI Connection ManagerThe first thing you'll needpoints or properties on your network or machines that to do when setting up the WMI tasks is create a connection manager. Figure 8.17 shows the connection manager UI. Figure 8.17. The WMI Connection Manager requires a server name and namespace
If you're accessing the local machine, the default server name is "\\localhost". You can access another machine on your network by typing in its NetBIOS name.
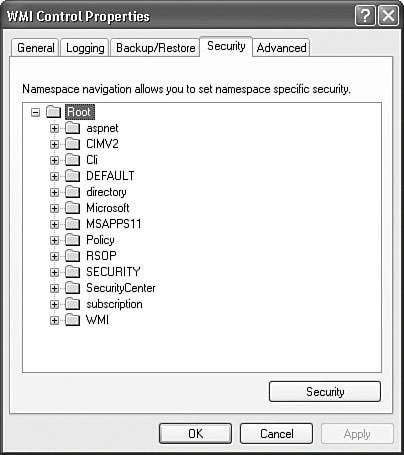
The namespace is the WMI namespace in which you're interested. WMI namespaces are a way to logically group classes and instances of classes that relate to a particular managed environment. The default namespace for the WMI Connection Manager is \root\cimv2. CIMV2 stands for Common Information Model, Version 2. The CIMV2 namespace includes various classes for managing windows machines. To see the namespaces on your machine, start the Computer Management Control Panel, right-click on the WMI Control node under Services and Applications, and click Properties. Figure 8.18 shows the typical list of namespaces for a Windows XP system. Figure 8.18. The Computer Management Control Panel displays WMI namespaces
Table 8.3 shows a few of the more interesting and useful namespaces. This list is not exhaustive and will vary from machine to machine, so the list of namespaces you see on your machines will likely vary.
If you don't choose to connect to the WMI server with Windows authentication, the User Name and Password properties must be entered. These properties are also useful when connecting to a server that is on a different domain.
WMI Data Reader TaskThe WMI Data Reader Task is useful for retrieving information about everything on or connected to your network. There are too many WMI classes to enumerate here; however, Table 8.5 lists the important classes and properties you might want to query. The WMI documentation lists more, and tools such as the WMI Browser can help you explore the enormous repository of information WMI provides. Setting Up the WMI TaskAfter you've created a WMI Connection Manager, you'll need to set a few more properties. Figure 8.19 shows the WMI Data Reader Task UI. Figure 8.19. The WMI Data Reader Task returns data about a system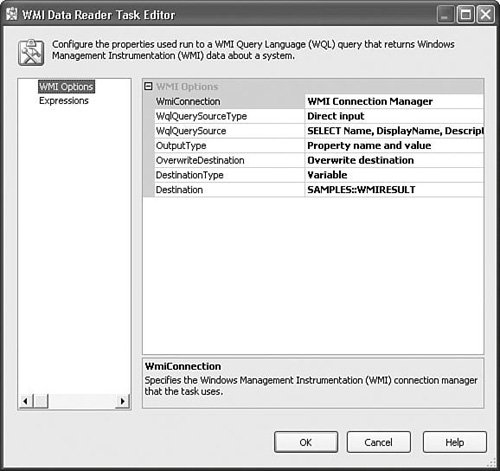 The WMI Data Reader Task provides settings for controlling the WQL to use, where the WQL will be found, where to place the results, and in what form you want the results to be returned. Table 8.4 lists these settings and their options.
Finding Information About ServicesThe Win32_Service WMI class in the CIMV2 name-space provides information about services installed on a machine. The WMIDataReader.dtsx package in the S08-StockTasks sample solution uses the following query to display the name, display name, and description of all the services installed on your machine with names that begin with the letter M. SELECT Name, DisplayName, Description FROM Win32_Service WHERE Name > "M" AND Name < "N" Then, the package uses a Script Task to display the returned properties and their values in a message box. There is also some disabled workflow in that package for enumerating the files in a folder. Try modifying the query slightly to get different results. For example, instead of returning just the Name, DisplayName, and Description, you could return all properties using the * wildcard like the following: SELECT * FROM Win32_Service WHERE Name > "M" AND Name < "N" Appendix C, "Tips, Tricks, and Gotchas," has more WMI queries you can try. Simply type them into the provided sample package and run it. Table 8.5 shows some useful classes in the CIMV2 namespace you can use to test different queries. To see the properties on these classes, insert the class name into a SELECT statement, as follows: SELECT * FROM <<CLASSNAME>>
Likely, this will generate a large resultset, so you might want to qualify the SELECT statement with a WHERE clause, as shown previously. Name is always a valid property on WMI classes. After you see the properties on one or two classes, you can further refine your select statement to only show the properties you want to see.
WMI Event Watcher TaskWMI also provides an eventing infrastructure for clients who want to be alerted to certain events as they happen. The Event Watcher Task provides a way for Integration Services to subscribe to WMI events in the package and to execute workflow either in the main package body or in event handlers based on the results of the event. Setting Up the WMI Event Watcher TaskWMI is a very large, powerful, and complex technology. There is simply not enough space here to do it justice. So, this section concentrates on a simple but useful example, watching for a file to appear in a folder. To get started, you need to pick an existing connection manager or create one, as shown in the previous WMI Data Reader Task discussion. Table 8.6 shows the important settings for the WMI Event Watcher Task.
Figure 8.20 shows the WMI Event Watcher Task configured to watch for a file to be created in the D:\Temp directory. Figure 8.20. The WMI Event Watcher can listen for system events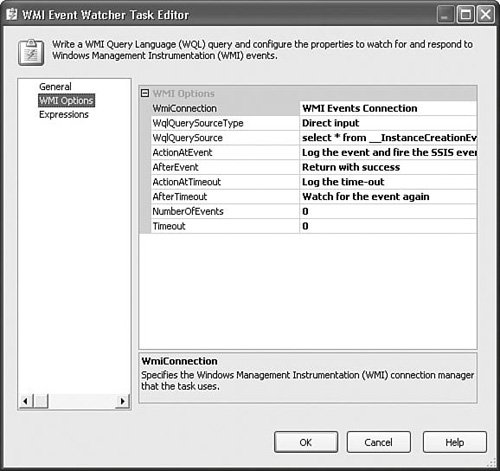 The query for this task is as follows:
The preceding WQL script has several parts that are worth mentioning.
The WMIEventWatcher.dtsx package in the S08-StockTasks sample solution uses the preceding query to watch a directory for any new files that get created there. To see this package in action, load it and then modify the SAMPLES::TEMPDRIVE and SAMPLES::TEMPFOLDER to point to the location where you want to drop files. Run the package and drop a file or create a new one in the directory you specify. The task returns when it receives the event. WMI Event Watcher Task PeculiaritiesThe WMI Event Watcher Task generates custom events that can be handled by event handlers. To see this, select the WMI Event Watcher Task and then click the Event Handlers tab. Next, click on the Event Handler drop down. Notice that there are two nonstandard events listed there: WMIEventWatcherEventOccurred and WMIEventWatcherEventTimedOut. Another interesting peculiarity with the WMI Event Watcher Task is that it can execute once, multiple times, or forever depending on how you configure it. It's possible to configure it to raise the event each time it receives the WMI event and then continue executing.
Web Services TaskWeb services is a technology designed to aid in the distribution and sharing of information by connecting disparate, standalone, and remote systems. There are web services that provide monetary exchange rates, credit card validation, stock quotes, weather information, nucleotide sequences, measurement and temperature conversions, document searches and delivery, web searches, and many more. The Web Services Task makes it possible to tap into these and other web services resources. The WebService.dtsx package in the S08-StockTasks sample solution uses a web service to retrieve the stock price for a given company. This is a simple example of the kinds of web services that are available. The Web Services Task is installed with Integration Services and it should not need any additional settings or configuration. You do, of course, need an Internet connection to use it. Setting Up the Web Services TaskTo set up the Web Services Task, first create an HTTP connection. Figure 8.21 shows the HTTP Connection Manager UI with the correct URL specified for the delayed stock quote service. The URL for the connection should point to the web services URL, which typically takes the following form: http://ws.domain.com/servicename/servicename.asmx?wsdl Figure 8.21. The Web Services Task requires an HTTP Connection Manager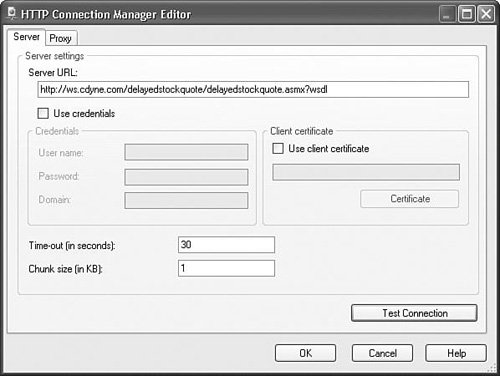 This web service does not require credentials or a certificate. If you're using a proxy that requires credentials, you can enter those on the Proxy tab. To ensure that the package can correctly find the WSDL files, the WSDLFile property has a property expression that builds the path to the files in the SAMPLES folder. The property expression that builds the path to the stock quote web service is as follows: @[SAMPLES::ROOTWD] + "\\SampleData\\StockQuotes.wsdl" If you've correctly configured the ROOTWD variable with the environment variable configuration, the package finds the WSDL automatically. Initially Retrieving the WSDL FileA button on the Web Services Task UI on the General tab allows you to download the WSDL file. To enable the Download WSDL button, type the fully qualified name that you want to use for the file in the WSDLFile property and press the Enter button. This enables the Download WSDL button. If the OverwriteWSDLFile property is set to TRUE, clicking the DownloadWSDL button downloads the WSDL file to the location you specified in the WSDLFile property. After you enter the WSDLFile and HTTP connection, as shown in Figure 8.22, you need to give input on the Input tab. The contents of the Input tab change based on the web methods available for the web service. A web service can provide more than one service, so the service property allows you to select which service you want to use. Figure 8.22. Specify the HTTP Connection Manager and WSDL on the General tab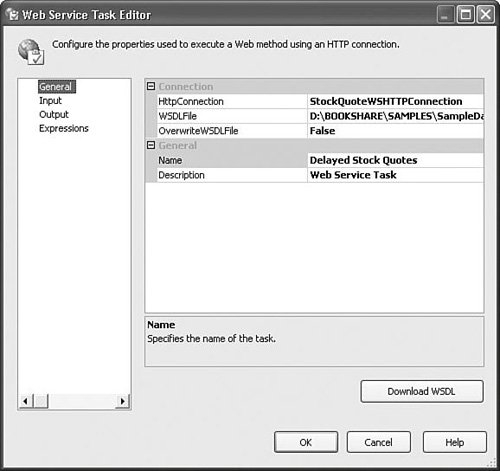 In the delayed stock quote example shown in Figure 8.23, only one is available, the DelayedStockQuote service. Four methods are available for this service. The sample uses the GetQuote method. As the method changes, the method selection also changes to reflect the parameters required for the method you've selected. In the sample, MSFT is entered to see how flat the Microsoft stock curve is. This web service requires a zero for the LicenseKey for trial users. Figure 8.23. Specify the service, method, and parameters on the Input tab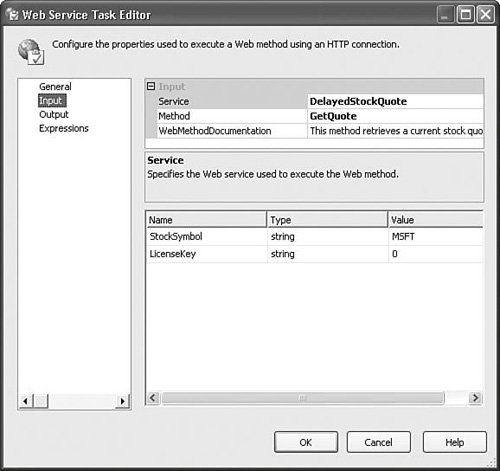 The Output tab provides a way to store the results of the Web Method invocation to a file or an SSIS variable. If the output type is set to Variable, the second property is named Variable and allows you to either pick an existing SSIS variable or create a new one to hold the results. If the output type is File Connection, the second property is named File and allows you to select an existing file connection or create a new one. When executed, the sample package executes the Web Services Task, retrieves the quote, loads it into a variable called SAMPLES::STOCKQUOTE, and then uses a Script Task to parse the returned XML stored in the variable to get the quote. Passing ParametersThe Web Services Task does not provide a way to dynamically provide parameters for the web method via variables or property expressions. This was an unfortunate oversight by Microsoft and will likely be fixed in the next service pack. For the immediate future, parameters must be entered directly.
Execute Package TaskThe Execute Package Task is conceptually very simple. Its primary purpose is to execute other packages. However, this simplicity belies the importance of the task because it can be used to reduce complexity and simplify solutions. In any complex system, the key to understanding the entire system is to understand its constituent parts in decreasingly complex chunks. Likewise, the Execute Package Task can be used to break down complex packages into simpler, more comprehensible packages, thus reducing the overall complexity of the entire system.
The Execute Package Task is installed with Integration Services. To use this task, you need only have a child package to execute. Setting Up the Execute Package TaskThe key setting for this task is the Location property on the Package tab. The Execute Package Task can execute packages stored in SQL Server 2005 instances or on the file system. Select the location from which to load the package. If you select File System, you'll need to create a File Connection Manager to point to the package file. If you select SQL Server, use an existing OLEDB Connection Manager or create a new one to load it. The Password property can be used to store the password for the child package if it has been saved with one of the Encrypt with Password package-protection options. Caution Microsoft felt it was important to protect the sensitive data often stored in packages and decided to only perform SQL Server operations when using an encrypted channel. Integration Services does not support saving packages to SQL Server 2000 because it does not provide connections with an encrypted channel. Therefore, if you attempt to connect to a SQL Server 2000 instance, it fails with the following error:
This can be fairly difficult to diagnose, especially if you're running instances of SQL Server 2000 or earlier versions on the same machine. If you see this error while attempting to enumerate the packages on the server, double-check that the instance you're pointing to is indeed a SQL Server 2005 instance. Figure 8.24 shows the Execute Package Task UI open with the Select Package dialog box open. The packages shown in the Select Package dialog box are stored in SQL Server in MSDB in the sysdtspackages90 table. Figure 8.24. You can execute packages on the file system as well as in MSDB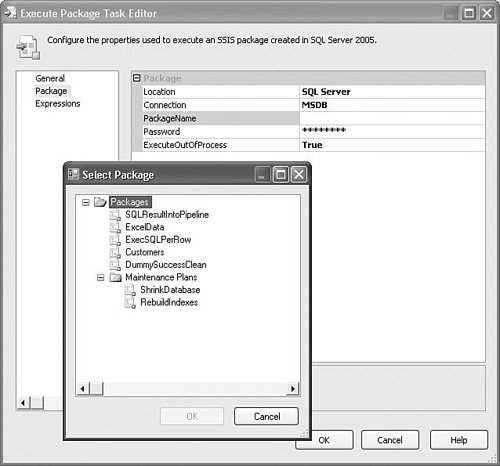 You can also execute maintenance plan packages with the Execute Package Task. These are packages you create in the Database Maintenance Editor in SQL Server Management Studio. The Select Package dialog box shows the Maintenance Plan packages as well, which are also stored in the sysdtspackages90 table.
Tip You should be careful how you set up your package-protection options. If you set the parent package-protection option to Do Not Save Sensitive and the child package-protection option is one of the two Save with Password options, the parent package will be unable to execute the child package. This is because the parent package stores the password of the child package as part of the Execute Package Task information. But, with the Do Not Save Sensitive package-protection option, which is the default, the parent package will lose the password and will be unable to open the child package successfully. Other interesting and problematic settings are also possible, such as when executing packages stored with a user key, and so on. Pay close attention to the package-protection option. If the parent package cannot open the child package, chances are you've got a conflicting package-protection option setting. Executing Out of ProcessThe ExecuteOutOfProcess property tells IS to run the package in a host process outside of the parent package process. When run out of process, the package is hosted in dtshost.exe. While running a package out of process, you might see one or more dtshost.exe processes in the Windows Task Manager. The advantage of running out of process is more available memory for the package. All packages running in the same process must share the same 2GB of memory on 32-bit systems. Running out of process, the full 2GB of memory is available for the single package. The decision about whether to execute the child package in process or out of process should really be made based on whether you're using child packages to reduce complexity as described previously or to gain some memory space for the child packages. If you're using child packages to better structure your solution and eliminate complexity, executing in process is likely the better choice. However, if your child packages are memory intensive, for example, they contain Data Flow Tasks that perform memory-intense operations, such as sorts, aggregations, or lookups, running out of process might be the right choice. Caution If you have multiple Execute Package Tasks in a package, you have the option of running the package without the debugging environment of the Business Intelligence Development Studio if you don't need to set breakpoints or use watches. A lot is going on in the designer when you debug a package. The designer launches debugging windows and manages breakpoints, for example. For each child package, the designer creates another window to display the child package. This increases the load on the designer and slows it down. You can execute the package without debugging by using the Start Without Debugging menu item or by pressing [Ctrl+F5]. This executes the package using dtexec instead and eliminates much of the designer overhead. The ExecPackage.dtsx sample package in the S08-StockTasks sample solution executes a child package stored in the SAMPLES\SampleData folder called SimplePackage.dtsx. The child package shows a string that it receives via a parent package configuration. The parent package references the child package with a file connection manager with a property expression that builds the folder and package file name. Note that the value of the SAMPLES::ParentVariableValue variable is "default," but when the Script Task shows the value of that variable, it has changed to whatever the value of the SAMPLES::ParentVariable is when you execute the parent package. Change the value of the SAMPLES::ParentVariable and watch the value change in the message box. This is a simple example of how to set up the Execute Package Task and use parent package configurations to pass in parent package variables such as parameters to the child package.
Execute Process TaskThe Execute Process Task provides a way for the package to launch a process, pass parameters to the process, and return the results to the package. Although it can be used to launch applications with a graphical user interface, it is generally used to execute batch files or command-line utilities such as the command-based script host cscript.exe because packages typically run in the back office without any human intervention. The stock tasks covered here generally provide the gamut of features required for a large percentage of workflow and ETL processing requirements, but occasionally it's nice to have a way to use system utilities to accomplish tasks that IS doesn't directly support. The Execute Process Task provides the simple means to do this while capturing the results for use in the package. Setting Up the Execute Process TaskThis is one of the simpler tasks to configure because it's really just a matter of entering the same commands that you'd type on the command line were you to execute the utility there. The twist is that the task provides a way to enter the parameters, working directory, and arguments separately from the executable. This gives some flexibility for entering the parameters and makes it possible to use property expressions to populate the settings. The standard and error output results of the utility can be captured in IS variables by specifying a variable of type string in the StandardOutputVariable and StandardErrorVariable properties. This way, whatever output you would normally see from the utility in the command prompt gets captured in the variables you specify. If the utility fails, chances are the error output will contain information about the failure. If the program requires input, it can also be provided via the StandardInputVariable property. If the utility you're launching takes input from the command-line prompt, this property can be used to provide it. For example, some utilities take the output of one command-line utility and process it; findstr is a good example of this. The task also has a way of detecting whether the command line succeeded. Most command-line utilities return an error level of zero for success and numbers greater than zero for failure, but you can't count on that. A few even document what their error levels are, but generally you're left to guess. The following simple batch file shows the error level for a utility given different inputs and can be found in the Samples\Script folder on the CD. @ECHO OFF %1 %2 ECHO ======================== ECHO The Error level was : %errorlevel% ECHO ======================== Type this into a .bat or .cmd file named ErrorLevelBatchFile.bat and then launch it, passing the name of the utility and a parameter similar to the following: ErrorLevelBatchFile Dir X:\ There isn't an X: drive on the example machine, so the batch file prints out: The system cannot find the path specified. . ======================== The Error level was : 1 ======================== This is a quick-and-dirty way to find out what the success and some of the failure error levels are for StandardOutputVariable and a command-line utility. Obviously, if the utility adequately documents the error levels, that's even better. The Sample PackageFigure 8.25 shows the Execute Process Task as it is configured in the sample package provided in the S08 sample solution. The sample uses a utility that is available on Windows called systeminfo.exe. When diagnosing problems with packages, it's often helpful to have information about the machine on which the package was executed. This information can be sent to logs as part of the error-handling processing for failed packages or tasks or just as part of the regular preexecution processing for all packages as a sort of package execution header. The systeminfo utility does a quick job of gathering information about the machine that includes germane points, such as operating system details, chipset, BIOS, hot fixes installed, virtual and available memory statistics, domain and user details, as well as other important system information. Figure 8.25. The Execute Process Task executes command-line utilities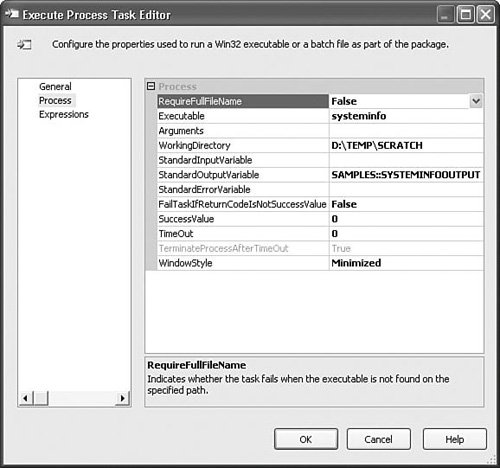 The sample package executes the systeminfo utility and then captures the results in a variable called SYSTEMINFOOUTPUT. The next Execute Process Task passes those results into the findstr utility, which filters the input to find the registered owner and organization entries returned from the systeminfo utility and captures the results in the variable called FINDSTROUTPUT. Then, using a Script Task, the package logs the information to the configured log text file and shows the information in a message box. Make sure you have the SSISSAMPLESWORKINGFOLDER environment variable correct. The folder to which it points is where the log file will be created. This pattern can be reused in your packages to capture machine information that's useful for postmortem analysis of failed packages or simply to document where packages are running. It's a nice way to get information because it's real time and will always be up to date and accurate, even if the package is executed on different machines. One way to use it in your packages is to create an OnPreExecute event handler with an Execute Package Task that calls this package. Also, you can adjust the package to suit your needs. Perhaps you don't want all the information that systeminfo provides so you can change the findstr command to include more or different information or simply eliminate it altogether and log all the information. If you do incorporate the package into your packages, make sure you remove the line of code in the Script Task that shows the message box and configure the child package to use the parent package log settings. Using this pattern, all your packages can self-document the environment on which they're running. Tip The sample package illustrates one way you can link multiple Execute Package Tasks together to accomplish functionality on par with that provided by a custom task or Script Task. If you're thinking of using a Script Task to accomplish something, look around to see if there isn't a command-line utility that already does what you want. In general, the less coding you have in your package, the easier it will be to understand and manage.
The Execute SQL TaskThe Execute SQL Task, or SQL Task for short, provides a way to execute SQL script or stored procedures against SQL Server or other databases. The SQL Task is commonly used to build tables, query data or metadata, execute DDL commands, and to insert and delete data in preparation for other data operations like the bulk insert or Data Flow Tasks. The SQL Task can pass input and output parameters to SQL script and stored procedures and capture the results in variables. Caution The Execute SQL Task does not support every type of query available in the source database. For example, OPENROWSET BULK statements that execute without error in SQL Server Management Studio will fail with an error in the SQL Task. You need to have access to either a database or an Excel file to use the SQL Task, which connects to databases or other data sources through various connection manager types. Setting Up the Execute SQL TaskFigure 8.26 shows the settings for the SQL Task in the ExecSQL.dtsx sample package in the S08 sample solution that does a simple join between two tables in the AdventureWorks sample database. Figure 8.26. The Execute SQL Task General tab is where you input the SQL script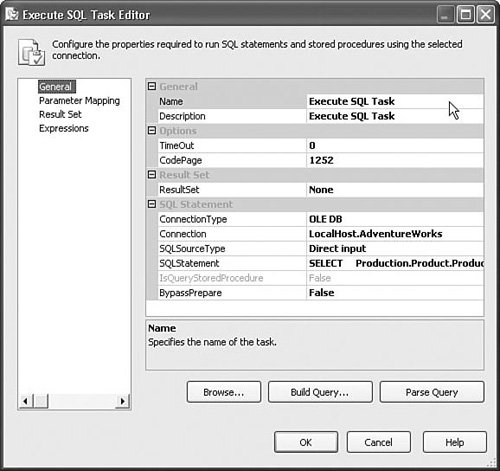 The General tab contains the most commonly used and mandatory settings. This is where you input the SQL script and other important properties. Table 8.7 details the important settings on the General tab.
Tip If you're attempting to retrieve the resultset from the SQL Task in managed code, it will likely be an exercise in frustration because the SQL Task has some portions written in native code, particularly those parts that deal with native data access layers like OLEDB and ODBC and will return native ADO recordsets when using those native connection types. If you want to have a managed dataset returned, use the ADO.NET Connection Manager type, which returns a managed type and can be manipulated easily in the Script Task or other component written in managed code. The Browse button allows you to search for a SQL script file to open. When you select a file with SQL script using this method, the SQL Task UI opens the file and retrieves the entire contents into the SQLStatement property. Consequently, this method only works when opening files with nothing but valid SQL script or if you modify the script after reading it in to make it correct. The Build Query button opens the query designer. Figure 8.27 shows the query designer with the query from the ExecSQL.dtsx sample package. In this environment, you can add tables, draw relationships between them for joins, choose columns to select, and test your queries. Figure 8.27. The query designer makes it easy to build SQL queries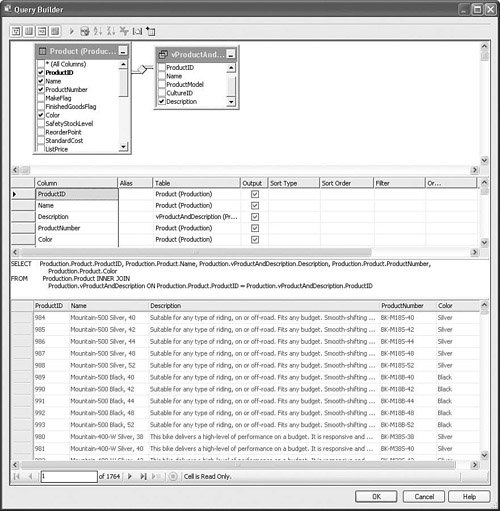 The Parse Query button is a quick way to check that the query is valid. This button is only useful if the connection type is OLEDB and BypassPrepare is set to FALSE because the feature uses the prepare function of OLEDB to perform the parse. The parse does not have side effects. In other words, it only parses the statement; it does not execute it. It's possible to successfully run the SQL Task with only the General tab settings configured and, in some cases, such as when you're creating tables or inserting data, it is sufficient. However, if you want to retrieve rows of data or pass in parameters to queries or stored procedures, you need to configure the other tabs as well. Mapping ParametersMapping parameters has been a stumbling block for many users. It can be confusing. The biggest problem is the format. Depending on the connection manager type the SQL Task uses, the format of the parameters changes. Another problem is that there are some elements of the query that can be parameterized and some that cannot and it's not always clear how to distinguish between the two. ANSI-SQL allows only certain elements to be parameterized. Metadata structures such as column names and table names cannot be parameterized, only those elements that are the equivalent of constants. If you attempt to parameterize a query, you might get an error similar to the following:
Chances are good that you've attempted to parameterize an element that is not supported by SQL. Integration Services provides two ways of performing parameter substitution. The first is the traditional method using parameter markers, such as the ? character to mark where the parameter should be inserted, which is limited by the ANSI-SQL substitution rules noted previously. For those cases in which you want more flexibility in building queries, you can use property expressions to perform the parameter substitutions, building the query as a string. The SQL Task does no parsing of the query. It simply passes the query string and the parameters, if provided, along to the data access layer underlying the connection manager. Therefore, the formats for parameters are based on the connection type. The formats for each connection manager type are detailed in Table 8.8.
The sample package ExecSQL.dtsx in the S08-StockTasks solution shows how to set up the SQL Task for each of the connection types in Table 8.8. As you can see, the way you set up the parameter replacements for each of the different connection manager types is quite different. Notice that all the data access layers except ADO.NET use '?' as the parameter marker and that the OLEDB parameter names start with 0 as the first name, whereas ODBC starts with 1. This is why people get confused. Hopefully, this scheme is simplified in the next release of the SQL Task. For calling stored procedures, the setup is almost identical with the exceptions that for ADO.NET connection types, you do not specify the parameter markers in the query and you set the IsQueryStoredProcedure property to trUE. The sample package queries the AdventureWorks sample database using replacement parameters stored in the SAMPLES::DESCRIPTIONMATCH and SAMPLES::NAMEMATCH variables. The results are placed into a collection that the Foreach Loop enumerates and the values are placed in the SYSTEM::PRODUCTNAME and SYSTEM::PRODUCTDESCRIPTION local variables, which the Script Task picks up and displays in a message box. This sample package is not intended to demonstrate best practices, but rather to illustrate how to configure the SQL Task to use parameters with the different connection manager types. You can change the values of the input variables and otherwise modify the package to learn a little more about how parameterized queries work in the SQL Task.
Caution You should be aware that the default transaction isolation level for the SQL Task is serializable. This level creates the greatest isolation from other transactions and is the safest. However, this is different than the DTS default, which was Read Committed, which is more performant but not as safe. The decision to make the default serializable was in the interest of defaulting to the safest level. If you experience performance degradation in your queries from what you saw in DTS, you might try changing this setting to see the benefits.
|

EAN: 2147483647
Pages: 200