11.4. Working with Shapes Word's Shapes don't have SmartArt's IQ, but they're much more flexible. SmartArt knows what it wants to do and can be stubborn if you try to change its ways. Shapes let you push and pull them into just about any size or shape. The drawback with shapes is that you must insert, position, and format each one individually. To open the Shapes menu, choose Insert  Illustrations Shapes or use the shortcut Alt+N, SH. You see dozens of shapes, arrows, lines, and icons. Down at the very bottom of the menu you find the New Drawing Canvas command. The drawing canvas is a rectangular work area where you can arrange several shapes, and then treat them like a single graphic. If youre inserting a single shape, you can simply insert it, format it, and then flow the text around it. If you're working with several shapes, it's better to place a drawing canvas in your document, and then work with your shapes on the canvas. That way, you can have your text flow around the entire canvas instead of fine-tuning it to flow around several individual shapes. Illustrations Shapes or use the shortcut Alt+N, SH. You see dozens of shapes, arrows, lines, and icons. Down at the very bottom of the menu you find the New Drawing Canvas command. The drawing canvas is a rectangular work area where you can arrange several shapes, and then treat them like a single graphic. If youre inserting a single shape, you can simply insert it, format it, and then flow the text around it. If you're working with several shapes, it's better to place a drawing canvas in your document, and then work with your shapes on the canvas. That way, you can have your text flow around the entire canvas instead of fine-tuning it to flow around several individual shapes. In the following tutorial, you'll place a canvas in your document and add shapes to it. In the process, you'll explore some of the myriad possibilities for positioning, sizing, and formatting shapes. -
Position the insertion point in your document where you want to place the canvas . It works best if you have the insertion point on a blank line because Word initially creates a canvas that runs from margin to margin. -
Choose Insert Illustrations Shapes New Drawing Canvas, or use the keyboard shortcut is Alt+N, SHN . The drawing canvas appears in your documenta large rectangle bounded by a dashed line and solid black resize handles at the corners and the middle of each side. When you pass the mouse over the canvas, it turns into a clear arrow instead of an insertion point. -
If you wish, click a corner or edge to resize the drawing canvas . If the edges of your canvas aren't visible, click anywhere on the colored area of the canvas to select it. When you hold the mouse cursor over one of the resize handles, the cursor changes shape, indicating that you can drag. If you hold the cursor over one of the canvas borders without resize controls, it turns into a cross with arrows pointing in four directionsso you can drag the entire canvas to move it. -
Open the Format Drawing Canvas dialog box . You can open the Format Drawing Canvas box three different ways. Right-click the canvas, and then choose Format Drawing Canvas from the shortcut menu. Press the keyboard shortcut Alt+JD, FA, or go to Drawing Tools Format Shape Styles Advanced Tools. The Format Drawing canvas box has tabs along the top, labeled Colors and Lines, Size, Layout, and Alt Text. For now, you use the first tab to change the canvas's color and transparency.
Tip: You can ignore the Alt Text tab unless your Word document is destined to become a Web page (Chapter 13). It lets you add some text describing the image. Folks who have images turned off in their Web browser see this text instead, and so get an idea of what the image shows. Alt text also benefits visually impaired people whose browsers read Web page text aloud .
-
On the Color and Lines tab, in the Fill section, choose a color for the canvas, and then set its transparency so that text or other objects show through the canvas . The Fill Effects button leads to yet another dialog box where you can adjust the shading and the gradations of color for your canvas (Figure 11-17). -
When you're through, click OK to close the dialog box, and then return to your document . 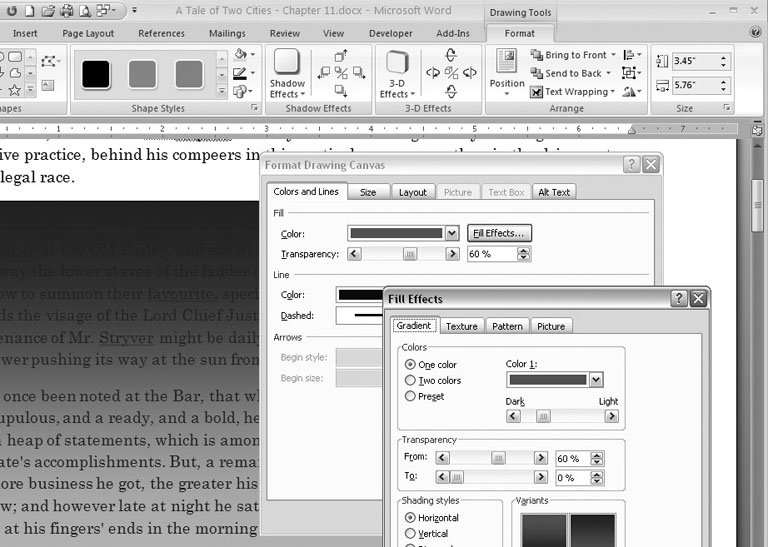 | Figure 11-17. You use nearly identical tools to format the drawing canvas and the shapes that you insert into your documents. Once you're comfortable working with colors, borders, and transparency for the canvas, you can apply everything you know to the shapes and lines in your graphics. Other formatting tabs let you specify the canvas's size and position and the way that text wraps around the object. | | -
Go to Insert Shapes and click to choose a shape (Figure 11-18) . On the Drawing Tools ribbon, use the scroll buttons to see more shapes, or click the button at bottom to see them all at once on a menu. -
Drag on the canvas to position and size the shape on the canvas . After clicking one of the shapes, click somewhere on your canvas, and then press the mouse button as you drag diagonally across the canvas. You see an outline of the shape drawn on the canvas as you drag the mouse. When it's roughly the size and shape you want, release the mouse button. If you want to move or resize the shape, you need to click to select it. When the shape is selected, handles appear around the edges. The handles for different shapes can have slightly different functions, but controlling them is very similar. Drag the corner or edge handles to resize the shapes. The handle sprouting out from the top is used to rotate the shape; just drag to spin the shape around.
Tip: You may also see diamond-shaped handles on a shape. These handles have special functions depending on the shape. For example, on a rectangle, they let you round the corners. Don't be afraid to experiment and try out all the handles. You can always get back to square one with the wonderful Ctrl+Z undo keystroke.
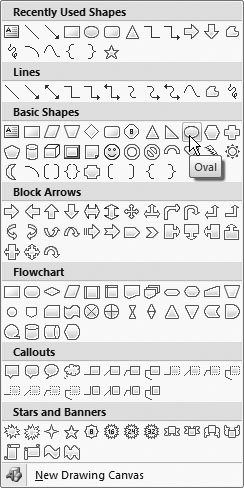 | Figure 11-18. On the Shapes menu, click to choose one of the shapes, and then drag to create a drawing canvas. The selected shape appears on the drawing canvas in your document. You can add other shapes to the canvas. For example, you can create an organizational chart using a combination of boxes and arrows. | | -
To add color to the shape, go to Drawing Tools Format Shape Styles and choose a style . The quickest way to apply formatting to shapes, lines, and your drawing canvas is with one of the Shape Styles shown on the Drawing Tools ribbon. Seventy variations are available using your documents Theme colors with different borders and shades. When you click one of them, Word applies the formatting to the selected shape. As an alternative, you can add color, borders, and shades to your shapes just like you formatted the canvas using a dialog box. In fact, you can use the same command (Drawing Tools Format Shape Styles Advanced Tools) or shortcut (Alt+JD, FA) to open the Format AutoShape box. Next, you'll add a second shape and shape-adjust its position with the Send to Back and Bring to Front commands. -
Choose a different shape from the Insert Shapes menu. Drag to place it on the canvas, making sure that it overlaps the first shape . Notice that each shape exists on its own layer. It's like placing one piece of paper on top of another. Every time you add a shape or a line to your drawing, Word puts it on a layer above the existing shapes. You can change the layer order of your shapes using the commands in the Drawing Tools Format Arrange group . Under the Bring to Front and Send to Back drop-down menus , several variations let you move the selected shape one layer at a time or to the top or bottom of the heap. Next, you'll draw a line between the two shapes. -
Choose one of the lines from the Insert Shapes palette (it doesn't matter if it has arrows on the end or not) . The cursor changes to a cross, but when you hold it over one of the shapes, it changes, looking a little more like a crosshair, and the shape shows handles at the edges. -
Click one of the shape handles to attach one end of your line to that shape. Click a blank spot on the canvas to place the other end of the line anywhere that's not connected to one of the shapes . Lines have some special talents. They can be independent, just like any of the shapes, or they can connect to a shape on either end. Word provides visual hints as you're drawing to let you know exactly how the line will behave. Now, if you move the shape, you see the line stays attached and moves along with the shape. The unattached end of the line moves freely . When you click to select the line, handles appear in the middle and on both ends. You can move the line by clicking just about anywhere except the ends and dragging it. You see the familiar move icon that looks like a cross with four arrows. Hold the cursor over one of the end handles, and the cursor changes to the cross without the arrows (Figure 11-19). -
Click the line's free end handle and drag it over to one of the handles on the other shape . Word attaches the line to the shape. With the line attached to the two shapes, you can move the shapes around the canvas, and the line shrinks, grows, and repositions itself to remain attached to both shapes. -
Format the line using the tools of your choice . Lines don't have to be dull black affairs. You can format lines using the same tools and commands that you use for the other shapes. You can apply Shape Styles (Drawing Tools Format Shape Styles), or you can fine-tune the formatting with the Format AutoShape box (Alt+JD, FA). 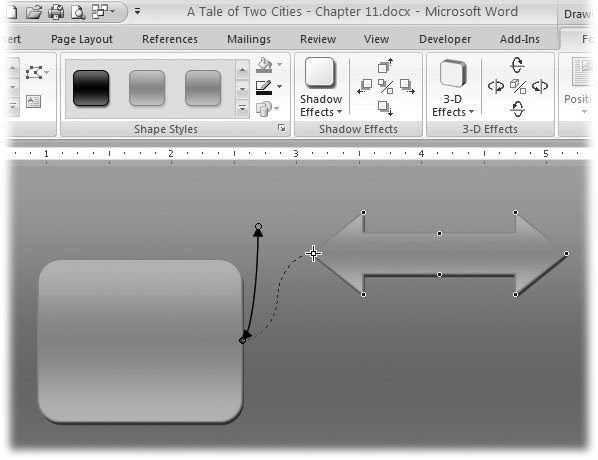 | Figure 11-19. Lines have some pretty clever AutoShape behaviors. When you attach lines to the handles of shapes, they'll stay attached even when you move the objects around the drawing canvas. This makes it easy to create organizational charts and other graphics that show relationships. | | At this point you have three objects, each on its own layer above or below the other objects. The line connects one shape to another and stays connected if you move either object. Sometimes when you're working on more complicated graphics, it's helpful to group several objects together as if they're a single object. Next, you'll group the drawings and the line. -
Click to select one of the shapes. In turn , Ctrl+click the line, and then Ctrl+click the second shape . With each click, selection handles appear on the shapes and the line. -
With all three objects selected, go to Drawing Tools Format Arrange Group Group . Now instead of lots of little handles, the trio of shapes and lines sport a simplified set of handles. You can position, size, and rotate the three objects as one. When you select the group as a unit, you can also apply formatting commands such as color to all the objects at once. If you want to apply formatting to just one of the objects, select the group first, and then click to select the object within the group. -
Go to Drawing Tools Format Arrange Text Wrapping or Alt+JD, TW and set the text wrapping behavior for the canvas and drawings . Several options are available for wrapping text around your graphics or around the canvas. The different commands let you position the drawing above or below the text and choose how tightly the text wraps around the shapes or the canvas. Figure 11-20 explains how Word decides what to wrap the text around. 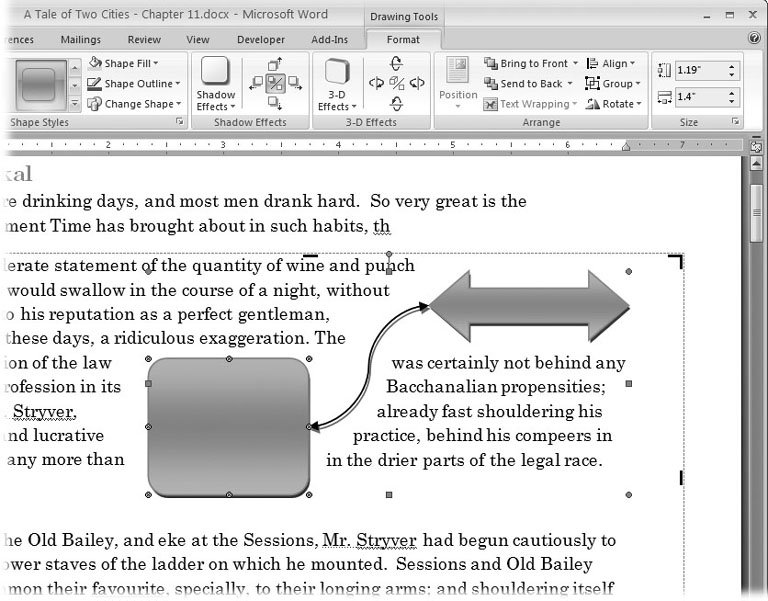 | Figure 11-20. If your shape isn't on a canvas or if you didn't apply color to the canvas, you can choose to wrap the text tightly around the shapes. If your graphics are on a canvas with a color fill, the text wrap commands apply to the entire canvas. | |
|