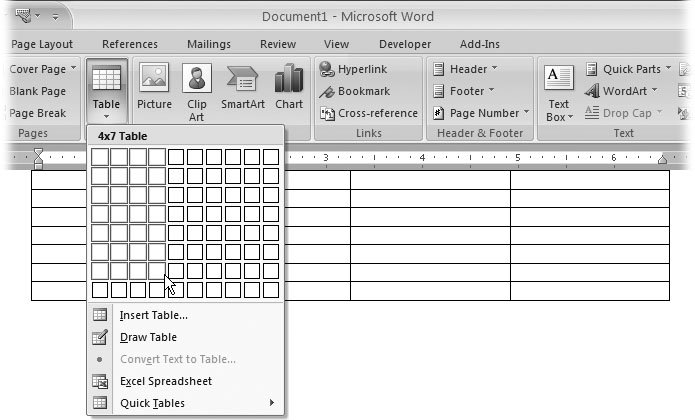
10.1. Creating Tables If you've never created a table in a Word document before, don't worryit's remarkably easy and even fun, especially if you use the drawing-with-the-mouse method. You can create tables by: 10.1.1. Creating a Table from the Ribbon As always, the ribbon approach to the job is very visual, and it may seem vaguely familiar. It's a variation on the way you'd create tables in the last few versions of Word, where you'd click a button and drag out a grid that represented the table. Word's new method is even a little easier for newcomers to grasp. The drop-down menu presents a 10 x 8 grid. You click to select the number of boxes you want in your table, as shown in Figure 10-1.
Note: A column is a group of cells running vertically, while a row is group of cells that run horizontally.
-
On the ribbon, choose Insert  Tables Table . Tables Table . A menu appears with what looks sort of like a bunch of boxes or a piece of graph paper (Figure 10-1). -
Point to a box on the grid to create a table with the number of rows and columns you want . As you move your mouse over the grid, the boxes in the grid are highlighted, and you see the table appear on your page. (Tables use Microsoft's Live Preview feature that shows you what will happen if you click the mouse button.) A message above the grid on the menu keeps tally of the number of columns and rows. You don't have to be exact; it's easy enough to create or delete columns and rows later. -
Click the grid to create the table and place it in your document for real . The Tables menu disappears, and your table is right there in your document with evenly spaced columns and rows. 10.1.2. Using the Insert Table Box The Insert Table dialog box is a more traditionaland boringway to create a table. Choose Alt+N, TI to open the Insert Table box (Figure 10-2). The box is a simple affair. Just type numbers in the text boxes at the top for the columns and rows you need in your table. This dialog box also lets you choose the AutoFit behavior, as explained below: -
Fixed column width . Use this option if you want to limit columns to a specific width. Enter a number in the box next to this option to set the width of the columns. Or, if you choose Auto instead, Word creates a table that fits in your current margins, with the number of columns specified above, each of equal width. -
AutoFit to contents . With this option, the column width adjusts automatically to accommodate the amount of text you type in the cells. Use this option if you're not sure how much space your text will take up until you type it. -
AutoFit to window . This option is more suited to Web pages than printed documents. It makes the table expand and contract to fit a browser window. Web pages are designed to work on all different types of computers, PDAs, cell phones, TV sets, and who- knows -what in the future. AutoFit tables like these help Web designers create pages that work for screens and browsers with dramatically different capabilities. If you're going to create similar tables in the future, turn on the "Remember dimensions for new tables" checkbox, and Word keeps the settings in the Insert Table box for your next visit. 10.1.3. Drawing a Table As you can guess, the least mechanical and most creative way to make a table is to draw your own. It's a great technique if you need an irregularly shaped table. With Word's table tools you can draw tables, and divide them into columns and rows in just about any configuration imaginable. As you can see from Figure 10-3, you can do just about anything except make a curve. Here's how to use the table drawing tools to draw a fairly traditional table: -
Choose Insert Tables Table Draw Table . Your mouse cursor changes into a pencil, inviting you to start drawing.  | Figure 10-2. The Insert Table box gives you a more traditional but less artistic way to create tables. The advantage of using this box is that you can specify exact column widths for precise layout. The AutoFit to window option is helpful if your document is going to end up as a Web page. | | 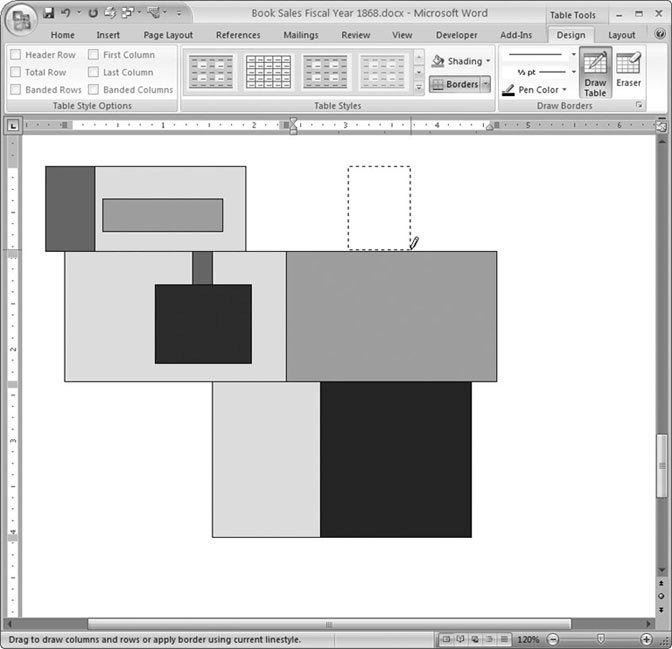 | Figure 10-3. You may be surprised how flexible tables are, especially if you use the Draw Table option (Alt+N, TD). Using the cell shading and border tools, tables become strong graphic elements in your document. | | -
On an empty place on the page, drag diagonally to draw your first rectangle (Figure 10-4) . The rectangle that appears on your page marks the borders for your table. Soon you'll divvy it up, creating columns and rows inside. Word adds paragraphs, adjusts margins, and generally does whatever's necessary to place your table exactly where you draw it. The moment you release the mouse button, the Table Tools contextual tab appears on the right side of the ribbon. Two tabs appear in this contextual tab: Design and Layout. You're now on the Design tab, where you see tools for formatting your table. On the right side, the Draw Table button is highlighted, indicating that you're in Draw Table mode. -
Next, drag to draw a vertical line to divide your table in half . Your line separates the table into two cells. You can draw lines wherever you want to divide your table into cells of just about any shape. When you drag diagonally, you create rectangles instead of lines. Rectangles turn into cells, or if they're far enough from the original table, they're new tables. Experiment to get a feeling for creating tables and cells. If you make an error, undo it with Ctrl+Z. Next to the Draw Table button you find an Eraser button (Table Tools Design Draw Borders Eraser or Alt+JT, E). If you click the button to highlight the eraser, then your mouse cursor changes to an eraser icon. Dragging it over lines in your table erases them. -
When you're done, click the Draw Table button (on the right side of the ribbon), to turn off the Draw Table mode . The Draw Table button loses its highlight glow, and the cursor changes from the pencil back to its familiar I-beam.
Note: Drawing a table is actually a lot simpler to do than it sounds; for a screencastan online, animated tutorialof the steps you've just read, head over to the "Missing CD" page at www.missingmanuals.com.
10.1.4. Choosing Quick Tables If three ways to create tables aren't enough, you can always choose from one of Word's predesigned tables. Choose Insert Tables Quick Tables to see a menu full of pre-rolled tables that you can drop into your documents. The choices range from calendars to periodic tables (Figure 10-5). Of course, you dont have to keep the content that Microsoft's put in there. If you like the look of one of the tables, you can always insert it and then delete the text and fill the space with your own words and graphics. 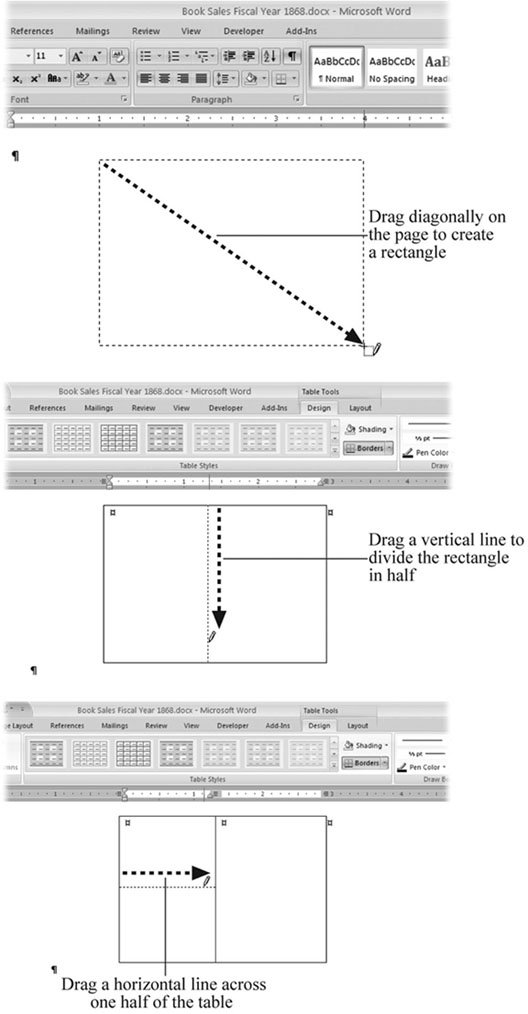 | Figure 10-4. Top: First click and then drag the pencil cursor diagonally across the page to create the table.
Middle: Click at the top of your table, and then drag down to draw a line that divides the table into two cells.
Bottom: Draw another line from the left side to the center to create two rows on the left. | |
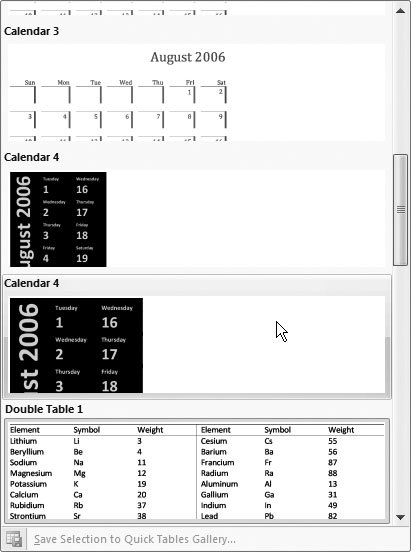 | Figure 10-5. If you're in a hurry, you can choose one of the predesigned Quick Tables (Alt+N, TT). The large menu gives you a good view of the different tables available. Once it's in your document, you can edit it and alter it for your own purposes. | |
|