3.7. Hyphenation Without hyphenation, if a word is too long to fit on the line, Word moves it down to the beginning of the next line. If a word is particularly long, it can leave some pretty big gaps at the end of the line. Justified text is aligned on both the left and right margins, like most of the text in this book. If you have justified text and no hyphenation, you often get large, distracting gaps between words, where Word is trying to spread out the text along the line. When used properly, hyphenation helps make text more attractive on the page and easier to read. In most cases, you can relax and let Word handle the hyphenating. You just have to choose one of three basic hyphenation styles from the Page Layout  Page Setup Hyphenation menu (Alt+P, H), as shown in Figure 3-22: Page Setup Hyphenation menu (Alt+P, H), as shown in Figure 3-22: -
None . No hyphenation at all. For informal letters , first drafts, and many reports , you may choose not to use hyphenation. It's a good-looking choice for documents that have fairly long lines (60 to 80 characters ) and left-aligned text. -
Automatic . Word makes hyphenation decisions based on some simple rules that you provide. Consider using automatic hyphenation for documents that have line lengths of about 50 characters or less, including documents that use newspaper-style columns . -
Manual . In this scheme, Word asks you about each word it wants to hyphenate, giving you the final decision. Use manual hyphenation when you need to be particularly scrupulous about your grammar and when you need to be certain that you don't hyphenate a company name, a person's name , or some other equally important word. 3.7.1. Automatic Hyphenation It's easy to turn on automatic hyphenation. Just choose Page Layout Page Setup Hyphenation (or press Alt+P, H). Still, you may want to assert some control over how and when Word uses hyphenation. To do that, open the Hyphenation box (Figure 3-23) by choosing Page Layout Page Setup Hyphenation Hyphenation Options (Alt+P, HH). This box has two important options that let you control hyphenation: 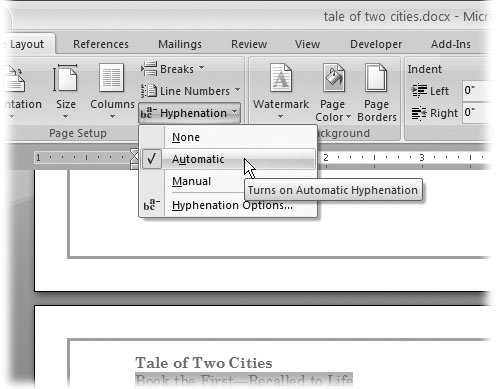 | Figure 3-22. Choose Automatic from the hyphenation menu, and Word takes care of all hyphenation decisions. Word's hyphenation feature works quite well and usually needs no help from you. | |
UP TO SPEED
Hyphenation Rules of Thumb | | Hyphenation rules are notoriously complicated, and, to make matters worse , they change by language and country. For example, Americans and British hyphenate differently. Still, you should follow these basic rules of thumb: -
Use hyphenation with documents that have shorter lines . A document that uses two or three columns on the page needs hyphenation to avoid large gaps in the text. -
Use hyphenation with justified text . Justified text, which is aligned on both the left and right margins, makes documents look formal and tidybut not if big gaps appear between letters and words. Avoid those gaps by letting Word hyphenate your justified text. -
Avoid hyphenating company names and proper names . Most people don't like to have their name messed with, and your boss feels the same way about the company name. Use manual hyphenation (covered on the following page) to prevent Word from dividing certain words. -
Avoid hyphenating more than two lines in a row . According to many standard style guides, it's wrong to use hyphenation on more than two consecutive lines. Use manual hyphenation to remove a hyphen if you see too many in a row. -
Avoid overusing hyphens . Excessive hyphenation, even if not on consecutive lines, distracts the eye and makes a document more difficult to read. |
-
Hyphenation zone . This zone is the maximum space that Word allows between the end of a word and the right margin. If the space is larger than this, Word hyphenates a word to close the gap. For most documents, .25" (a quarter of an inch) is a reasonable choice. A larger distance may give you fewer hyphens but a more ragged look to your right margin. -
Limit consecutive hyphens to . A "ladder" of three or more hyphens makes text difficult to read. Enter 2 in this box, and Word won't hyphenate more than two lines in a row. 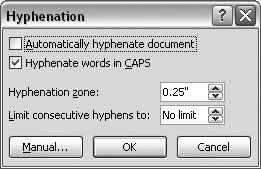 | Figure 3-23. Use the Hyphenation box to set the ground rules for hyphenation. Turn on the "Automatically hyphenate document" checkbox at top to have Word automatically hyphenate words according to the rules you set. | |
3.7.2. Manual Hyphenation The term manual hyphenation sounds like more work than it actually is. Computerassisted hyphenation would be a better term. When you turn on manual hyphenation (Alt+P, HM), Word automatically finds and shows you words that fall within the hyphenation zone, using the hyphenation rules you set in the Hyphenation box (Figure 3-23). As shown in Figure 3-24, Word gives you the word in a box and suggests where to place the hyphen. If you agree, click Yes. If you'd rather hyphenate the word in a different spot, click to put the insertion point where you want the hyphen, and then click Yes. 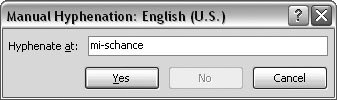 | Figure 3-24. You may not always agree with Word when it comes to hyphen placement. In this case, the hyphen is in the wrong spot in the word "mischance." To manually set the hyphen, click to put the insertion point between the "s" and the "c," and then click Yes. | |
Tip: It's best to run the Manual Hyphenation command (Page Layout Page Setup Hyphenation Manual or Alt+P, HM) immediately before you print or save the final draft of your document. If last-minute edits change the line lengths and line breaks, you need to run manual hyphenation again.
3.7.2.1. Optional hyphens Optional hyphens are like saying to Word, "If you're going to hyphenate this word, do it here." You can place an optional hyphen in any word by placing the insertion point where you want the hyphen and then pressing Ctrl+-(hyphen). Optional hyphens appear on the printed page only when the word is split between lines. Otherwise, the optional hyphen is a hidden, non-printing character.
Tip: You can change your Word Options to show all optional hyphens. Go to Office button Word Options Display. Under the heading "Always show these formatting marks on the screen," turn on the "Optional hyphens checkbox that's labeled. In your text, optional hyphens look like this:  . .
When you use manual hyphenation, you're actually inserting optional hyphens in your text. Each time you click Yes, Word inserts an optional hyphen in your document. If you change your text, words that you hyphenated may no longer fall within the hyphenation zones and they won't be split. The optional hyphens are still there, as you see if you use the tip to show optional hyphens on the screen. 3.7.2.2. Hyphenating selected text You don't have to hyphenate an entire document. If you select a chunk of text and then start manual hyphenation (Alt+P, HM), Word looks within the selection for words that should be hyphenated. You can choose to hyphenate the words by clicking Yes, or you can move the hyphen by clicking elsewhere in the word. If you don't want to hyphenate the word at all, then click No. After Word is finished hyphenating the selection, a box appears asking if you want to hyphenate the remainder of the document. 3.7.2.3. Nonbreaking hyphens Some words always have hyphens, and some of those are words that you don't want to split between two lines. Suppose the CEO of Coca-Cola decreed that under no circumstances should the company name or product ever straddle two lines of text. That could be a problem because whenever Word sees a typed hyphen, it feels free to break the word at the point. What you need is a nonbreaking hyphen, which, despite the oxymoronic name, is easy to use. To make a hyphen nonbreaking, press down the Ctrl and Shift keys when you press the hyphen key (Ctrl+Shift+-). A hyphen appears at the insertion point, but it's a nonbreaking hyphen and has enough glue to hold Coca and Cola together no matter what. 3.7.3. Removing Hyphenation from Your Document It's easier to remove hyphenation from your document if you've used automatic rather than manual hyphenation. In the case of automatic hyphenation, you simply turn it off: Choose Page Layout Page Setup Hyphenation None, or use the keyboard shortcut Alt+P, HN. All the automatic hyphens in your document disappear and the words rearrange themselves accordingly . But when you use manual hyphenation, Word inserts optional hyphens in your document that don't go away even if you turn hyphenation off. If you set Hyphenation to None (Alt+P, HN), then Word continues to split words at the end of lines using the optional hyphens. The only way to find and delete the optional hyphens is with Word's Find and Replace dialog box (Figure 3-25). Here are the steps to remove optional hyphens from your document: -
Choose Home Replace (or press Ctrl+H) to open the Find and Replace dialog box to the Replace tab . If you don't see a Special button at the bottom, click the More button on the left to expand the box. (If the box is expanded, the More button is labeled "Less" and clicking it shrinks the box.) -
Click in the "Find what" box to put the insertion point in the box . Normally, you'd just type in the text that you're searching for, but the optional hyphen is a special character that you won't find on your keyboard. Searching for optional hyphens requires a couple of extra steps. -
Click the Special button to reveal the list of special characters . The Find and Replace tool can search for a number of special characters. Some of them, like the optional hyphen and the paragraph mark, are nonprinting characters. Others, like the em dash need more than a single keystroke to produce. -
From the menu of special characters, choose Optional Hyphen . The Special menu closes when you make a choice from the list. In the "Find what" box, you see ^-, the code Word uses to indicate an optional hyphen. Leave the "Replace with" box empty, because you want to replace the optional hyphens with nothing, which effectively removes them. -
Click Replace All to remove all optional hyphens from your text . Word quickly removes the optional hyphens and displays a message telling you how many changes were made. Click Close to dismiss the alert box, and then, in the Find and Replace box, click Close. Mission accomplished. 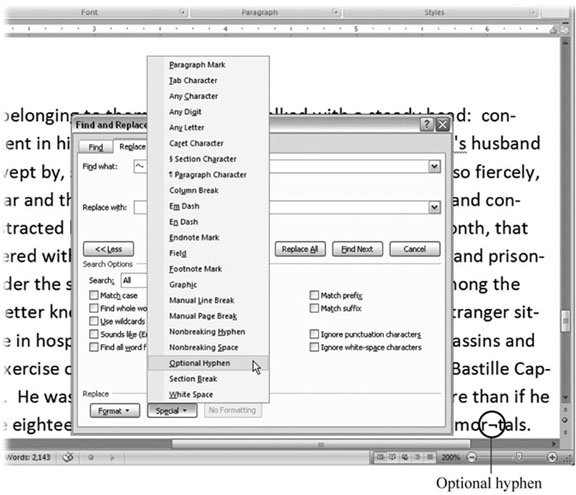 | Figure 3-25. Click the Special button on the Replace tab (Ctrl+H) to enter nonprinting characters like optional hyphens in the "Find what" or "Replace with" field. You can change your display settings to always show optional hyphens. When they aren't at the end of a line, optional hyphens look like the character between the "r" and "t" in the word " mortals " (circled). | |
|