3.2. Setting Document Margins Page margins are more than just empty space. The right page margins make your document more readable. Generous page margins make text look inviting and give reviewers room for notes and comments. With narrower margins, you can squeeze more words on the page; however, having too many words per line makes your document difficult to read. With really long lines it's a challenge for readers to track from the end of one line back to the beginning of the next . Margins become even more important for complex documents, such as books or magazines with facing pages. With Word's margins and page setup tools, you can tackle a whole range of projects. 3.2.1. Selecting Preset Margins Word's Margins menu (Page Layout  Page Setup Margins) gives you a way to quickly apply standard margins to your pages. The preset margins are a mixed bag of settings from a half inch to one and a quarter inches. For most documents, you can choose one of these preset margins and never look back (Figure 3-4). Page Setup Margins) gives you a way to quickly apply standard margins to your pages. The preset margins are a mixed bag of settings from a half inch to one and a quarter inches. For most documents, you can choose one of these preset margins and never look back (Figure 3-4). 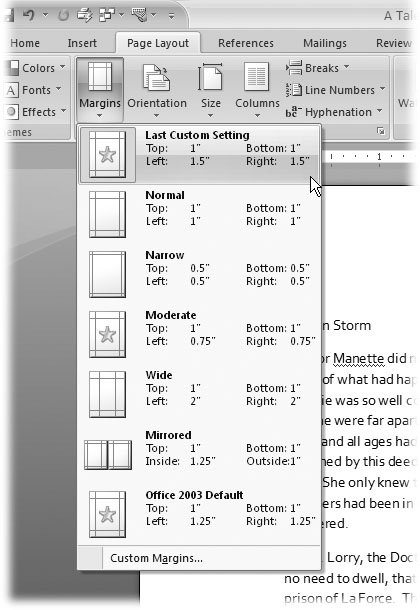 | Figure 3-4. The Margins menu provides some standard settings such as the ever popular one inch all the way around. Word calls this favorite of businesses and schools the Normal margin. If you've customized your margins, your most recent settings appear at the top of the menu. | |
For each of the preset margin options you see dimensions and an icon that hints at the look of the page. -
Normal gives you one inch on all sides of the page. -
Narrow margins work well with multicolumn documents, giving you a little more room for each column. -
Moderate margins with three-quarter inches left and right let you squeeze a few more words in each line. -
The Wide preset gives you more room for marginal notes when you're proofing a manuscript. To select one of the preset margins, go to Page Layout Page Setup Margins, and then click one of the options. You can also use the shortcut key Alt+P , M, and then use your up and down arrow keys to highlight one of the margins. Press Enter to use the highlighted margin.
Note: Word measures margins from the edge of the page to the edge of the body text. Any headers and footers that you add (Section 3.4) appear in the margin areas.
3.2.2. Setting Custom Margins What if none of the preset margins on the menu suits your needs? Say your company's style guide insists on one-and-a-half-inch margins for all press releases. Here's how to customize your margins: -
Go to Page Layout Page Setup Margins Custom Margins to open the Page Setup box to the Margins tab (Figure 3-5) . The Page Setup box has three tabs at the top. The Margins tab is on the left. -
At the top of the box, enter dimensions for top, bottom, left, and right margins . The boxes in the Margins section already contain your document's current settings. To change the Top margin to one and a half inches, select the current setting, and then type 1.5, or you can click the arrows on the right side of the box to change the margin number. Make the same change in the Bottom, Left, and Right margin text boxes.
Tip: While you're here in the Page Setup box, double-check the page Orientation setting. Margins and page orientation have a combined effect. In other words, if you want a quarter-inch top margin, make sure the orientation is set correctly depending on whether you want the "top" of the page to be on the long side or the short side of the paper.
-
Click OK to apply the changes to your document . The Page Setup box closes and your document takes shape with the new margins. If the changes are substantially different from the previous settings, you may find that you have a different number of pages in your document. 3.2.3. Setting Margins for Booklets The vast majority of the documents spewing forth from our collective printers are printed on a single side of the page. If they're bound at all, it's likely to be with a staple or a paper clip in the upper-left corner. Documents like this don't need fancy margins or page setups. But, if you're putting together a booklet, corporate report, or newsletter, you need more sophisticated tools. 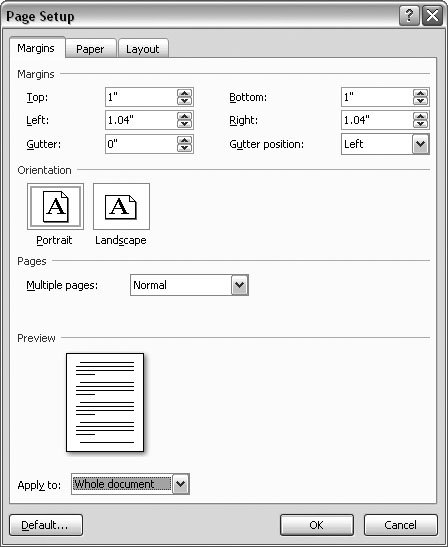 | Figure 3-5. The Margins tab is divided into four groups of controls: Margins, Orientation, Pages, and Preview. Use the text boxes at the top to set your top, bottom, and side margins. Use the gutter settings to specify the part of the page that's hidden by a binding. | |
Open the Page Setup box to the Margins tab (Page Layout Page Setup Margins Custom Margins or Alt+P, MA). In the Pages group , click the "Multiple pages drop-down menu to see the options. -
Normal is the setting you use for most single-sided documents. -
Mirror margins are great for documents with facing pages, like bound reports or newsletters. This setting makes outside and inside margins identical. Outside margins are the left margin on the left page and the right margin on the right page. Inside margins are in between the two facing pages. Documents with facing pages may also have a gutter, which is a part of the page that is hidden when the document is bound. -
2 pages per sheet prints two pages on a single side of the paper. If you've defined headers and footers, they'll show up on both pages. Usually you cut these pages after printing to create separate pages. -
Book fold is similar to the option above and prints two pages on one side of the paper. The difference is that the book fold layout is designed so you can fold the paper down the middle to create a booklet with facing pages. When you make a selection from the "Multiple pages" menu, some of the other options in the Margins box change too. For example, if you choose "Mirror margins," the labels above for the Right and Left margins change to Inside and Outside. |