19.2. Recording Macros You don't have to be a programmer to create timesaving macros. You'll probably find recording a macro easier than recording a message for your answering machine or a TV show on your Tivo. If you click the Record button, then Word records your keystrokes and mouse clicks, and then, when you're done, you click Stop. The goal for recording a macro is so that you can quickly apply several formatting commands at once. You can combine any number of commands into a single command, making just about any Word command, option, or dialog box faster and easier to use. Suppose, for example, you work as an editor and frequently select a complete sentence , change its text color , and add a strikethrough effect. Wouldn't it be handy if you could perform all those steps with a single keyboard shortcut? No problem. Turn on the macro recorder, and then do your selecting and formatting. When you're done, click the Stop button on the macro recorder. Simple as that. UP TO SPEED
Macro Security Warnings | | When you open a document that contains macros, Word shows a warning in the Message Bar below the ribbon (see Figure 19-2). If you haven't changed your security settings since you installed Word, the macros are disabled in plain English, they don't work. (See Chapter 18 for the full story on security.) To enable macros so that they can run, click the Options button next to the warning. Word gives you two choices: "Help protect me from unknown content (recommended)" and "Enable this content." Word's recommendation is the safest route because it prevents macros from running. This security setting is designed to help stop viruses and other malicious code from sneaking onto your computer in the form of macros. On the other hand, if you know that the document is safeeither because you created the macros yourself, or you trust the sourcethen you can go ahead and choose to "Enable this content." |
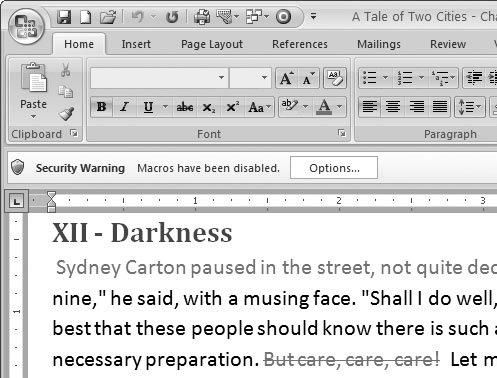 | Figure 19-2. The message bar below the ribbon shows this warning when you open a document that contains macros, even if you're the one who created the macros. To give your document the go-ahead to run macros, click Options, and then, in the Microsoft Office Security Options box that opens, select "Enable this content." As discussed in the previous chapter, you should turn on macros only for documents that you created or that come from someone you trust. | |
Here's a step-by-step description of the process to create a macro that selects an entire sentence, changes the font color, and applies the strikethrough effect: -
Open a document that has at least a couple paragraphs of text, using Office button  Open, and then use Office button Save As to save it as a Word Macro-Enabled Document (.docm) . Open, and then use Office button Save As to save it as a Word Macro-Enabled Document (.docm) . When you use the Save As command, Word makes a copy of the document, so you can experiment while your original remains untouched. From the "Save as type" drop-down menu, choose "Word Macro-Enabled Document (*.docm)," as shown in Figure 19-3. 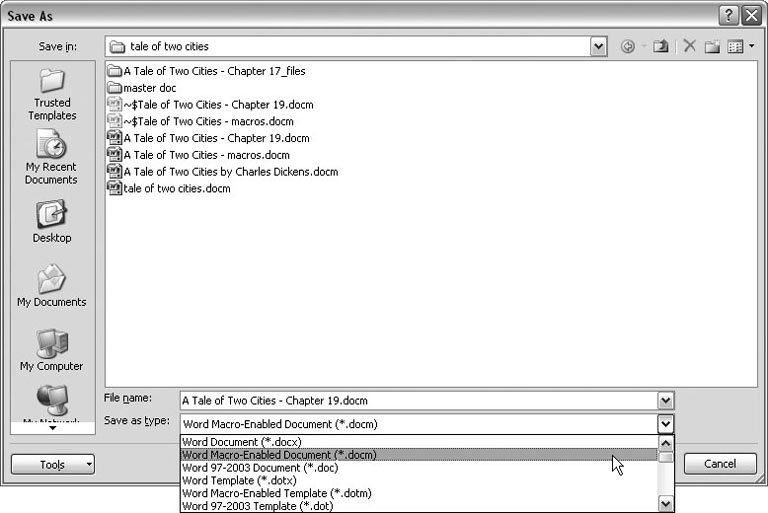 | Figure 19-3. Before you record a macro, you need to save your document with the .docm filename extension. Files that end with .docm can run macros; files that end in .docx can't. | | -
With your document still open, click in the middle of a sentence to place the insertion point. Then, to start recording, click Developer Code Record Macro (or press Alt+L, R) . Make sure you click the Record Macro button, which has a little red dot in the corner of the icon, and not the larger Macro button. The Record Macro box opens, showing a couple text boxes and buttons , most of which you use in the following steps as you name and save your macro (Figure 19-4). 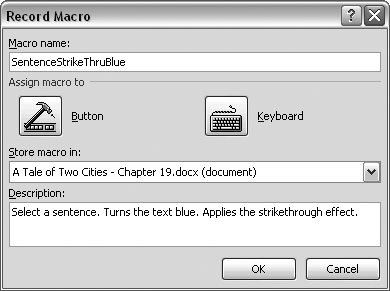 | Figure 19-4. Use the Record Macro box to name your macro and save it in a document or template. You can also assign the macro to either a button or a keyboard shortcut. In the text box at the bottom, you can type a description explaining how the macro works. | |
Tip: There's also a button in the status bar in the Word window's lower-left corner that you can use to start and stop the macro recorder. It looks like a little Word window with a red dot in the corner. (If this Record Macro button isn't showing, right-click the status bar, and make sure a checkmark appears next to Macro Recording.)
-
In the "Macro name" box, type SentenceStrikeThruBlue Word automatically gives your macro an imaginative name like Macro1 or Macro2, so change it to something that describes what the macro does. You can't include spaces in the macro name, so if the name consists of several words, use uppercase and lowercase letters or use the underscore character to separate words and make the name more readable. -
In the "Store macro in" box, choose the name of the document you're using . You can store a macro in a document a template or in normal.dotm . When you store the SentenceStrikeThruBlue macro in your document, it is available only in that one document. If you store a macro in a template, then the macro is available in any document based on that template. If you store your macro in normal.dotm , it will be available to any document you open in Word. The standard setting that Word uses unless you change it is normal.dotm . -
In the Description text box at the bottom, type in the purpose of the macro or the actions that it performs . For macros, a good description explains what the macro does. In this case, you can describe three actions: "Selects a sentence. Turns the text blue. Adds a strikethrough." -
Click the Keyboard button to open the Customize Keyboard box, where you can assign a keyboard shortcut to the macro . Using the two buttons in the middle of the Record Macro box, you can assign your macro to a button or to a keyboard shortcut. You don't have to do either, but buttons and shortcuts sure make it easier to run your macro. For this example, click the Keyboard button to open the Customize Keyboard box (Figure 19-5). As explained in Chapter 17, you can create custom keyboard shortcuts for any of Word's commands, and that includes macros (Section 17.2). -
Click in the "Press new shortcut key" text box, and then press Ctrl+Shift+Alt+X . A message appears at left: "Currently assigned to: [ unassigned ]." That's good; it means your keyboard shortcut won't conflict with any other Word keystrokes. Use the "Save changes in" drop-down menu if you want to save your keyboard shortcut someplace other than normal.dotm , the standard setting. For example, you can save the shortcut in your document or in a template if you want it used only there. 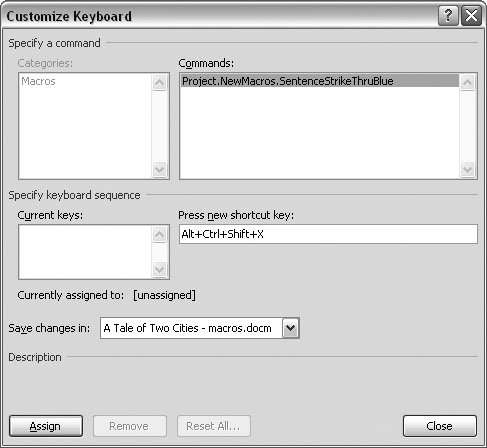 | Figure 19-5. Use the Customize Keyboard box to give your macros a keyboard shortcut. Click in the "Press new shortcut key" text box, and then record your keystrokes. If you make a mistake, use the Backspace key to erase your keystrokes. If your shortcut is already assigned to a command, you'll see the name of the command next to "Currently assigned to:" | | -
Click the Assign button to assign the shortcut to your macro . The keystroke sequence appears in the Current keys box. -
Close the Customize Keyboard box . You're done assigning the Ctrl+Alt+Shift+X keyboard shortcut to your macro. Back in your Word document, the cursor sports a new icon showing that you're in Record mode (Figure 19-6). At this point, the macro recording is all set to go. Word records every keystroke and command you choose from the ribbon. When you're recording a macro, you can use the mouse to click buttons on the ribbon and to setoptions in a dialog box, but you can't use it to move the cursor or to select text. You need to use keyboard commands to record those actions.
Note: If you need a refresher on using the keyboard to select text and move around in your document,see Chapter 2 (Section 2.2).
-
To select the entire sentence where the insertion point is flashing, press F8 three times . Each time you press F8, Word selects a bigger chunk of your document. The first F8 starts the selection. The second F8 extends the selection to include a whole word. The third F8 selects an entire sentenceas you can see by the highlight. The macro recorder stores the three F8 keystrokes, which Word knows as the Extend Selection command. 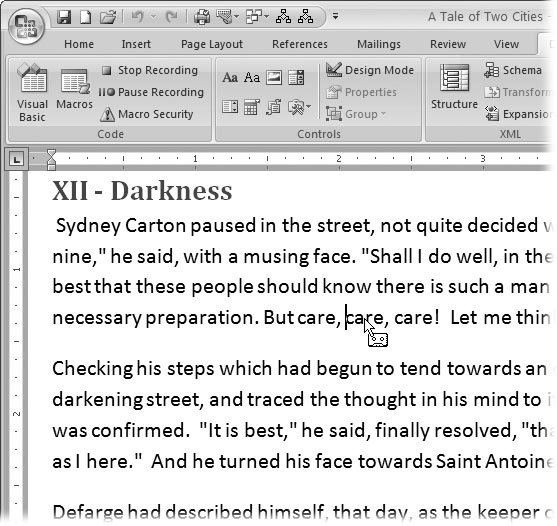 | Figure 19-6. While you're recording a macro, the mouse cursor takes on a new look. Next to the usual arrow, you see what looks like a cassette recording tape. It's your clue that you're in the middle of recording a macrothat is,if you're old enough to remember what a cassette is. | | -
Go to Home Font. Click the Font Color button, and then choose a blue color from the palette . You can also use Alt+H, FC to open the font color palette; the macro recorder captures the commands either way. The text in the selected sentence changes to blue and, at the same time, the macro records the command to set the font color of the selected text to blue.
Tip: If you're using the mouse, click carefully . The macro recorder doesn't pay much attention if you click different tabs looking for a command, but it does record your action any time you click a command button on the ribbon or in a dialog box.
-
With the sentence still selected and highlighted, click Home Font Strikethrough . Word applies the strikethrough effect to the selected text and adds the strikethrough command to the recorded actions in the macro. -
Click the right arrow key on your keyboard once to deselect the text . To complete the macro, you want to deselect the sentence and remove the highlight from the text. The easiest way to do that using the keyboard is to press the right arrow button. -
Choose Developer Code Stop Recording to turn off the macro recoding . You can turn off the macro recorder three ways. You can use the ribbon command Developer Code Stop Recording. Or you can use the keyboard shortcut Alt+L, R. Last and easiest, you can click the Stop Recording button in the status bar, as shown in Figure 19-7.  | Figure 19-7. You can use the Macro button in your status bar to both start and stop macro recording. The Start Recording button looks like a Word window with a small red dot in the upper left corner. It works like a toggle, click Start and the Stop button (this tiny square button) is the Stop Recording button. | | Once you stop the recording, you're all done. Word has memorized the commands and, if everything went as planned, you've got a macro that you can use over and over again every time you press Ctrl+Alt+Shift+X. 19.2.1. Testing Your Macro All good programmers test their programs to make sure they work as planned, and you should do the same with your new SentenceStrikeThruBlue macro. To see how your macro works, just click to put your insertion point in a new sentence, and then press the keyboard shortcut you createdCtrl+Alt+Shift+X. Quick as a wink, you see the plain text change to blue highlighted text. After you run your macro, you should see something similar to Figure 19-8. 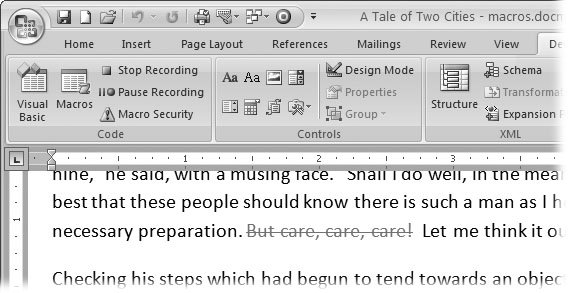 | Figure 19-8. Click in a sentence and run your SentenceStrikeThruBlue macro, and you should end up with a sentence with blue text, with a strikethrough effect. The insertion point should be at the end of the sentence, and the sentence shouldn't be highlighted. | |
When you create a macro just for your own use, you can test it quickly to see if it behaves the way you planned. If you're creating a macro that's going to be used by others, you need to test it a little more rigorously. You'll find that people often use your macros in ways you didn't expect. Also, it's not unusual for a recorded macro to have some quirks. If you're the only one using the macro, you can learn to work around the quirks, but others using your macro may call your quirks bugs , and complain that your macro doesn't work. The SentenceStrikeThruBlue macro has a couple of those quirks. For example, it works just fine if you place your insertion point in a sentence that is formatted with plain text. However, if you put the insertion point in text that already has a strikethrough effect, the macro removes the strikethrough line. If you're just using the macro for yourself, you can remember that it works this way and avoid using it with strikethrough text. However, if you're sending it out there into the world for others to use, you may want to change it. in Section 19.4.1, you see how to fix this particular quirk. |