14.1. Creating a Paper Form Most forms have the same basic elementspermanent text and blanks. Permanent text includes things like the heading at the top of the page, labels, and perhaps tips on how to fill out the form. The blanks collect information from the people filling out the form. Take the IRS 1040 Income Tax form, for example. On second thought, scratch thattoo depressing. Suppose you're a magazine distributor creating a subscription form, and as incentive you're running a sweepstakes so new subscribers get a chance to win a Porsche (Figure 14-1). This form has the two basic elements: permanent text and blanks to hold the subscription information. You also want your form to have some checkboxes for folks to choose which magazines they want. The entire form can fit on the back of a postcard, which is great since it's easy for people to fill out the form and mail it in. 14.1.1. Using a Table to Design Your Form When you design a form, your primary concern is making it easy to use. If it's difficult or hard to fill out, chances are you'll get incomplete and incorrect information. Spend most of your time organizing and arranging the elements on your form. Tables are a great tool for the job. Using tables, you can keep the labels and the blanks next to each other. You can organize text, pictures, and other elements with precision. As icing on the cake, you can format the cells in the table to provide visual clues. For example, you may have cells with a white background color for labels, and cells with a blue background color for blanks that need to be filled in. In the following steps, you create a postcard- sized form that collects information for magazine subscriptions and entries in the Porsche sweepstakes (Figure 14-1). To lay out this paper-based form, you use a Word table. 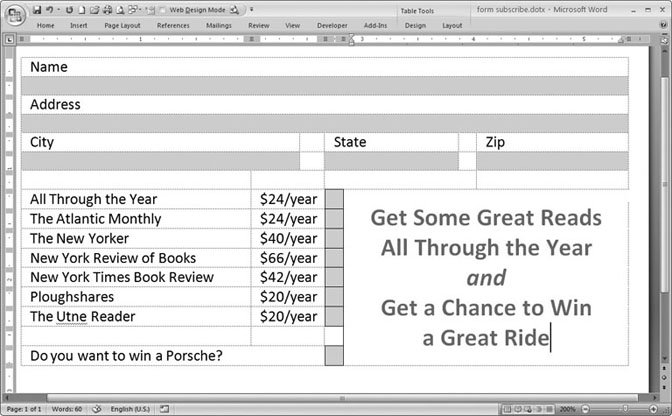 | Figure 14-1. Tables are great tools for organizing the information in a form. Use separate cells for labels and the blanks that need to be filled in. It's helpful to give cells that need to be filled in a different background color from the permanent text. | |
-
Starting with a blank document, change the page size to Post Card using the command Page Layout  Page Setup Size Post Card. Open the Orientation menu (Alt+P, O), and then choose Landscape . Page Setup Size Post Card. Open the Orientation menu (Alt+P, O), and then choose Landscape . Post Card is one of the standard sizes provided in Word. The dimensions are 5.83" wide by 3.94" high. It's a good size for a postage -paid return card. Like most postcards, you lay this one out in Landscape (horizontal) orientation. -
Open the Margins tab in the Page Setup box with Page Layout Page Setup Margins Custom Margins. Enter .25 inches for all the margins: top, bottom, left, and right . Word's standard 1" margins eat up too much space on a tiny postcard. -
Save the document with the name form_subscription.docx . Of course, you can name the document anything you want. Using the word form at the beginning of the name can help you identify it later. -
On the ribbon choose Insert Tables Table Insert Table to open the Insert Table box. In the "Number of columns box, enter 4 , and in the "Number of rows" box, enter 16 . Click OK . The table appears in your document. The four columns are all the same width. You can adjust them later to fit the information you're collecting in the form. Tables are a great way to separate permanent text from the blanks that you want filled in. You separate the text from the blanks by placing them in different cells and formatting those cells with different background colors. -
Select the table. Remove the cell borders (Alt+JT, BN), and then turn on Gridlines (Alt+JL, TG) . In this step, you're applying basic formatting to the entire table. To select the table, move your mouse cursor over it. A button appears near the upper-left corner of the table. Click the button to select the entire table. Borderlines make the printed form look too busy, so you remove them with the shortcut Alt+JT, BN. On the other hand, it's helpful to have non-printing gridlines as you design your form, so you turn on the gridlines.
Tip: You can toggle gridlines on and off as needed. Just use the View Gridlines button on the left side of the Table Tools Layout tab (Alt+JT, TG).
-
Drag to select the four cells in the first row, and then merge cells to create a single cell with Table Tools Layout Merge Merge Cells or Alt+JL, M. Type Name in the first row . This step lays out the Name field for your form. The first row holds the label "Name," and the second row is a blank where people will write their name. -
In the same way, select and merge the cells in the second row, and then format the single cell with a light shade of blue (Alt+JT, H) . The results should look something like Figure 14-2. Repeat steps 6 and 7 in the third and fourth row to create a field for the street address. After you merge the cells, type Address in the third row. Use the same color to shade the fourth row where subscribers will write in their street address or P.O. box. -
Click within the cell in the third column on the fifth row, and then press Alt+JL, P to open the Split Cells box. In the "Number of columns" box type 2, and then click OK . You've split this cell into two cells to make room for more pieces of information.  | Figure 14-2. Each field in this magazine subscription form has a label that describes the contents of the field and a blank shaded area where a subscriber provides details like name, address, and choice of magazine. | | -
On the fifth row, type City, State , and Zip code in the first, third, and fifth cells . The empty cells between each of these fields keep them from running together and make it easier for subscribers to enter their information. -
Create matching blank cells below City, State, and Zip code, where subscribers will enter their details . Split the third column as you did in the step above (Alt+JL, P). Shade the first, third, and fifth cell under the labels. Adjust the column widths to provide the right amount of space for each of the fields City, State, and Zip code (Figure 14-3). -
In rows 8 through 14, create seven fields with the names of magazines for subscribers to choose from . In the first column, type the magazine names. Then, in the second column, type a subscription rate. The third column serves as a checkbox, so shade it with your fill-in-the-blank blue (Alt+JT, H). Put a border around each of the checkboxes (Alt+JT, BA) so subscribers can clearly understand how to use them. -
In the left margin, drag to select the rows with magazine names, subscription rates, and checkboxes, and then adjust the column widths (Figure 14-4) . For example, drag the vertical gridlines so that the magazine titles fit on one line. You can also reduce the column width so that the checkboxes actually look like boxes instead of rectangles. -
In the bottom row, type Do you want to win a Porsche , and then create a checkbox exactly as described in step 11 . In other words, adjust and format one of the cells in the bottom row to match the checkboxes in the rows with magazine names. 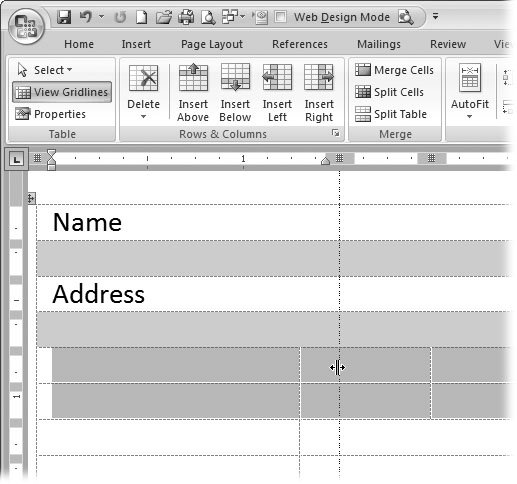 | Figure 14-3. To make adjustments to the width of the cells, select both rows. Move the mouse cursor to the left margin, and then drag to select the two rows. Drag the vertical gridlines to adjust the column width. The columns for both rows move independently of the rows on the form. | | 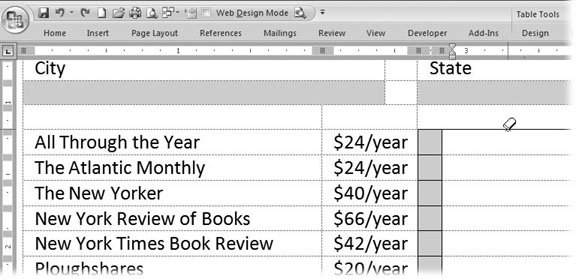 | Figure 14-4. In addition to boxes where subscribers enter their information, this form has checkboxes where they select magazines. If necessary, use the Eraser (Alt+JT, E) and the Draw Table (Alt+JT, D) tools to clean up the borders around the checkboxes. | | -
When you're done, your form should look like Figure 14-1. It should be easy for subscribers to give you the information you need to sign them up. There's no confusion about the information you need and how they should give it to you. The form works great as a postcardespecially with the reply address and postage on the other side. (You can mail the postcard as fits in an envelope, or it can be tucked into a magazine or newspaper.) |