Creating Services
|
| < Day Day Up > |
|
Now that we have a basic understanding of the concepts of services, and why and how they are used, we will walk through some examples of creating services. To begin with, there are two basic ways to create services. The most common is by using the Database Configuration Assistant (DBCA). The second way is to create services via the command line using the SRVCTL utility. In addition, the Net Configuration Assistant (NETCA) can be used to configure clients to connect to a service. However, by and large, we recommend that the DBCA be used to create the services, as the DBCA will automate the process and do all of the necessary work for you. In addition, once the services are created, Enterprise Manager Grid Control can be used to monitor and manage services-starting, stopping, and relocating services between nodes.
HA Workshop: Using the DBCA to Create Services
Workshop Notes
This workshop will walk you through the creation and definition of services using the DBCA. During the workshop, we will discuss at various stages what is being done via the DBCA.
Step 1. Execute DBCA from one of the existing nodes in the cluster. On the Welcome screen, select Oracle Real Application Clusters database and choose Next.
Step 2. Select Services Management from the next screen, as shown in Figure 6-1.
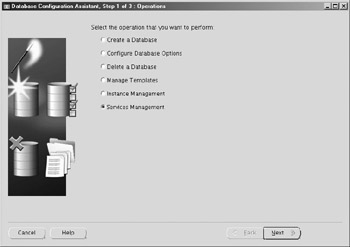
Figure 6-1: Services Management screen in DBCA
Step 3. Select the database that you want to add services for. In most cases, you will likely only have one cluster database to choose from, though it is possible to have more.
Step 4. On the page titled Step 3 of 3, choose Add to add the service name. Choose a name that has a meaning with it associated with your application-for example, a convention such as dbname_appname. In our example, we will choose a name of grid_callcenter, which we intend to be used by our callcenter application. After clicking OK, we will see the grid_callcenter service displayed in the DBCA on the left, under Database Services (see Figure 6-2).
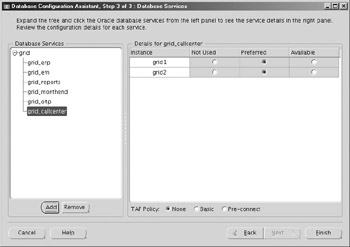
Figure 6-2: Adding database services in DBCA
Step 5. Now we define where this service can run. As you can see, by default, the service can run on all nodes as Preferred, meaning that the application can connect to any given node as long as it is running. Since the callcenter app in our example is a critical app, we will leave it as is, with both nodes as Preferred. Under TAF policy, we will set the policy by checking the radio button next to the Basic option.
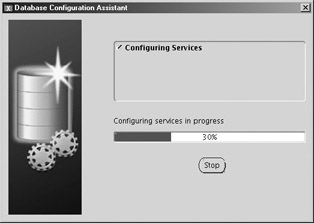
Step 6. Finish the service creation by clicking Finish, and then click OK in the confirmation box that pops up. The DBCA will open up the Configuring Services window and give you a status bar indicating the progress.
Step 7. Once completed, choose No when prompted to perform another operation.
Step 8. Now that the services are configured, we can see what has been done by connecting to the instances in SQL*Plus. From each instance, issue the following command:
Show parameter service_names
You should see that the service_name of grid_callcenter is listed under each node. Note that the spfile is not actually updated with the new service_names value; however, you should be able to see an update in the alert log via an ALTER SYSTEM command as follows:
ALTER SYSTEM SET service_names='grid','grid_callcenter' SCOPE=MEMORY SID='grid1';
A similar command will be executed on each preferred instance that you have selected for the service to be run on.
Step 9. Next open up the tnsnames.ora file on each node (located in the $ORACLE_HOME/network/admin directory). You should see a definition for the new service that looks similar to the following:
GRID_CALLCENTER = (DESCRIPTION = (ADDRESS = (PROTOCOL = TCP)(HOST = rmscvip1.us.oracle.com)(PORT = 1521)) (ADDRESS = (PROTOCOL = TCP)(HOST = rmscvip2.us.oracle.com)(PORT = 1521)) (LOAD_BALANCE = yes) (CONNECT_DATA = (SERVER = DEDICATED) (SERVICE_NAME = grid_callcenter) (FAILOVER_MODE = (TYPE = SELECT) (METHOD = BASIC) (RETRIES = 180) (DELAY = 5) ) ) )
| Note | The host name is actually defined as the virtual IP. We will discuss this in more detail later in this chapter, in 'Node Applications.' In addition, we cover the Virtual IP in Chapter 11. |
Step 10. Finally, test the connection using the new alias in the tnsnames.ora, and then run a quick query to verify the connection type:
connect scott/tiger@grid_callcenter
From another session with DBA privileges, you can check the connection type via a query like the following:
select inst_id, username, failover_type, failover_method from gv$session where username = 'SCOTT'; INST_ID USERNAME FAILOVER_TYPE FAILOVER_METHOD ---------- ---------- --------------- ------------------------- 2 SCOTT SELECT BASIC
Viewing Services from Within the Database
Once the services have been created, information about them can be retrieved in various different ways. As noted in the preceding HA Workshop, the SHOW PARAMETER command can be used to view the service names. Aside from that, however, several additional views have been added in Oracle Database 10g to give the DBA the ability to view and monitor services and service activity from within the database. Some of the most useful of these views include the following:
-
DBA_SERVICES
-
V$SERVICES
-
V$ACTIVE_SERVICES
-
V$SERVICE_STATS
-
V$SERV_MOD_ACT_STATS
Of course, all of the V$ views have their GV$ equivalents in a RAC environment. A query such as the following will allow you to view the services by instance (for instance, 1):
SQL> col inst_id for 99 SQL> col service_id for 99 SQL> col name for a15 SQL> col network_name for a15 SQL> select inst_id, service_id, name, network_name from gv$services SQL> where inst_id = 1; INST_ID SERVICE_ID NAME NETWORK_NAME ------- ---------- --------------- --------------- 1 10 grid_monthend grid_monthend 1 13 grid_payroll grid_payroll 1 12 grid_callcenter grid_callcenter 1 11 grid_oltp grid_oltp 1 9 grid_reports grid_reports 1 8 grid_em grid_em 1 7 grid_erp grid_erp 1 5 grid grid 1 6 gridXDB gridXDB 1 1 SYS$BACKGROUND 1 2 SYS$USERS
Using Enterprise Manager to View and Manage Services
To view and manage services from within EM, you should first log in to the Grid Control console. Recall that by default this will be
:7777/em">http://<hostname_for_mgmt_server>:7777/em
You will first need to log in to the Grid Control console using the sysman account. From there, choose Targets | Databases and select the cluster database where your services have been configured. From the cluster database home page, choose the Administration tab. On the right-hand side, under High Availability, click on the link for Cluster Managed Database Services as shown in Figure 6-3. At this point, you will be prompted for an operating system login in order to retrieve the information about the services from the Oracle Cluster Registry (which we will discuss later in this chapter). Specify the operating system account with the proper privileges and continue on from there.
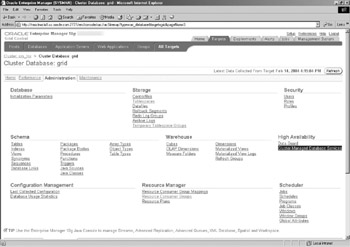
Figure 6-3: Cluster-managed services in Enterprise Manager
Once logged in, you will be able to see all of the services defined cluster-wide, and their statuses. Note in Figure 6-4 that our service grid_callcenter is listed, and it shows that the status is up and that it is available for connection on both instances-grid1 and grid2. Note also in Figure 6-4 that there are additional services in various states of running. Like the grid_callcenter service, grid_erp, grid_em, and grid_payroll are all set up to run on either node. Note that grid_reports is set up to run only on grid2, whereas grid_monthend is set up to run on node1. The grid_monthend service has a warning, because it is not running on its preferred node. It can be relocated back to its preferred node by selecting the service and clicking on the Manage Service button. By the same token, the grid_oltp service can be started by selecting that service and choosing the Start Service option.
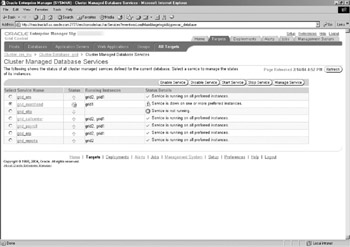
Figure 6-4: Cluster Managed Database Services screen
Relocating a service can only be done to an instance that has been defined as Available for that service, when it was created via the DBCA (see Figure 6-2). If you wish to redefine a service so that it can run on additional nodes that were not part of the original service definition, you cannot currently do that through EM. Instead, you can run the DBCA again, and go through the service management steps. On the last screen, select the service that you wish to modify and change the definition. You can make multiple changes here, including adding and removing services. Once you have made the modifications, click on the Finish button in the DBCA and the services will be reconfigured. At that point, you can return to EM and refresh the page, and the modified services will now be available for relocation.
Resource Manager and Service Mappings in EM As we mentioned, services can be mapped to a resource group in Enterprise Manager, allowing you to assign priorities at the service level for different types of services. To view or configure this information in EM, go to the Targets tab in the Grid Control console and choose All Targets. From there, select your cluster database, and then choose Administration. Under Resource Manager, select the link for Resource Consumer Group Mappings. You will then have the opportunity to map a service name to a consumer group, as shown in Figure 6-5. For additional information on configuring consumer groups in Resource Manager, refer to Chapter 24 of the Oracle10g Release 1 Database Administrator's Guide.
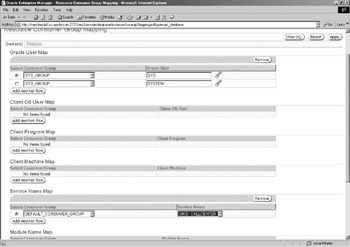
Figure 6-5: Mapping a service to a consumer group
|
| < Day Day Up > |
|
EAN: N/A
Pages: 134
- The Second Wave ERP Market: An Australian Viewpoint
- Distributed Data Warehouse for Geo-spatial Services
- Data Mining for Business Process Reengineering
- Relevance and Micro-Relevance for the Professional as Determinants of IT-Diffusion and IT-Use in Healthcare
- Development of Interactive Web Sites to Enhance Police/Community Relations