In Lesson 3 and Lesson 5, we explored Keynote's robust support for QuickTime media import and playback. The output options in Keynote are just as powerful. We'll take a quick tour here that will suit many reader's needs. For those who want more, see Lesson 11, "For the Power User."
1. | With the file you want to export open, choose File > Export.
Here, we're still using 06Photo Portfolio.key.
The Export dialog box opens with several options.
|
2. | Click the QuickTime button to access movie options.
 Your choices in the QuickTime options depend on the purpose of your QuickTime movie. For example, do you want to make a movie that runs interactively on a desktop computer, or are you trying to convert your presentation so you can edit it together with video in iMovie?
|
| |
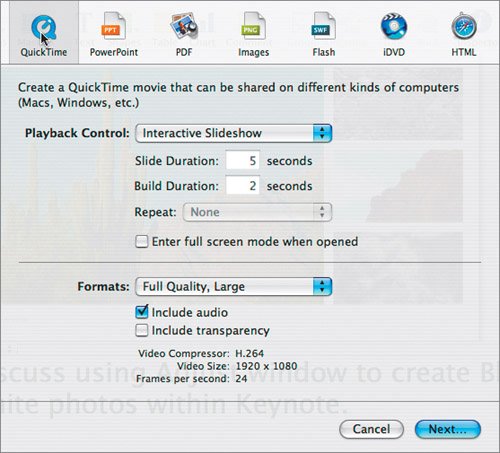
3. | Choose a Playback Control method:
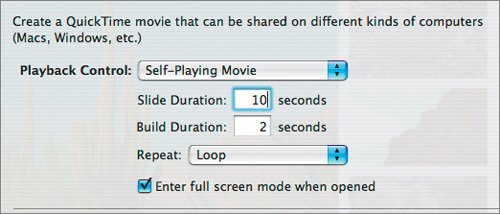
Interactive Slideshow: This option gives viewers total control over the slideshow as they can click to advance slides. This is a good option for self-paced learning or as a backup of your presentation. Hyperlinks Only: This option lets the presentation run in Kiosk mode. The user can only click buttons or links to navigate to other slides or Web pages. Self-Playing Movie: This option runs the slideshow with no user interaction. You must set slide duration and build options. If slides contain automatic build timings, those will be used. For this task, choose Self-Playing Movie.
|
4. | Set the Slide Duration to 10 seconds and the Repeat option to Loop.
|
5. | Set the movie to fill the screen by selecting "Enter full screen mode when opened."
 You now must choose playback quality settings for the movie. It is important to keep in mind how you plan to deliver this movie when choosing these options. For example, if you want the user to view the movie over the Internet you'll need a smaller file size. On the other hand, a CD-ROM movie can be larger than a Web movie, but because it has to play back from an optical disc, it should be smaller than a kiosk movie that plays from a hard drive.
|
| |
6. | From the Formats pop-up menu, choose CD-ROM Movie, Medium to set the playback quality.
Note We'll explore custom output in Lesson 11. |
7. | Since this presentation has no audio, deselect the "Include audio" option.
Note The Include audio option is on by default and can bloat your file sizesilence takes up space in your file. If file size is a concern (as it may be for Web and CD-ROM delivery), be sure to disable audio if your presentation doesn't have any. |
8. | Click the Next button.
|
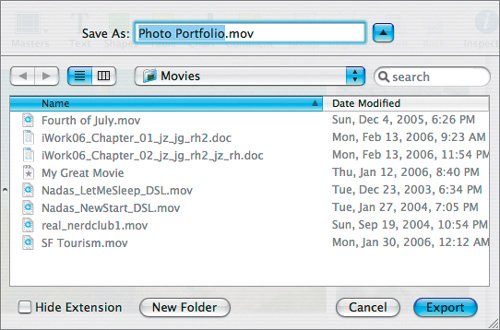
9. | Give the movie a name and choose the location where you want the exported file to be saved.
|
10. | Click Export.
 Note Depending on the number of slides and the speed of your machine, this process can take a few minutes. |
| |
11. | Navigate to the file in the Finder and double-click the file to view it.
The movie opens in the QuickTime Player application. It should fill your screen and continue to loop (if you used the settings in this task). Because the movie is at CD-ROM quality, the image quality (especially during animated transitions) will be reduced.
 |
12. | Press the Esc key to exit the full-screen movie.
|
13. | Quit QuickTime Player and return to Keynote.
|