Site Management and Transferring Files
|
|
Managing a website can be a major headache for even the most experienced web developers. As sites grow and change, they can become unwieldy, and you can inadvertently introduce broken links, orphaned pages, and general chaos in folder structure. Dreamweaver MX can help you keep your sites in order. In fact, some web developers think the site management features Dreamweaver MX provides are alone worth the cost of the software. The Site Manager modifies links within your pages to reflect new folder locations (for when you need to move files), checks links to verify they work, provides folder and file management, lets you move the site to your testing server and to your live server, and more. Let's take a quick look at some of the features that will make your website management easier
What's on Those Menus?
Figure 2.28 shows the Site tab that's located on the Files panel. The buttons across the top of the panel give you access to the most frequently used options. Table 2.3 lists and describes these buttons.
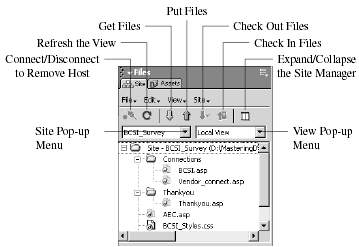
Figure 2.28: The Site tab can be used to alleviate many of the headaches associated with maintaining your website's structure and files.
| Button | What It Does |
|---|---|
| Connect/Disconnect To Remote Host | Connects you to the remote host (your live web server) if you've defined it in the Advanced tab of the Site Definition window. This button toggles to Disconnect From Remote Host if you're already connected. (The type of connection established to your remote host is defined in the Advanced tab of the Site Definition window.) |
| Refresh | Simply refreshes the local and remote file lists. Useful for refreshing the file lists if you deselected the Automatically Refresh File Lists option in the Site Definition window. |
| Get Files | Downloads the selected files from your live site or your testing server and copies them to your local site. This option overwrites any files, with approval, that exist in your local site, so make certain you want to copy these when you click the button. You specify the server from which to get the files using the View pop-up menu |
| Put Files | Uploads a copy of your local site to your remote or testing server. You specify the server on which these files are placed using the View pop-up menu. |
| Check Out Files | If enabled in the Advanced tab of the Site Definition window, this button lets you check out a file by copying the file to your local site and marking the file as "checked out" on the server. |
| Check In Files | Allows you to check in a file or files by copying the version from your local site to the testing server (or remote server, depending on which is selected in the View pop-up menu). |
| Expand/Collapse | Expands the Site tab to allow you to see more of the site. |
| Site Pop-Up Menu | Allows you to select a site from your defined site list. |
| View Pop-Up Menu | Allows you to select which view is active-Local View, Remote View, Testing Server, or Map View (shows you a map of your site). |
Using the Site Tab
As we mentioned, the Site tab can help keep sites in order by aiding you in development tasks such as creating new folders, moving files, and so forth. Let's take a look at some of these useful features in more detail.
Import an Existing Website into the Site Tab
The Site tab is an invaluable tool in maintaining your site. You don't have to create a site from scratch to use it, either. Dreamweaver MX lets you import existing sites into the Site tab so you can take advantage of error checking, Site Map viewer, and other features. To import an existing website into the Site Tab, you must first add a site just as if you were creating a new site. To do so, from the main menu bar choose Site and then choose New Site from the pop-up menu to open the Site Definition window. Enter the appropriate settings for the new site (see the previous section for more information), and click OK. As you can see in Figure 2.29, we're calling our new site TestSite. Also notice that our Local View shows that there are indeed no files in our new site. Now, we want to switch to the server on which our site resides. Since we're going to import the files from our testing server, we'll choose Testing Server from the View pop-up menu.
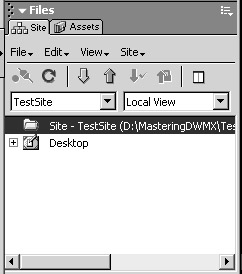
Figure 2.29: The Local View of our new site shows there are no files yet in the site.
The Testing Server shows our site, just as we'd expect, so let's click the Get Files button. Dreamweaver MX asks for confirmation (Figure 2.30), so click OK to start the import process.
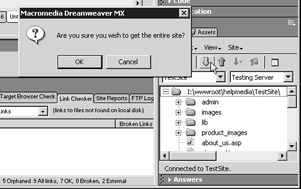
Figure 2.30: To import the existing site, switch to the proper view and click the Get Files button. You'll be asked for confirmation.
Once the import process is complete, switch back to Local View, and you should see a replica of your site, only this copy is in your local working folder. You can see the results of our import in Figure 2.31.
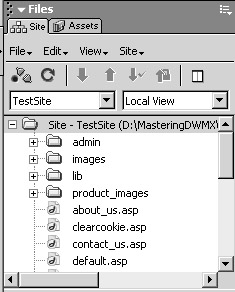
Figure 2.31: Our import of an existing site is a success!
One last thing we need to do after an import is to tell the Site Manager what our default home page should be. We need to do this in order for features such as the Site Map to work properly. Setting the home page is easy-just right-click the file that should be the home page and choose Set As Home Page from the pop-up menu.
View Your Website with the Site Map
Once you've imported or created a site, you can view your site with the site map. You can launch the site map by choosing Map View from the View pop-up menu on the Site tab.
This feature shows you a map of your site, complete with links to other pages and whether those links are broken. Figure 2.32 shows the site map in action. Our default home page, default.asp, is at the top, followed by the subpages and links within those pages. This view also shows files that might be included as well. Notice the broken-link icons next to files such as products.asp, index.asp, and about_us.asp. Those are visual cues that these links might be broken. Dreamweaver MX adheres to strict syntax rules for specifying links and the like, so if you deviate at all from the "official" rules, Dreamweaver might not be able to interpret the link. In our case, our test site appears to have broken links because of the default behavior of ASP. We didn't specify an explicit .. / in the link to indicate relative paths in our links, so Dreamweaver is reminding us that we may have a bit of sloppy code.
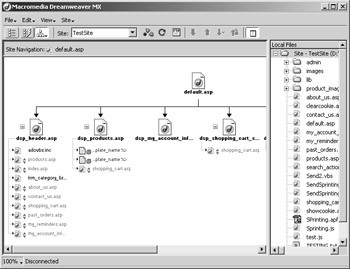
Figure 2.32: The site map in action
Managing Links
Dreamweaver is useful in managing links within pages, as well. It can track links from pages you create as well as those from imported sites and show you where broken links might reside. Obviously, this is a useful feature, especially when you're dealing with sites whose content changes frequently.
Finding Broken Links
Since we don't necessarily want to check the site map for broken links-can you imagine trying to do that for a site with hundreds of pages?-we can use one of Dreamweaver MX's features designed specifically for finding broken links; the Check Links feature. You can invoke the Check Links feature
in a number of ways (like most features in Dreamweaver MX), but the quickest way is to click the Site menu in the Site tab, Check Links Sitewide. You can also use the hotkey combination of Ctrl+F8. Once you do, Dreamweaver MX checks your entire site's linking and inclusion structure. Anything it finds suspect, it displays in the Results panel, as you can see in Figure 2.33.
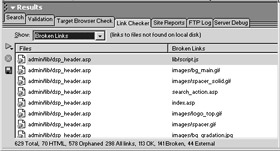
Figure 2.33: Dreamweaver MX checks our site for links it thinks might be broken.
You can also view external links and orphaned files (files for which Dreamweaver can find no incoming link, or call). Click the Show drop-down menu in the Link Checker panel to get to these two extra categories.
To fix broken links, you can double-click the link to open the file and jump immediately to the offending link. Fix the link, save your file, and you're done!
| Tip | If you have a number of links to fix within a file, a judicious use of Find/Replace All will save you lots of time. |
The Autoupdate Link Feature
One of the coolest features in Dreamweaver MX's link management repertoire is the Autoupdate Link feature. Suppose you need to move a document, or web page, from one folder to another. You can move the file, do a global search and replace through all your site files with the appropriate tag change, and then test the site to make sure you covered all your bases. Or, you can simply move the file into the new folder and let Dreamweaver MX do all the work. Drag the web page to its new location within the Site Tabpanel, and Dreamweaver displays a list of the files that refer to the file you're moving. You can choose to update or not by clicking the appropriate button, as shown in Figure 2.34. If you click Update, Dreamweaver MX takes care of the appropriate tag changes for you. Great, isn't it?
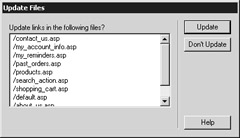
Figure 2.34: Dreamweaver MX can automatically update links to moved web pages for you.
| Warning | Unfortunately, Dreamweaver MX doesn't autoupdate links to graphics files and images. If you need to move these files, you'll have to revert to the old tried-and-true method of a global search and replace. Also, Dreamweaver MX cannot update links buried in custom-created scripts. There are simply too many possible variations in custom scripting, so Dreamweaver only checks and changes scripts that it creates as part of its feature set. If you have any custom scripts, you'll have to maintain those links by yourself as well. |
|
|
EAN: 2147483647
Pages: 214