Architectural Considerations
|
| < Free Open Study > |
|
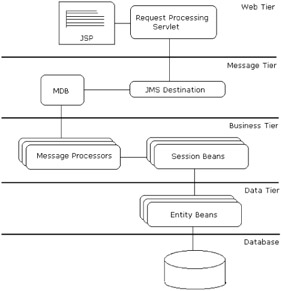
The architecture that a web application uses greatly influences the resulting performance and scalability. The following figure depicts the most commonly-used architectural model for J2EE web applications (as we saw in Chapter 1):
![]()
Communication between tiers will slow down the generation of a response, so it might appear sensible to reduce the number of tiers - effectively moving all the application processing into the presentation tier. However, in-memory session management, business logic, and data access will utilize the VM heap and CPU resources on the machine that hosts the presentation tier. When a lot of client threads start executing in the VM that hosts the presentation tier, there will be resource contention, which will result in degradation of performance - our application will not scale well.
It is important to partition the application across multiple tiers and to implement the different pieces of application logic in the most appropriate tier. It is also important to keep the presentation tier as thin as possible and to perform basic validation checks in the presentation tier.
In this section we are going to consider several architectural issues that impact upon the performance of applications:
-
Handling business logic
-
Accessing data
-
Caching data
-
Session management
-
Using asynchronous communication
-
Load balancing and clustering
Handling Business Logic
All enterprise-class web applications apply business logic during request processing. For a simplistic example, in an online banking system, if a user requests a transfer of funds between two accounts, the system may need to perform the following business rule checks:
-
Check the validity of the debiting account
-
Check the validity of crediting account
-
Check the availability of funds in the debiting account
Well architected enterprise applications always centralize business rule validations in a specific tier of the application. The choice of where the business rules are validated greatly impacts on the performance and scalability of the system. In this section, we will look at the various options for performing business rule validations and compare their advantages and disadvantages.
Requests from clients' browsers are normally received by request processing servlets or request delegate objects chosen by a controller servlet (depending on the architecture you use for your web tier). These elements that process the requests will normally have access to the request data, like request parameters and request attributes.
The snippet below shows a basic way to perform business rule validation within the request processing servlet. The excerpt is from the doPost() method of a request processing servlet:
InitialContext ctx = new InitialContext(); Object ref = ctx.lookup("java:comp/env/UserTransaction"); UserTransaction trans = (UserTransaction)PortableRemoteObject.narrow(ref, UserTransaction.class); trans.begin(); DataSource ds = ctx.lookup("java:comp/env/jdbc/myDB"); Connection con = ds.getConnection(); String creditAccountID = request.getParameter(""CREDIT_ID"); //Use JDBC to check the validity of the credit account String debitAccountID = request.getParameter(""DEBIT_ID"); //Use JDBC to check the validity of the debit account double amount = Double.parseDouble(request.getParameter("AMOUNT"); //Use JDBC to check the balance in the debit account //Use JDBC to credit the credit account //Use JDBC to debit the debit account trans.commit();
The above snippet performs the following tasks:
-
Looks up a user transaction provided by the J2EE web container
-
Starts a transaction
-
Looks up the datasource object and gets a connection
-
Validates the debit and credit account
-
Verifies the balance in the debit account
-
Debits the debit account
-
Credits the credit account
-
Commits the transaction
Even though the code looks fine, we are cluttering the presentation component (the request processing servlet) with both business and data access logic. This not only impacts on the performance and scalability of the system, but also degrades the extensibility and maintainability of the system too.
Using Task Delegation
Well designed applications always delegate specific tasks to specific entities with in the system. For example, these systems will have:
-
Business objects handling business logic
-
Data access objects that handle data access logic
-
Domain objects that model the system
In the above example, we can have a domain object called Account that will provide methods to get and set the account ID, account balance, and so on. There can be an AccountDAO to handle the data access logic and an AccountBO that handles the business logic. The presentation component will only interact directly with the business object for performing a business operation. As a result if we decide to partition the application to improve performance, we can move all the business, data access and domain objects to the enterprise tier and make the business object a remote object. The presentation component will look up the business object and delegate the task of business processing to the business component as shown in the sequence diagram below:
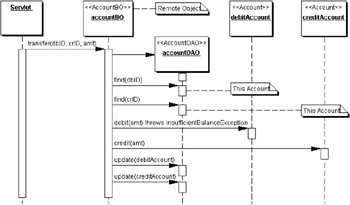
In this scheme there is minimal amount of processing within the presentation component. The business object may provide the functionality for demarcating transactions and the data access object the task of establishing database connections. Therefore it will be easier to decentralize business processing by partitioning the application to multiple tiers and making the business object available as a remote object. This may be accomplished either by using vanilla Java RMI or making the business object a session EJB. The advantage in making it a session EJB is that all the system level tasks like transaction management may be declaratively delegated to the EJB container. However, a comprehensive coverage of session EJBs is beyond the scope of this book and chapter. For more information, you should refer to Professional EJB (ISBN 1-861005-08-3) and Professional Java Server Programming J2EE, 1.3 Edition (ISBN 1-861005-37-7).
Accessing Data
Data access is one of the most important performance hotspots in most enterprise J2EE web applications. This predominantly because in many cases the enterprise's data is managed by processes running outside the VM hosting the web applications, such as relational database management systems. Optimizing the design of your data access layer can significantly improve performance and scalability.
Many of the measures you can use for improving data access involve shifting the data access logic to the enterprise tier, and using coarse-grained entity beans and session beans that act as data access objects. However, a comprehensive coverage of EJBs is beyond the scope of this chapter and the book. Hence in this section we will be concentrating more on improving data access performance within the presentation tier.
Data Access Objects
If you decide to perform data access within the web tier it is always better to design for data access later within your web tier, rather than using direct JDBC calls within your servlets. This will not only improve maintainability of the system, but it will also make it easier to refactor the system when you decide to perform data access within the enterprise tier. A standard pattern for implementing data access objects is to define one for every domain object within your system. The data access object will take care of all the logic related to persisting the instance of the domain objects in the backend storage. This will include calls for:
-
Creating a new instance
-
Updating an existing instance
-
Deleting an existing instance
-
Finding an instance by primary key
-
Finding an instance or collection of instances for a given predicate
If you have a domain object called Customer, the skeleton for a data access object CustomerDAO may look like the following:
public class CustomerDAO { public void create(Customer val) { //JDBC call for creating the instance } public void update(Customer val) { //JDBC call for updating the instance } public void delete(Customer val) { //JDBC call for deleting the instance } public Customer findByPrimaryKey(Object key) { //JDBC call for finding the instance by primary key } public Collection findByLastName(String name) { //JDBC call for finding all the instances by last name } }
Pooling JDBC Connections
In the pattern shown above, all of the methods will need to get a reference to a JDBC connection to the underlying resource manager used for persisting the data. However, physically opening and closing connections each time a method is accessed can involve heavy resource usage and significantly degrade performance and scalability. To avoid this, it is better to keep a pool of open connections; getting a connection from the pool when required, and returning the connection after use. To implement a connection pool, you have two different options:
-
Write your own connection pool using the JDBC core API
-
Using a third party pooling API
-
Rely on the container implementation of the JDBC optional extension interfaces such as DataSource, ConnectionPoolDataSource and PooledConnection
Your Own Connection Pool
In this section we will write a small connection pool based on JDBC core API. The class will provide methods for getting a connection from the pool, releasing the connection, initializing the pool, and so on.
The pool is initialized by specifying the JDBC URL, driver class name, number of connections, request timeout and security credentials. The initialization method creates the specified number of open connections and maintains it in a stack. When a client thread requests a connection, a connection is popped from the stack, and when a client thread releases a connection the connection is pushed into the stack. If the stack is empty, the client thread releases the monitor lock and waits for the specified period of timeout. When a connection is released the client thread notifies all the current threads waiting on the monitor lock. The listing below shows the code for our connection pool:
package pool; import java.util.Stack; import java.sql.Connection; import java.sql.SQLException; import java.sql.DriverManager; public final class ConnectionPool {
First we create the Stack object that stores the pooled connections, and the timeout value:
private Stack pool; private long timeout;
Then we create a single instance of the pool. The singleton pattern ensures that only one instance of the pool is available for the given VM and classloader. You may also configure the pool and make it available in a JNDI namespace as an alternative:
private static ConnectionPool mySelf; We have a private constructor to avoid public instantiation:
private ConnectionPool() {} Next we define the singleton accessor method:
public static ConnectionPool getInstance() { if(mySelf == null) { mySelf = new ConnectionPool(); } return mySelf; }
The initialize() method, below, initializes the pool:
public synchronized void initialize(String url, String driver, int numCons, long timeout) throws SQLException {
The method throws an exception if the pool is already initialized:
if(pool != null) { throw new SQLException("Pool already initialized"); } try {
We set the timeout and load the driver class:
this.timeout = timeout; Class.forName(driver);
Then we instantiate the stack instance and initialize the connections:
pool = new Stack(); for(int i = 0; i < numCons; i++) { pool.push(DriverManager.getConnection(url)); } } catch (ClassNotFoundException ex) { throw new SQLException("Driver not found."); } }
The getConnection() method obtains connections from the pool:
public synchronized Connection getConnection() throws SQLException { The method throws an exception if the pool is not initialized:
if(pool == null) { throw new SQLException("Pool not initialized"); }
If the pool is empty, we relinquish the monitor lock and wait for the specified timeout in a while loop. If the connection is still not available, we throw an exception:
while(pool.empty()) { try { wait(timeout); } catch (InterruptedException ex) { throw new SQLException("Connection not available"); } }
Then we return the connection:
return (Connection)pool.pop(); }
The releaseConnection() method releases the connection to the pool:
public synchronized void releaseConnection(Connection con) throws SQLException {
As with the previous method, we throw an exception if the pool is not initialized:
if(pool == null) { throw new SQLException("Pool not initialized"); }
If not, we push the connection to the stack and notify all of the threads waiting on the monitor lock:
pool.push(con); notifyAll(); }
This last method closes all of the connections in the pool:
public void destroyPool() throws SQLException { Throw an exception if the pool is not initialized.
if(pool == null) { throw new SQLException("Pool not initialized"); }
Close the connection and dereference the Stack object:
while(!pool.empty()) ((Connection)pool.pop()).close(); pool = null; } }
Using JDBC Optional Extension
A more elegant way of using pooled connections is to use the JDBC optional extension API. The JDBC optional extension specifies interfaces that may be used for pooling JDBC connections. The main interfaces are:
-
javax.sql.DataSource
This provides a factory-based approach for obtaining database connections.
-
javax.sql.PooledConnection
This interface encapsulates physical connections to the database
-
javax.sql.ConnectionPoolDataSource
This extends the DataSource interface and manages pooled connections
These interfaces are normally implemented by the container provider. Instances of the DataSource or ConnectionPoolDataSource interfaces may be configured within the container and made available to client programs using standard JNDI lookup. The J2EE 1.3 specification mandates that the web container should provide DataSource implementations that may be configured in a JNDI namespace.
The connections that are obtained from DataSource objects are intended to be returned to the pool when the close() method is called, rather than being physically closed. The snippet below shows the use of DataSource objects for getting JDBC connections:
//Create JNDI initial context InitialContext ctx = new InitialContext(); //Lookup the datasource object DataSource ds = ctx.lookup("java:comp/env/jdbc/myDB"); //Get the connection Connection con = ds.getConnection(); //Perform JDBC operations //Release the connection con.close();
Optimizing Record Retrieval
In the snippet for CustomerDAO we saw a method called findByLastName() that returns a collection. Assume we are displaying a list of Customer objects nested with other domain objects like customer rating, address, and so on, and the data is coming from multiple database tables. In the JDBC call we will issue a SQL command that joins all the relevant tables. Now the question is: what do we return back to the request processing servlet that will render the data in a HTML table? In an ideal object-orientated world we would have a Customer domain object composed of domain objects representing rating, address etc. We would create the required domain objects from the JDBC result set, compose the collection and return it to the request processing servlet.
In effect, the more complex your query, the more complex your tree of objects. Hence we have created a tree of objects from the relational tabular stream of data present in JDBC ResultSet. However, in the request processing servlet, we will again transform this tree of objects into tabular form to display as an HTML table.
We can therefore significantly improve the performance if we return the data in tabular form back to the servlet. However, we can't return the JDBC ResultSet back to the web tier, because in most of the JDBC driver implementations, as soon as you close the connection associated with the result set, the result set is also closed making it useless. This is where the RowSet interface defined in JDBC optional extension API comes into our rescue. The RowSet interface adds support to the JDBC API for the JavaBeans component model, and Sun provides an excellent implementation of this interface called CachedRowSet that can be downloaded from the Javasoft website. This implementation can work in a disconnected mode from the JDBC connection because it enables us to cache the data extracted from the database, and it therefore makes an excellent DTO (Data Transfer Object).
The snippet below demonstrates how the finder method can work with a CachedRowSet:
import javax.sql.DataSource; import javax.sql.RowSet;
We need to import the RowSet implementation:
import sun.jdbc.rowset.CachedRowSet; public Class CustomerDAO { public RowSet findByLastName(String name) { try {
In the findByLastName() method, we start by creating a new CachedRowSet:
RowSet rs = new CachedRowSet(); Then we set the JNDI name of the datasource that will provide the database connection:
rs.setDataSourceName("java:comp/env/jdbc/inventoryDB"); Next we define the SQL query used to retrieve the data:
String sql = ("SELECT a.Name, b.rating, c.address " + "FROM customer a, rating b, address d " + "WHERE a.id = b.id " + "AND a.id = c.id " + "AND a.lastName = ?";
We then use this to set the SQL command for the RowSet, and we also set the input parameter:
rs.setCommand(sql); rs.setString(1, name);
The execute() method will execute the SQL, fill the RowSet and close/release the connection.
rs.execute(); The final step is to return the RowSet to the servlet:
return rs; } catch (Exception ex) { //Handle exception } } }
The servlet may simply iterate through the returned RowSet and print the data stored in it as shown below:
RowSet rs = new CustomerDAO().findByLastName("Flintstone"); while(rs.next()) { out.println("rs.getString(1)); out.println("rs.getString(2)); out.println("rs.getString(3)); }
As it is relatively simple to use, CachedRowSet is ideal for caching database data in smaller web applications where using EJBs for this purpose would be over the top.
Caching Data
Caching data that is frequently accessed and shared by the users of the application helps to achieve high levels of scalability and performance in web applications that support a large number of concurrent users.
There are different types of objects and resources we would like to cache, such as domain objects that are shared between users, expensive resources, and data retrieved from external systems running outside the process space of the web container VM.
There are different strategies we can take towards caching, each suitable for different objects. Most caching strategies either use a LRU (Least Recently Used) or a MRU (Most Recently Used) replacement algorithm. In LRU, when the cache is full and a new object needs to be placed in the cache, the least recently used object in the cache is replaced. In the MRU mechanism, the new object is added to the top of the cache (which contains the most recently-used objects), but the object at the other end (the least recently-used end) of the cache is removed. Commercial frameworks may also use complex caching algorithms based on access patterns.
There are various caching applications and APIs available. PoolMan from http://www.codestudio.com/ is one of the popular frameworks used for SQL data caching. Many of the commercial Object-Relational mapping tools like TopLink and CocoBase also provide a caching layer. However, these commercial frameworks are often quite expensive, so you may consider developing your own.
We are going to develop a caching framework following a simple LRU replacement algorithm that is easy to develop and use. The strategy you choose depends very much on your caching requirements. For example, if your application tend to access the same objects in quick succession it is better to go for the LRU algorithm as the most recently accessed object may be required again in the near future. However, if your application tends not to access an object that is quite recently accessed, it is better to go for an MRU strategy.
Developing a Simple Caching Framework
We're going to develop a simple caching mechanism based on the Least Recently Used (LRU) algorithm. In a cache that implements LRU replacement algorithm, the least recently used object is replaced from the cache when the cache is full. Our caching service must be able to:
-
Manage multiple caches that cache different type of objects. For example you may need a cache for Customer objects and a different one for Product objects.
-
Provide a global point of access for the caching service within the application. This will provide a singleton instance of the cache manager that can be accessed from anywhere within the application.
-
Provide access to each of the objects that are stored in the cache via a unique identifier
-
Set a size limit for the caches, restricting the number of objects that may be stored in the cache.
-
Allow the addition of new objects to the cache, replacing the least recently used object when the cache is full
-
Expire cached objects after predefined intervals, to avoid "dirty" data (how we define "dirty" data depends on our application requirements).
From the requirements we specified, we identify three basic interfaces that make up the caching framework. These interfaces define the methods that need to be implemented by the objects that are cached, the objects that serve as caches, and the objects that manage a collection of caches. We're also going to provide simple implementations for the cache and cache manager objects.
Defining the Caching Interfaces
The ICacheable interface defines the methods that need to be implemented by the objects that are cached. It contains methods to:
-
Get the object's unique identifier
-
Get and set the time the cached object was last accessed
-
Set the expiry time for the cached object
Here's the interface:
package cache; public interface ICacheable { public Object getIdentifier(); public long getLastAccessedTime(); public void setLastAccessedTime(long time); public long getExpiryTime(); }
The ICache interface defines the methods that need to be implemented by objects that function as caches. It defines methods to:
-
Get and set the name of the cache
-
Get and set the size of the cache
-
Get a cacheable object via its unique identifier
-
Expire all objects with an expiry time less than the current time
-
Add a new cacheable object
Here's the ICache interface:
package cache; public interface ICache { public String getName(); public void setName(String name); public int getSize(); public void setSize(int size); public ICacheable getCacheable(Object identifier); public void expire(); public void addCacheable(ICacheable cacheable); }
The ICacheManager interface defines the methods that need to be implemented by the objects that manage a collection of caches. It defines two methods to:
-
Get a cache by its name
-
Add a new cache
The ICacheManager interface is defined below:
package cache; public interface ICacheManager { public ICache getCache(String cacheName); public void addCache(ICache cache); }
Implementing the Interfaces
Our next task is to provide simple implementations for the interfaces we defined. We'll begin with the cache manager interface.
The Cache Manager
In most cases an application requires a single cache manager instance that can be accessed globally by client classes. This is because the cache may be initialized at one point in the application but used at a different point. Accordingly, this class is implemented using the singleton pattern.
Using a singleton pattern ensures that there is only one instance of a class instantiated for a given VM and class loader. Please note that in a clustered environment you may typically end up with a cache manager per VM. In such cases it is better to implement the cache manager and caches as remote objects, and leave the task of replicating the state to the container and the cluster management software.
Here's the implementation of the ICacheManager interface, CacheManagerImpl:
package cache; import java.util.*; public final class CacheManagerImpl implements ICacheManager {
This is the singleton instance:
private static CacheManagerImpl mySelf; This hash map stores the collection of managed caches:
private HashMap cacheMap = new HashMap(); The constructor starts a low priority thread that goes through all the managed caches and expires the cached objects that are due for expiry:
private CacheManagerImpl() { Thread th = new Thread(new Runnable() { public void run() { try { Thread.sleep(60*1000); } catch(InterruptedException ex) { throw new RuntimeException(ex.getMessage()); } expire(); } }; th.setPriority(th.MIN_PRIORITY); th.start(); }
We will define the expire() method a little later. Next we define a method to provide access to the singleton instance:
public static ICacheManager getInstance() { if(mySelf == null) { synchronized(ICacheManager.class) { if(mySelf == null) { mySelf = new CacheManagerImpl(); } } } return mySelf; }
Next, we implement the two methods defined in the ICacheManager interface. The first gets a cache from the collection of managed caches via its name:
public ICache getCache(String cacheName) { synchronized(this) { return (ICache)cacheMap.get(cacheName); } }
The second adds a cache to the collection of managed caches:
public void addCache(ICache cache) { synchronized(this) { cacheMap.put(cache.getName(), cache); } }
In the constructor we made use of an expire() method that we define here. This private method is called from the low priority thread in order to expire cached objects. It goes through all the managed caches and expires the cached objects that are due for expiry:
private void expire() { synchronized(this) { Iterator it = cacheMap.values().iterator(); while(it.hasNext()) { ((ICache)it.next()).expire(); } } } }
The Cache
Next, we implement the ICache interface in the SimpleCacheImpl class:
package cache; import java.util.*; public class SimpleCacheImpl implements ICache {
We define private fields to hold the name of the cache, its maximum size (which we set to 100), its current size, and a collection to stored the cached objects in:
private String name = ""; private int size = 100; private int currentSize = 0; private HashMap objectMap; public SimpleCacheImpl() { objectMap = new HashMap(); }
We implement methods to get and set the name of the cache, and to get and set the size of the cache:
public String getName() { return name; } public void setName(String name) { this.name = name; } public int getSize() { return size; } public void setSize(int size) { this.size = size; }
We implement the method to get a cached object corresponding to the specified identifier too. This method sets the last accessed time of the cached object to the current time:
public ICacheable getCacheable(Object identifier) { synchronized(this) { ICacheable cacheable = (ICacheable)objectMap.get(identifier); if(cacheable != null) { cacheable.setLastAccessedTime(System.currentTimeMillis()); } return cacheable; } }
The expire() method removes all the cached objects that are due for expiry. The current size of the cache is also updated accordingly. An expiry date of zero is understood to mean that the cached object will never expire:
public void expire() { synchronized(this) { Iterator it = objectMap.keySet().iterator(); while(it.hasNext()) { ICacheable current = (ICacheable)objectMap.get(it.next()); if(current.getExpiryTime() <= System.currentTimeMillis() && current.getExpiryTime() != 0) { currentSize--; objectMap.remove(current.getIdentifier()); } } } }
The addCacheable() method adds a new object to the cache. If the cache is full, the least recently used object is removed from the cache.
public void addCacheable(ICacheable cacheable) { synchronized(this) {
If the object is already present in the cache, we return:
if(objectMap.containsKey(cacheable.getIdentifier())) { return; }
If the current size is equal to the maximum size, we iterate through the cache to find the least recently used object:
if(currentSize == size) { Iterator it = objectMap.keySet().iterator(); long time = System.currentTimeMillis(); ICacheable lastAccessed = null; while(it.hasNext()) { ICacheable current = (ICacheable)objectMap.get(it.next()); if(current.getLastAccessedTime() < time) { time = current.getLastAccessedTime(); lastAccessed = current; } }
Then we remove the least recently used object and decrement the current size:
if(lastAccessed != null) { currentSize--; objectMap.remove(lastAccessed.getIdentifier()); } } cacheable.setLastAccessedTime(System.currentTimeMillis()); objectMap.put(cacheable.getIdentifier(), cacheable); currentSize++; } } }
Using the Caching Framework
To use the caching framework, the objects that are cached should implement the ICacheable interface. Please note that if you want to cache third party objects you can wrap the third party object in a wrapper object that implements this interface. Then you can either use the cache and cache manager implementations provided by the framework, or write your own implementations.
We'll define an Employee object that we want to cache:
package cache; public class Employee implements ICacheable { private String id; private String name; private long lastAccessedTime; private long expiryTime;
The constructor initializes the id and name, and the expiry time is set to zero:
public Employee(String id, String name) { this.id = id; this.name = name; this.expiryTime = 0; } public Object getIdentifier() { return id; } public String getName() { return name; } public long getLastAccessedTime() { return lastAccessedTime; } public void setLastAccessedTime(long time) { lastAccessedTime = time; } public long getExpiryTime() { return expiryTime; } }
The example below demonstrates how the caching framework may be used within a servlet. The servlet initializes the cache in the init() method, and after that the doGet() method uses the singleton accessor to get a reference to the cache manager and extract the cached objects. Please note that the cache manager may be initialized in the init() method and later accessed from anywhere in the web application:
package cache; import javax.servlet.ServletConfig; import javax.servlet.ServletException; import javax.servlet.http.HttpServlet; import javax.servlet.http.HttpServletRequest; import javax.servlet.http.HttpServletResponse; import java.io.IOException; import java.io.PrintWriter; public class CacheServlet extends HttpServlet { public void init(ServletConfig config) throws ServletException { super.init(config);
At the start of the init() method of the servlet, we initialize the cache manager and create a new cache:
ICacheManager manager = CacheManagerImpl.getInstance(); System.out.println(""); System.out.println("Cache manager retrieved"); ICache cache = new SimpleCacheImpl(); cache.setName("employeeCache"); cache.setSize(10); System.out.println("Cache created");
Then we add this cache to the cache manager, and finally add a cached object to the cache:
manager.addCache(cache); System.out.println("Cache added"); cache.addCacheable(new Employee("123", "Meeraj")); System.out.println("Object added to cache"); } public void doGet(HttpServletRequest request, HttpServletResponse response) throws ServletException, IOException {
The doGet() method gets a reference to the cache manager singleton, retrieves the cache by name, and then accesses the cached object from the cache by specifying the identifier:
ICacheManager manager = CacheManagerImpl.getInstance(); System.out.println(""); System.out.println("Cache manager retrieved"); ICache cache = manager.getCache("employeeCache"); Employee emp = (Employee)cache.getCacheable("123"); if(emp == null) { //return the employee from the database and add it to the cache } System.out.println("Employee "+emp.getName()+" retrieved from cache"); } }
Running the Caching Application
To run the application you will need a web app. Place the classes above in a folder called cache in the WEB-INF directory of the web application and compile them. Also add the following servlet declaration and servlat mapping to the web.xml file of the web app:
... <servlet> <servlet-name>CacheServlet</servlet-name> <servlet-class>cache.CacheServlet</servlet-class> </servlet> <servlet-mapping> <servlet-name>CacheServlet</servlet-name> <url-pattern>/CacheServlet</url-pattern> </servlet-mapping> ...
Now start up Tomcat, and access the CacheServlet via http://localhost:8080/cache/CacheServlet (you should replace cache with the name of your web app). You should see the following output at the command line:
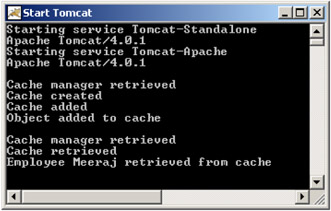
As you can see, the init() method of the servlet is accessed first, where the cache manager is retrieved, the cache is created and added, and an Employee object is added to the cache. Then the doGet() method is accessed on request; in this method the cache is retrieved and the Employee object corresponding to the id 123 (Meeraj) is retrieved. If you accessing the servlet again, the doGet() method will get called again, so the same Employee object will be retrieved from the cache again.
Session Management
The HTTP protocol that is most commonly used in J2EE web applications is a stateless protocol - in other words one that doesn't preserve state across multiple requests from the same web client to the J2EE web application. HTTP sessions provided by the J2EE Servlet API provide an excellent way of linking multiple requests from a single web client as parts of a conversation. HTTP sessions also provide a great way of storing client specific data on the server, there by avoiding the tedious task of transferring huge amount of data back and forth during requests and responses. In this section we will have a look at the various options for storing session data to improve performance and scalability.
The default way of handling HTTP sessions in J2EE web applications is to use the HTTPSession interface provided by the Servlet API. This interface provides methods for storing and retrieving user data into the session.
Once a session is established, the session data is stored on the server and only a string that identifies the session is sent back and forth, between the client and server during the subsequent requests and responses. The Servlet specification states that this string should be sent as a cookie or a rewritten URL and should be called jsessionid. However, the process by which the session ID is transmitted should be transparent to the application developer. The HTTPServletRequest interface provides methods for getting a reference to the session associated with the current request and establishing a new session. A session becomes invalid when it times out or when it is programmatically invalidated at the server. The snippet below demonstrates the basic way of handling sessions via the doGet() method, as we saw in Chapter 5:
public void doGet (HttpServletRequest req, HttpServletResponse res) throws ServletException, IOException { HttpSession sess = req.getSession(); sess.setAttribute("myName", "Meeraj"); String myName = (String)sess.getAttribute("myName"); sess.removeAttribute("myName"); }
Web containers normally store the HTTP sessions as in-memory objects in the VM heap that runs the web container. This will provide very good performance as the session data is held is very close to the client tier. However, when the load on the application increases, this may pose serious problems with resource contention and have a negative impact on the scalability of the system. This problem can be resolved either by clustering the web application across multiple servers, or delegating the session management logic to a different tier in a partitioned J2EE application.
Now we will have a look at the other viable options for storing session data.
Storing Sessions in Backend Databases
In this solution the actual session data is stored in a database table as a blob. The session IDs of the sessions that are stored in the database table act as the primary keys for the table. This ID is sent back forth, between the client and the server. When a session is requested, the session ID from the current request is used to retrieve the session data that is stored as a blob from the database table. However, if your chosen application server implements this strategy by appropriately implementing the HTTPSession and HTTPServletRequest interfaces, the actual session data management mechanism will be transparent to the application developers. They only need to know about the contracts defined by the relevant interfaces.
This solution can significantly reduce the amount of resources used within the VM heap that hosts the web container, significantly improving scalability. Another advantage is that the session data is persisted and the sessions may be maintained across shutdowns and startups of your web server. However, this approach incurs a performance cost to the system since it involves frequent database access. Also, if the application server doesn't implement this approach, you will end up writing the code that implements your database-based session management scheme.
Storing Sessions in Stateful Session Beans
In this case, we use the session management facilities to only a limited extent. We will store the real session data within the enterprise tier using stateful session beans. This is illustrated in the diagram below:
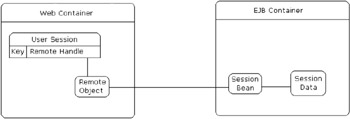
In this case, the first time a session is established, a stateful session EJB that mimics the functionality of an HTTP session object is created, and the EJB remote handle stored in the real HTTP session object is associated with the request. Each time the session is accessed, the remote handle is used to obtain a reference to the EJB remote object. The EJB remote interface will expose methods for adding, retrieving and removing session data. However, in this case the session data is stored in the EJB container.
In this approach we distribute the session management functionality between the web and the EJB tiers. Even though this approach requires more initial programming and doesn't provide the same performance as the first approach, this scheme does increase scalability.
However, most of the web containers won't provide an implementation for handling sessions using EJBs, so you will end up writing the implementation on your own. A possible way of doing this is to write your own implementations for the HTTPSession and HTTPServletRequest interfaces that use EJBs for session management. Then use a servlet filter to create your own implementations of the Session and Request objects that wrap the original container implementations. Your implementations will delegate most of the methods defined by the interfaces to the container implementations. However, the methods for handling sessions will be implemented differently, to use stateful session EJBs instead. When you forward the request and response within the filter class, you will pass your objects instead of the container object.
Comparing Schemes for Storing Session Data
The table below compares the various approaches for maintaining HTTP sessions.
| Scheme | Ease of Use | Performance | Scalability | Development Time |
|---|---|---|---|---|
| In-Memory High | High | Low | Low | |
| Vendor BLOB | High | Moderate | High | Low |
| Custom BLOB | Moderate | Moderate | High | High |
| Session EJB | High | Moderate | High | Very High |
Using Asynchronous Communication
Some user requests initiate processes in a web application that take a relatively long time to complete. In this case, it is not a good idea to make the request thread wait for the processing to finish before a response is sent back to the browser. Traditionally the way J2EE web applications dealt with such scenarios was to spawn a new thread from the request thread, delegating the responsibility of processing the request, and then immediately returning an information message back to the server. However, there are two main disadvantages to this approach:
-
Most of the mainstream application server vendors put restrictions on spawning new threads
-
More importantly, spawning a lot of threads within the web container can lead to heavy resource usage and so poor performance and scalability
Since JMS (Java Message Service) became a mandatory API with J2EE 1.3, and with the advent of MDBs (message driven beans), a plethora of avenues for asynchronous processing in J2EE applications have been opened. In asynchronous communication, the message recipient doesn't need to receive or respond to the message immediately after it is sent, and the sender doesn't need to receive a reply from the sender immediately either.
MDBs are EJB components that get activated by JMS messages. They provide all of the features that are provided by other types of EJBs, such as declarative transaction, security management, and so on. Let's now take a closer look at how JMS-enabled asynchronous messaging, so that we can understand how this form of communication can improve the scalability of our applications.
An Overview of the JMS Architecture
The Java Message Service (JMS) specifies a standard set of interfaces for enabling Java applications to exchange enterprise messages asynchronously in an efficient and vendor-neutral manner. The JMS interfaces and classes belong to the package javax.jms and are available with Java 2 Platform, Enterprise Edition. In this section we're going to take a look at the arc.
JMS Providers and Clients
The software vendors who provide the messaging products implement the interfaces defined in the JMS specification. These software vendors are called JMS providers in JMS terminology. Java applications that use JMS for exchanging enterprise messages are called JMS clients. JMS clients that don't use any vendor-specific features, only standard JMS interfaces for implementing their messaging solutions, are portable across different JMS providers. Clients normally connect to a central messaging hub supplied by the JMS provider, and exchange messages through this messaging hub instead of connecting to each other directly. In addition, clients use the services provided by the JMS provider for sending and receiving enterprise messages.
JMS Messages
The JMS specification defines different kinds of messages that can be exchanged by JMS clients. JMS messages can be plain text messages or an entire serialized web of Java objects. The JMS specification defines messages containing:
-
Plain text
-
Serialized Java objects
-
An uninterpreted stream of bytes
-
A stream of Java primitives and strings
-
A map of Java primitives and strings
Additionally JMS providers may provide their own message extensions. For instance, providers may provide messages that extend plain text messages that can support XML.
Administered Objects
Administered objects are pre-configured objects stored in a namespace by JMS administrators for the use of JMS clients. An administrator is the person responsible for ensuring the proper day-to-day functioning of the JMS system. Administered objects form the basis for writing portable JMS applications. They are normally available for standard JNDI (Java Naming and Directory Interface) lookup, even though the JMS specification doesn't make this requirement. Administered objects can be stored outside the JMS provider, in the namespace of any naming and directory service provider. JMS defines two kinds of administered objects:
-
One for obtaining connections with the JMS provider
-
One for specifying the destinations to which JMS clients send messages, and the sources from which they receive messages
These objects include factory objects for creating connections as well as message destinations. Connection factories are used for creating connections that can represent an open TCP/IP socket to the provider. All configuration information required for creating the connection is stored in the administered object by the JMS administrators. Connections also act as factories for creating JMS sessions. Connections are explained in further detail in the coming sections.
Sessions are single-threaded contexts for sending and receiving messages, and are used as factories for creating different kind of JMS messages. They are also used for creating objects that send and receive messages. These objects are called message producers and message consumers respectively.
Message consumers and producers are associated with specific message destinations/sources. A consumer can receive messages only from the message source it is associated with and a producer can send messages only to the message destination it is associated with. JMS supports both synchronous and asynchronous message delivery to message consumers.
The diagram below depicts the high-level architecture of a JMS system as explained above.
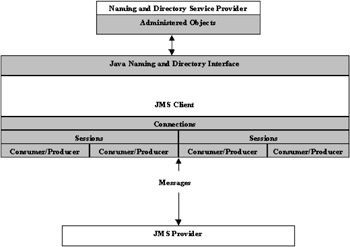
The JMS specification defines interfaces for all the JMS entities explained above like connections, sessions, connection factories, destinations, and so on. Portable JMS clients need to be aware of only these interfaces and should not be using any of the provider-specific implementation classes in their application code.
Messaging Models
JMS specification supports two messaging models:
-
Point-to-Point (PTP)
The PTP messaging model is based upon message queues. JMS clients send messages to and receive messages from specific message queues provided by the JMS provider. In the PTP messaging model, only one client can retrieve a message from the message queue. Once a JMS client has retrieved a message from a message queue, the message is no longer available for any other JMS client accessing the message queue. A message is addressed to a specific message queue and it remains in the queue until a client removes it. Message queues are generally configured and stored in a JNDI namespace and are available for clients by standard JNDI lookup. In the PTP model message producers are called queue senders and message consumers are called queue receivers.
-
Publish/Subscribe (Pub/Sub)
This model enables messages to be addressed to more than one client. In the Pub/Sub model, message producers are called topic publishers and message consumers are called topic subscribers. Publishers send messages to topics to which multiple clients can subscribe. Topics are generally configured and stored in a JNDI namespace and are available for clients by standard JNDI lookup. A topic can have multiple publishers as well.
In both messaging models clients can invariantly act as message producers and message consumers.
Message-Driven EJBs
Message-driven beans (MDB) provide an elegant way of registering components that are activated by asynchronous JMS messages delivered to specific JMS destinations. These EJBs implement javax.ejb.MessageDrivenBean and javax.jms.MessageListener interfaces. The MessageListener interface defines the onMessage(Message msg) method that is called by the container when a message is delivered to a JMS destination monitored by the bean.
The destination type, transaction contexts, security details, and so on, are defined in the deployment descriptor of the bean.
Improving Scalability Through Asynchronous Messaging
In the case of requests that take a long time to process, when it receives a request, a request-processing servlet can send a JMS message to a JMS destination, wrapping the request data. The thread that runs the servlet can immediately return, providing an informational message. The MDB listening on the JMS destination can retrieve the message and perform the required processing. This is illustrated in the diagram shown below:
Load Balancing and Clustering
In most cases scalability is adversely affected by a huge number of client threads contending for a limited amount of resources on the machine that hosts the web container. Clustering is an effective solution to this problem, which allows us to construct highly available and scalable web applications. Clusters let the load on the web application be shared across multiple VMs running on different machines participating in the cluster. A cluster may be basically defined as a group of web containers hosted by different physical machines that run a web application as a single entity in a transparent manner. Machines that participate in the cluster may transparently share J2EE resources like JSPs, servlets, HTTP sessions, JNDI namespaces, EJB components, and so on.
The main elements that are involved in a clustered architecture are the following:
-
Load balancers - these are the common entry points to the clusters and routers to the web containers participating in the cluster
-
J2EE web containers
-
Gateway routers - these are exit points from the internal network
-
Multi-layer switches -these elements make sure the individual machines in the cluster receive only information specific to that machine
Types of Clusters
There are two different schemes adopted by web container vendors for implementing clustering. The first solution defines the machines participating in the cluster totally independently of each other. The machines participating in the cluster are integrated using a dispatcher element, which receives the client requests and sends a response with a redirect header directing the client to access a particular machine in the cluster.
The second solution uses a tightly coupled group of machines that are aware of each other and the resources running within them.
The clusters are basically classified depending on the type of sharing scheme they use for resources. In the first scheme, the participating machines in the cluster have their own file systems and have their own running copies of the application. This makes application upgrades very difficult for large clusters as the latest versions must be applied to all the machines participating in the cluster. The second scheme uses a shared storage space from where the machines participating in the cluster may acquire the latest running copy of the web applications. A drawback of this scheme is the single point of failure in the cluster. The main factors that need to be considered when you choosing a cluster implementation are:
-
Failover services for the web components
-
Failover services for HTTP sessions
-
Software maintenance
-
Replication schemes for web components
-
Replication scheme for HTTP sessions
-
Single point of failure in the cluster
Distributed Sessions and Clusters
The web applications that run on clustered servers should be marked as distributable in the web deployment descriptor, and all of the objects that are stored in the HTTP sessions should be tagged as serializable by implementing the java.io.Serializable interface. Most of the cluster schemes promote server affinity, which in turn enables sticky sessions. This means that once a client connection is attached to a server in the cluster, the subsequent requests from that client are directed to the same server by the load balancer, and the primary HTTP sessions for those requests are maintained on the server to which the requests are attached.
However, the main purpose of session failover is that when a request is redirected to a different server on failure of the server to which the client is attached, the session data should be persisted. Commercial web containers provide different schemes for the replication of session data. This ranges from JDBC-based session stores to in-memory session stores (with session data replicated after each request or depending on the events fired on session attribute listeners). The scheme used for session replication mainly impacts upon the cluster performance.
Content Type and Scalability
The choice of the type of software used on the machines that participate in the cluster greatly depends on the type of content that is served. If your application serves a lot of static content, you can serve them directly using a web server without depending upon a J2EE web container. In this case you can improve the scalability of your application by adding more web servers in the cluster, because the bulk of the client requests will be for static content. However, if your application serves more dynamic content, you can improve the scalability of the system by adding more web containers to the cluster.
|
| < Free Open Study > |
|
EAN: 2147483647
Pages: 130