Looping Commands
Computers excel at processing huge amounts of data very quickly. Indeed, the most common task for a programmer is to write a program that automates a manual process, tasking a computer to perform the work that previously required a great deal of human effort to complete. The manual process almost always includes a human typing in data or performing some other task, such as filing paperwork. To automate a process, programmers usually employ loops that run through large lists of transactions or other processes and perform one or more tasks depending on the type of data in the list.
For example, most banks process thousands or even millions of financial transactions a day. This is only possible because computers quickly iterate through the transactions and process them very quickly, one at a time. In the days before computers revolutionized the banking industry—something that happened to most industries, in fact—vast hordes of tellers, accountants, statisticians, and auditors were required to process and balance the dreaded end-of-day pile of deposits, withdrawals, loans, and other financial tasks. Thanks to computers and their awesome looping capabilities, humans are free to perform tasks that are better suited to their nature, such as helping customers and making business decisions.
Understanding the Importance of Looping
This chapter provides an overview of the looping commands built into DarkBASIC. There are four looping commands available, and it's important to understand the strengths and weaknesses of each. The four looping commands are
- FOR…NEXT
- DO…LOOP
- REPEAT…UNTIL
- WHILE…ENDWHILE
I'll explain each of these commands in detail shortly. In the meantime, I'd like to provide you with a little background information.
What Is a Loop
A loop can be defined as anything that repeats something over and over. It has a starting point and an ending point. See Figure 5.1 for an example of a loop. It contains a circle with a big black dot. The big black dot indicates the beginning and ending points of the loop.
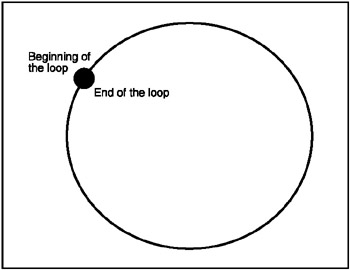
Figure 5.1: A simple representation of a loop
Although the computer doesn't actually use a circle to perform a loop, this is a suitable illustration of the concept. You have a starting point, which is the first instruction in the loop. The program then executes one instruction after another inside the loop until it reaches the last instruction. It then jumps back to the first instruction and begins the process again. So you see, it's not exactly like a circle, but I suppose that concept is where the term "loop" originally came from.
It s All About Iteration
It's all about iteration, the ability to get repetitive things done. A loop in DarkBASIC will help you complete some repetitive task. A single iteration is complete when you have reached the ending point, where DarkBASIC will decide whether you need to return to the starting point or continue with the program based on the conditions you have set.
Iteration is the process of repeating one or more commands until a series has been processed (or completely run).
My best example of a repetitive task is mowing the lawn. I know … what a bore, right? In fact, I'm writing this chapter right now instead of doing it. Mowing the lawn is indeed a repetitive task—not only in the number of times it needs to be done during the summer, but also the actual process of going around the yard, row after row. Mowing involves pushing—or if you are lucky, riding—the lawnmower back and forth across the yard, as straight as possible. Eventually, you complete a row and must turn around for the next row. This could be thought of as a loop, since you're performing the same task over and over until the yard is done.
Number Looping
At this point you might be wondering, "How will looping help me write a game with DarkBASIC?" I'm glad you asked! You might use looping in DarkBASIC to find the solution to a problem. Suppose you write a program that asks the user to type in 10 numbers, which the program will then add. Here's a short example—a program called Adder1 (see Figure 5.2). You will find this program on the CD in the SourcesChapter05Adder1 folder.
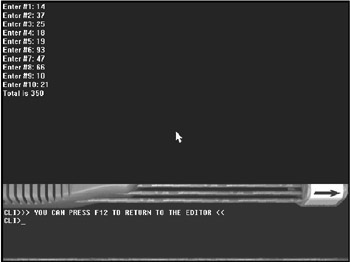
Figure 5.2: The Adder1 program demonstrates multiple additions without loops.
REM --------------------------------
REM Beginner's Guide To DarkBASIC Game Programming
REM Copyright (C)2002 Jonathan S. Harbour and Joshua R. Smith
REM Chapter 5 - Adder1 Program
REM --------------------------------

REM This program will take a series of numbers and add them together
REM This program is written without the use of LOOPS
print "Enter #1: ";
INPUT a
Total = a
print "Enter #2: ";
INPUT a
Total = Total + a
print "Enter #3: ";
INPUT a
Total = Total + a
print "Enter #4: ";
INPUT a
Total = Total + a
print "Enter #5: ";
INPUT a
Total = Total + a
print "Enter #6: ";
INPUT a
Total = Total + a
print "Enter #7: ";
INPUT a
Total = Total + a
print "Enter #8: ";
INPUT a
Total = Total + a
print "Enter #9: ";
INPUT a
Total = Total + a
print "Enter #10: ";
INPUT a
Total = Total + a
print "Total is "+str$(Total)
WAIT KEY
Let me guess … after the third or fourth line of code things started to look familiar, and it only got worse with each passing line. It's called repetition! Any time you find yourself typing in the same thing two or more times, it's a good hint that a loop will be helpful.
The Adder1 program has approximately 30 lines of code. Using a loop, that same program can probably be written with fewer than seven lines of code. But the real advantage is that those short seven lines of code can be employed to handle 50, 100, 1,000, or any number of iterations! It makes no difference at all to DarkBASIC because it is simple a repetitive loop, and programming languages excel at doing things like that.
When I was in high school, I used loops all the time in computer class. My teacher once asked us to write a program to accept a list of test grades and then return the average score. The assignment was easy using a loop! In the next section, I'll introduce you to the first looping command, FOR…NEXT, and then I'll show you how to convert that unwieldy Adder1 program into a more elegant solution.
Looping through an Array
There are other practical applications for loops that might be overlooked at times. You can use loops to read numbers in arrays. By looping through an array, you can perform complex tasks based on the data in the array (such as calculating the sum or an average). Figure 5.3 illustrates an array being passed though a loop.
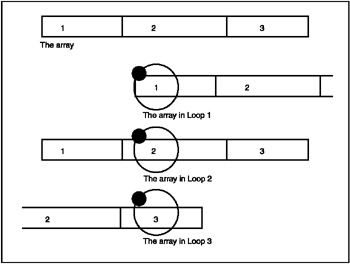
Figure 5.3: An array within a loop
Working with Looping Commands
DarkBASIC has many different commands for looping, each of which has its own unique way of defining the starting and ending points of the loop. As I mentioned briefly at the beginning of the chapter, there are four looping commands in DarkBASIC: FOR…NEXT, DO…LOOP, REPEAT…UNTIL, and WHILE…ENDWHILE. The difference between these commands is the condition each one uses to determine when the loop is finished.
What is a condition? It is a programming statement that resolves to either a true or false answer. A condition determines each iteration through a loop; if the condition is true, then the loop ends and the program continues. Chapter 8, "Number Crunching: Mathematical and Relational Operators and Commands," covers the myriad conditions supported in DarkBASIC, so I'll stick to very simple conditions now and save the more advanced subjects for later. For a quick reference, Table 5.1 shows the relational operators used to test a condition.
|
Symbol |
Description |
|---|---|
|
= |
Equal |
|
<> |
Not equal |
|
< |
Less than |
|
> |
Greater than |
|
<= |
Less than or equal |
|
>= |
Greater than or equal |
The FOR NEXT Command
The first looping command up to bat is FOR…NEXT. It's deceptively simple, but it provides easily understandable results. With the FOR…NEXT command, you can define how many times you want the loop to run. A loop that runs forever—in which case the condition is always false—is called an infinite loop. Fortunately, the FOR…NEXT command is the most limited of the four looping commands because it runs a fixed number of times. The starting point of the loop is the FOR command; the ending point is the NEXT command. See Figure 5.4 for an example.
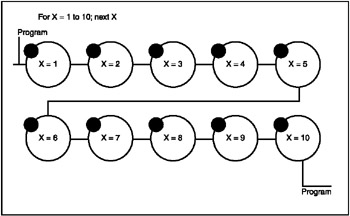
Figure 5.4: A FOR…NEXT loop
The command format for the FOR…NEXT loop is
FOR variable = starting number TO ending number
NEXT variable
The FOR command initiates the first loop by making the variable equal to the starting number. When DarkBASIC reaches the NEXT command, it returns to the FOR command and adds 1 to the variable. When the variable reaches the ending number, the NEXT command does not return to the FOR command. Instead, it continues through the source code.
Using the FOR…NEXT Command
So let's use the FOR…NEXT loop in a practical sense. Why not shorten the Adder1 program to seven lines, like I said could be done? The Adder2 program (shown in Figure 5.5) follows. You will find this program on the CD in the SourcesChapter05Adder2 folder.
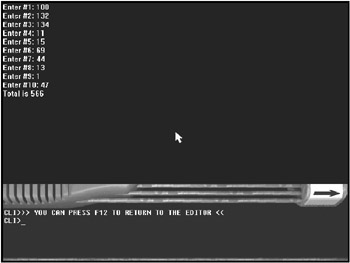
Figure 5.5: The Adder2 program demonstrates multiple additions with a FOR…NEXT loop.
REM ---------------------------------
REM Beginner's Guide To Game Programming With DarkBASIC
REM Copyright (C)2002 Jonathan S. Harbour and Joshua R. Smith
REM Chapter 5 - Looping Commands
REM ---------------------------------

REM This program will take a series of numbers and add them together
REM This program is written with the use of a FOR...NEXT loop

Total = 0
FOR x = 1 to 10
print "Enter #"+str$(X)+": ";
INPUT a
Total = Total + a
NEXT x print "Total is "+str$(Total)
WAIT KEY
It is pretty simple and yet so very powerful. With a single change of a number, you can make the program add 100 numbers or even 1,000 numbers! Try playing with the starting and ending values to see what kind of crazy combinations you can create.
Specialty Case: The STEP Parameter
Sometimes you need to count by something other than 1. For example, suppose you want to print every other number between 15 and 33. There is a special command for this, called STEP. It is placed at the end of a FOR command, and you can specify the increment by which you want to count. For example, if you want to loop between 15 and 33 by increments of 2, the FOR command would be FOR X = 15 to 33 STEP 2. See Figure 5.6 for a better representation of the STEP command.

Figure 5.6: A FOR…NEXT loop with a STEP of 2
The STEP command is also useful because it allows you to loop backward. Figure 5.7 demonstrates how you can use the STEP command to do so. A simple program that uses the STEP command backward follows.
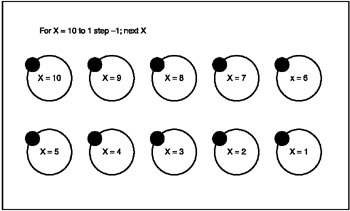
Figure 5.7: Count backward with a STEP of −1.
The Countdown program (shown in Figure 5.8) demonstrates looping with a negative number. You will find this program on the CD in the SourcesChapter05Countdown folder.
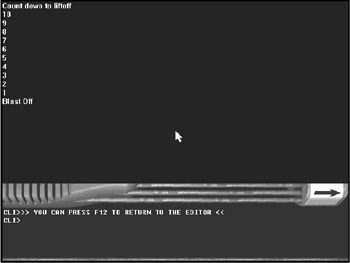
Figure 5.8: The Countdown program demonstrates one use of the STEP command.
REMSTART
--------------------------------
Beginner's Guide To Game Programming With DarkBASIC
Copyright (C)2002 Jonathan S. Harbour and Joshua R. Smith
Chapter 5 - Looping Commands
--------------------------------
REMEND
REM This program counts down from 10 to 1
REM This program is written with the use of a FOR...NEXT loop

PRINT "Count down to liftoff"
FOR X=10 to 1 step -1
 PRINT X
 SLEEP 500
 NEXT x
PRINT "Blast Off"
The DO LOOP Command
Like FOR…NEXT, DO…LOOP is another looping command. The big difference between the two is that DO…LOOP is known as an infinite loop, which means that as long as you do not interrupt it, the loop will continue forever. Okay, forever is quite a long time and hardware can fail between now and then, but for all practical purposes DO…LOOP will run forever. See Figure 5.9 for an example of a DO…LOOP.
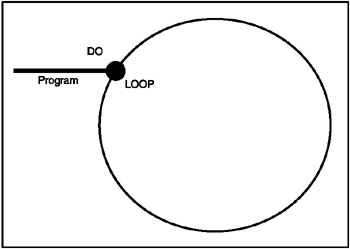
Figure 5.9: A DO…LOOP
The format for the DO…LOOP command is the same as the FOR…NEXT command, except that you do not have to follow the DO or the LOOP with anything.
DO
 Source Code
 Source Code
 Source Code
LOOP
Notice that I indented my source code lines between the DO and the LOOP. This is called source code formatting. You do not have to do this, but it makes the source code between the DO and LOOP much easier to read, and it helps you to know that it is a separate section of source code.
Using the DO…LOOP Command
The following program shows you a practical use for the DO…LOOP command (see Figure 5.10). Warning: To exit this program, you will need to hit the F12 key (DBV1) or the Esc key (DBPro). Now on with the program. You will find this program on the CD in the SourcesChapter05BouncerWithDo1 folder.
Figure 5.10: The BouncerWithDo1 program demonstrates infinite looping using DO…LOOP.
REMSTART
-----------------------------
Beginner's Guide To DarkBASIC Game Programming
Copyright (C)2002 Jonathan S. Harbour and Joshua R. Smith
Chapter 5 - Looping Commands
-----------------------------
REMEND

REM This program bounces your name around the screen
REM This program is written with the use of a DO...LOOP loop

PRINT "Please Type in your Name:"
INPUT NAME$
DO
 CLS
 TEXT RND(500),RND(350),NAME$
 SLEEP 500
LOOP
Don't worry about some of the commands you don't recognize; they will be addressed in later chapters. It's a pretty cool program to bounce whatever you typed around the screen.
Breaking Out with EXIT
DO…LOOP is useful if you have all the time in the world to sit in a loop. However, some of us have better things to do. The makers of DarkBASIC knew that, so they provided the EXIT command, which will break out of any DO…LOOP. No more sitting around, waiting for the end of the world as you know it. Figure 5.11 shows the great benefits of using the EXIT command.
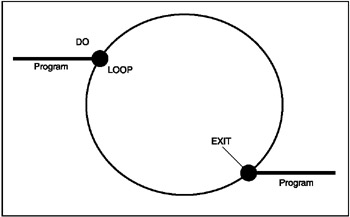
Figure 5.11: A DO…LOOP with the EXIT command
The following program is just like the previous one you typed in, but with one slight difference—it breaks out after 10 prints for you. Do not worry about the IF command; I will cover it in Chapter 6, "Making Programs Think: Branching Statements and Subroutines." Figure 5.12 shows the output of the BouncerWithDo2 program, which follows. You will find this program on the CD in the SourcesChapter05BouncerWithDo2 folder.
Figure 5.12: The BouncerWithDo2 program demonstrates breaking a DO…LOOP using the EXIT command.
REMSTART
--------------------------------
Beginner's Guide To Game Programming With DarkBASIC
Copyright (C)2002 Jonathan S. Harbour and Joshua R. Smith
Chapter 5 Looping Commands
--------------------------------
REMEND

REM This program bounces your name around the screen
REM This program is written with the use of a DO...LOOP loop
REM This program will stop after the 10 time of bouncing

PRINT "Please Type in your Name:"
INPUT NAME$

count = 1
DO
 CLS
 TEXT RND(500),RND(350),NAME$
 SLEEP 500
 count = count + 1
 if count > 10 then EXIT
LOOP
The REPEAT UNTIL Command
The DO…LOOP command is a great loop for just hanging around. The EXIT command ensures that you do not hang around forever, but what about the times when you want to loop for a while and stop when a condition is met? Welcome to the REPEAT…UNTIL command, your next stop in the wonderful world of loops.
The REPEAT…UNTIL command will do just that—repeat until a condition is met. See Figure 5.13 for an example of REPEAT…UNTIL.
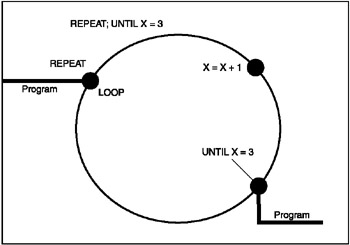
Figure 5.13: A REPEAT…UNTIL loop
The command format of REPEAT…UNTIL is
REPEAT
 Source Code
 Source Code
 Source Code
UNTIL condition
An important thing to note about the REPEAT…UNTIL command is that the source code inside it will run at least once. That is, all the code between the REPEAT and the UNTIL will run once. If the condition is met, the loop will not repeat.
Using the REPEAT…UNTIL Command
Now you are going to rewrite the program you wrote in the DO…LOOP section. This time, the code will repeat until you hit the spacebar. Again, don't worry about the INKEY$ command; that will be covered in a later chapter as well. Figure 5.14 shows the output of the BouncerWithRepeat1 program.
REMSTART
---------------------------------
Beginner's Guide To Game Programming With DarkBASIC
Copyright (C)2002 Jonathan S. Harbour and Joshua R. Smith
Chapter 5 - Looping Commands
---------------------------------
REMEND

REM This program bounces your name around the screen
REM This program is written with the use of a REPEAT...UNTIL loop
REM This program will stop after the spacebar has been hit

PRINT "Please Type in your Name:"
INPUT NAME$
REPEAT
 CLS
 TEXT RND(500),RND(350),NAME$
 CENTER TEXT 320,400,"Press Spacebar to Quit"
 SLEEP 500
 UNTIL INKEY$()=" "
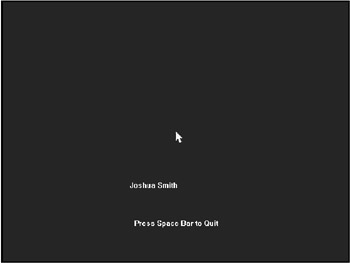
Figure 5.14: The BouncerWithRepeat1 program demonstrates finite looping using the REPEAT…UNTIL loop.
Breaking Out with EXIT
Remember the EXIT command from the DO…LOOP? Well, it's back. You can use the EXIT command in the REPEAT…UNTIL command as well. Instead of having one condition to leave the loop, you can create multiple conditions to leave the loop. The following program uses the REPEAT…UNTIL command with an EXIT command. The program bounces your name around the screen and stops when the spacebar is hit or after 10 loops. Figure 5.15 shows the output of the BouncerWithRepeat2 program. You will find this program on the CD in the SourcesChapter05BouncerWithRepeat2 folder.
REMSTART
------------------------------------
Beginner's Guide To Game Programming With DarkBASIC
Copyright (C)2002 Jonathan S. Harbour and Joshua R. Smith
Chapter 5 - Looping Commands
------------------------------------
REMEND

PRINT "Please Type in your Name:"
INPUT NAME$

count = 1
REPEAT
 CLS TEXT RND(500),RND(350),NAME$
 CENTER TEXT 320,400,"Press Spacebar to Quit"
 SLEEP 500
 count = count + 1
 if count > 10 then EXIT
UNTIL INKEY$()=" "
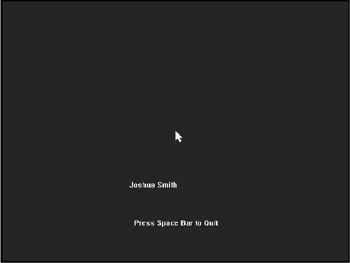
Figure 5.15: The BouncerWithRepeat2 program demonstrates finite looping with the REPEAT…UNTIL loop using the EXIT command.
The WHILE ENDWHILE Command
The last of the loop commands is the WHILE…ENDWHILE command. Its purpose is different than the REPEAT…UNTIL command, but it can act almost the same. Just like the REPEAT…UNTIL command, WHILE…ENDWHILE runs the code between the lines. However, unlike REPEAT…UNTIL, WHILE…ENDWHILE will not run the code between the lines if the condition is met before the loop is started. Figure 5.16 shows an illustration of a WHILE…ENDWHILE loop.

Figure 5.16: A WHILE…ENDWHILE loop
The command format of the WHILE…ENDWHILE command is
WHILE condition
 Source Code
 Source Code
 Source Code
ENDWHILE
Using the WHILE…ENDWHILE Command
Okay, now it's time to rework the name-bouncing program. The main difference between this program and the previous REPEAT…UNTIL program is that it checks for the spacebar before it runs the code. Figure 5.17 shows the output of the BouncerWithWhile1 program. You will find this program on the CD in the SourcesChapter05BouncerWithWhile1 folder.
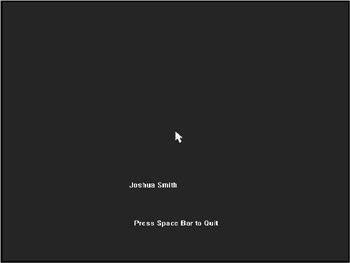
Figure 5.17: The BouncerWithWhile1 program demonstrates finite looping using the WHILE…ENDWHILE loop.
REMSTART
---------------------------------
Beginner's Guide To Game Programming With DarkBASIC
Copyright (C)2002 Jonathan S. Harbour and Joshua R. Smith
Chapter 5 - Looping Commands
---------------------------------
REMEND

REM This program bounces your name around the screen
REM This program is written with the use of a WHILE...ENDWHILE loop
REM This program will stop after the spacebar has been hit

PRINT "Please Type in your Name:"
INPUT NAME$

WHILE inkey$() <> " "
 CLS
 TEXT RND(500),RND(350),NAME$
 CENTER TEXT 320,400,"Press Spacebar to Quit"
 SLEEP 500
ENDWHILE
Breaking Out with EXIT
There are times when you need to break out of a loop. You can use the EXIT command to stop a loop and jump to the line that follows it. This is very useful for the programmer who has every command under his belt. Figure 5.18 shows the output of the BouncerWithWhile2 program.
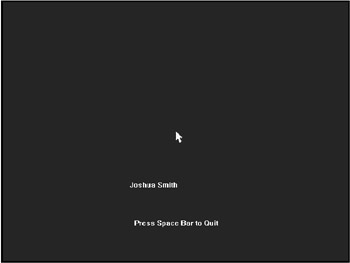
Figure 5.18: The BouncerWithWhile2 program demonstrates finite looping with the WHILE…ENDWHILE loop using the EXIT command.
You will find this program on the CD in the SourcesChapter05 BouncerWithWhile2 folder.
REMSTART
---------------------------------
Beginner's Guide To Game Programming With DarkBASIC
Copyright (C)2002 Jonathan S. Harbour and Joshua R. Smith
Chapter 5 - Looping Commands
---------------------------------
REMEND

PRINT "Please Type in your Name:"
INPUT NAME$

count = 1
WHILE inkey$() <> " "
CLS
 TEXT RND(500),RND(350),NAME$
 CENTER TEXT 320,400,"Press Spacebar to Quit"
 SLEEP 500
 count = count + 1
 if count > 10 then EXIT
ENDWHILE
Combining Loops
There is one last topic that I need cover on the subject of loops before you move on to the chapter project—nesting loops. The loops I have shown you so far are single loops, meaning that only one loop is running at a time. DarkBASIC supports nested loops, meaning that more than one loop is running at a time. Nested loops are some of the best programming tricks to use. You can do things such as scroll through two variables in one sitting. Through the journey of game programming, you will find nested loops to be one of your greatest allies. Figure 5.19 shows what a nested loop looks like.
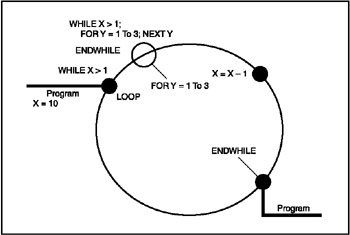
Figure 5.19: A nested loop
Sample Project
Okay, now it's time to put into practice what you have learned in this chapter. I have used two different kinds of loops in the chapter project, and I have a challenge for you. Try changing the loops to a different kind of loop, such as changing the REPEAT…UNTIL loop to a WHILE…ENDWHILE loop.
The chapter project is a simple math program to sharpen your skills. Just enter the two numbers and the program will add them for you. What you get after you have entered all the numbers is just as interesting. You will find this program on the CD in the SourcesChapter05MathFun folder.
REMSTART
---------------------------------
Beginner's Guide To Game Programming With DarkBASIC
Copyright (C)2002 Jonathan S. Harbour and Joshua R. Smith
Chapter 5 - Looping Commands
---------------------------------
REMEND

DIM Numbers1(50)
DIM Numbers2(50)
CLS
Total = 0
REPEAT
 PRINT "Enter a number between 1-50: "
 INPUT Total
UNTIL TOTAL<=50 and TOTAL >0

FOR X = 1 to Total
 PRINT "Enter First Number To Add: "
 INPUT a
 Numbers1(x) = a
 PRINT "Enter Second Number To Add:"
 INPUT a Numbers2(x) = a
 Answer = Numbers1(x)+Numbers2(x)
 PRINT Numbers1(x);
 PRINT "+";
 PRINT Numbers2(x);
 PRINT "=";
 PRINT Answer
 SLEEP 500
 CLS
NEXT X

PRINT "Now for the interesting stuff:"
SUM = 0
FOR x= 1 TO Total
 SUM = SUM + Numbers1(x) + Numbers2(x)
NEXT X

PRINT "The sum of all the numbers you entered is ";
PRINT SUM
PRINT "The Average of all the numbers you entered is ";
PRINT (SUM/Total)
WAIT KEY
Summary
This chapter was dedicated to the study of looping commands, which are essential for processing large sequences of numbers, strings, or any other information in DarkBASIC. There are several looping commands, such as WHILE…ENDWHILE, DO…LOOP, REPEAT…UNTIL, and FOR…NEXT. These four looping commands add a tremendous amount of power to a program, quickly automating what might have been a laborious manual process without them.
Quiz
The chapter quiz will help to reinforce the material you have learned in this chapter, and will provide you with feedback on how well you have learned the subjects that were covered. For the answers to the quiz, refer to Appendix A, "Answers to the Chapter Quizzes."
|
1. |
How many times will the following loop iterate? FOR X = 1 to 10 NEXT X
|
|
|
2. |
Which command will exit out of a loop?
|
|
|
3. |
Which word describes what happens in a FOR…NEXT loop?
|
|
|
4. |
Which of the following conditional statements means greater than?
|
|
|
5. |
How would you make a FOR…NEXT loop count by 3s?
|
|
|
6. |
Which command completes a REPEAT loop?
|
|
|
7. |
According to this chapter, what is a loop?
|
|
|
8. |
What is another term for a combined loop (one loop inside another)?
|
|
|
9. |
Which command completes a DO loop?
|
|
|
10. |
Which command completes a WHILE loop?
|
|

Answers
|
1. |
C |
|
2. |
B |
|
3. |
D |
|
4. |
B |
|
5. |
A |
|
6. |
D |
|
7. |
B |
|
8. |
B |
|
9. |
C |
|
10. |
A |
Part I - The Basics of Computer Programming
- Welcome to DarkBASIC
- Introduction to Computer Programming
- Basic Commands, Variables, and Data Types
- Characters, Strings, and Text Output
- Looping Commands
- Making Programs Think Branching Statements and Subroutines
- More Power to the Numbers Data Sequences and Arrays
- Number Crunching Mathematical and Relational Operators and Commands
Part II - Game Fundamentals Graphics, Sound, Input Devices, and File Access
- Basic Graphics Commands
- Game Graphics Learning to Use Bitmaps
- The Art of Using Animated Sprites for 2D Games
- Programming the Keyboard, Mouse, and Joystick
- Adding Sound Effects to Your Game
- Playing Some Tunes CD Audio, MIDI and MP3 Music
- Loading and Saving Information Using Files
- Playing Intro Movies and Cut-Scenes
Part III - Advanced Topics 3D Graphics and Multiplayer Programming
Epilogue
Part IV - Appendixes
EAN: 2147483647
Pages: 203
