Basic Component Creation: The RandomSquares Component
|
|
Once we have brainstormed the component's formation, we can dive into its development. We start by creating a new Flash movie named RandomSquaresComponent.fla, which will hold the component and all of its assets. By this point in the book, you know that a component is simply a movie clip with added functionality by means of customizing its parameters. Therefore, we must first create a movie clip that will be the graphical representation of our component. This is a very important notion; our component is abstracted into two separate parts: the code, which handles functionality, and the graphics, which provide the user interface. So, create a new movie clip by pressing Command/Ctrl+F8 and name it RandomSquares. This will be the movie clip users drag to the stage when they want to use that particular element.
To be as organized as possible, a folder structure has been created for the component in the library of the component file. A folder named RandomSquares Component has been created, in the root of the library, where the component and its assets are kept. The component sits immediately in this folder along with another folder that will hold all of the component's assets-that is, any other symbols the component needs to function properly.
Defining Parameters
Right now, nothing differentiates the common movie clip from our supposed component. The crucial step where the movie clip crosses into the component domain is done by right-clicking the movie clip in the library and selecting Component Definition. In the dialog box that opens (see Figure 10.1), you add the parameters that users can edit.
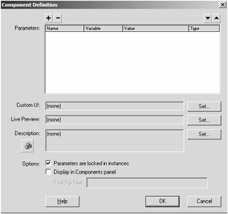
Figure 10.1: Open the Component Definition dialog box to define its parameters.
To add and remove parameters, use the plus and minus buttons at the top. The first column of the parameters box is the name that appears to users when they edit the parameters in the Component Parameters panel. The name should be a very short, descriptive phrase about the component.
The second column is the name of the variable that will hold the parameter's information. This value is automatically placed in the movie clip at the very start of the movie. The third column is the default value of the parameter.
The last column of the RandomSquares component is a choice of nine data types that the parameter can use, as shown in Figure 10.2. Data types are very important for parameters; hence the large selection. Always know what data type a parameter will hold and stick by that choice. Table 10.1 is a description of each data type.
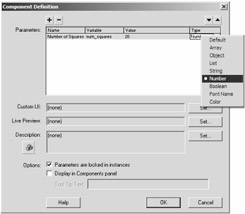
Figure 10.2: You can choose from many data types for your parameters.
| DATA TYPE | DESCRIPTION |
|---|---|
| | |
| Default | This data type should never be used for Flash MX components. I discuss the Default data type in Chapter 12, where we'll see how to make Flash 5-compliant components. |
| Array | Allows you to use an array in the component. In the Component Parameters panel, the user can add and remove elements from the array. Elements are stored as strings. |
| Object | Allows you to use an object in the component. You can use the Component Definition dialog box to add properties to the object, which can be set by the user in the Component Parameters panel. Use this parameter whenever you have a large number of parameters that pertain to essentially the same thing. For example, your parameters call for the user to specify the width, height and color of a square that will be drawn on the screen, then all three of those parameters could be put in an Object. |
| List | Allows you to use a combo box interface for a set of choices. You add the choices to the list in the Component Definition dialog box, and the user chooses from the list in the Component Parameters panel. |
| String | A simple string data type. |
| Number | A simple number data type. |
| Boolean | A list in which the only choices are True and False. |
| Font Name | Produces a combo box with all the fonts on the user's computer to choose from. The user can either choose a font on their system, or type in a string. The latter option is important when using Shared Fonts, as we will see later. |
| Color | Produces a color palette from which the user chooses a specific color. |
Since we have already planned out the parameters that we want to use, we can simply add each one to the Component Definition dialog box. Once a parameter is added, be sure to set the parameter's data type before you set its initial value; when a data type is selected, the value column of the parameter is cleared. Figure 10.3 shows how the parameters were entered for the RandomSquares component.
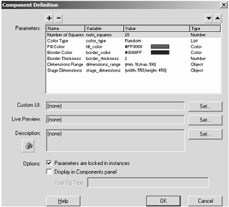
Figure 10.3: The Component Definition dialog box with all the parameters added
The general steps you take to add a parameter to a component are outlined here:
-
Right-click the component in the library and select Component Definition.
-
Click the plus sign in the upper-left corner of the Component Definition dialog box to add a parameter to the Parameters data grid.
-
Click the text "varName" and type a very short phrase to describe the purpose of the parameter. This is what users will see when they open the Parameters panel.
-
Click in the blank area in the Variable column and type the name of the variable that will hold the parameter's value. This is the name of the variable that you will use in your code for the component.
-
Click the drop-down menu under the Type column and select the data type for the parameter.
-
At this point, you might have to do different things depending on which data type you selected:
-
If you select Array, double-click the brackets under the Value column. This will bring up an interface where you can add and remove elements to the array for the default value of the array.
-
If you select Object, double-click the curly braces under the Value column. This will bring up an interface where you can add and remove properties to the object and set their default values.
-
If you select List, double-click the text <empty> under the Value column. This will bring up the same interface as Array, and you add and remove list items the same way. However, remember that items you add to this list are simply the possible values for the parameter, from which the user will choose.
-
If you select Number or String, simply click the 0 (Number) or text defaultValue (String) and enter the default value for the parameter.
-
If you select Boolean, click the drop-down menu under the Value column and select the default Boolean value (True or False) for the parameter.
-
If you select Font, click the drop-down menu under the Value column and select the default font for the parameter.
-
If you select Color, click the color palette under the Value column and select the default color for the parameter.
-
To utilize many different data types at once, the parameters that hold the minimum and maximum possible dimensions of the squares and the parameters that hold the width and height of the stage have been coupled into just two object variables. That is, one object has two properties, "min" and "max," which correspond to the minimum and maximum dimensions, and another object has the two properties "width" and "height," which correspond to the width and height of the stage.
The Color Type parameter is a list that holds two values: Random and Constant. This parameter controls whether the colors of the squares should be random.
When you close the Component Definition dialog box, your movie clip will appear a little differently in the library, as shown in Figure 10.4. The movie clip's icon has changed to an image of orange, green, and blue blocks to signify that the movie clip is serving as a component.
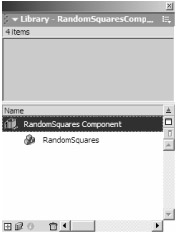
Figure 10.4: When a movie clip is made into a component, its icon in the library changes.
How a Component and Its Parameters Are Related
Oddly enough, just with these few mediocre tasks taken care of, and no actual functionality programmed, you can see how any component works in the first place. Using the debugging features of Flash, you can see that any movie clip to which you've added parameters is automatically given an onClipEvent function, which declares all the variables associated with the parameters (as shown in Figure 10.5).
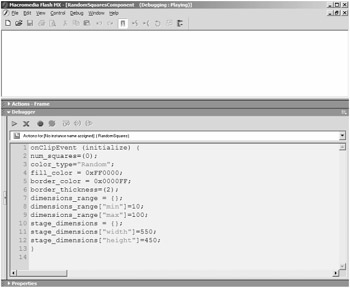
Figure 10.5: By making a movie clip a component, Flash automatically creates an onClipEvent function, which is used to initialize the variables associated with the component's parameters.
To check this yourself, drag an instance of the component to the stage and test the movie in debugging mode by pressing Command+Shift+Enter/Ctrl+Shift+Enter. You will see a drop-down window in the debugging panel that displays every movie clip and button in the movie. Click on your component's movie clip in this menu, and you will see all onClipEvent actions that are placed on the movie clip. This is how the component gets the information of its parameters when the movie is published. Note that the actions you see in the debugging panel are not physically there in the authoring environment. They are added by Flash when the SWF is created.
It is also curious to note that the component uses a strange "initialize" onClipEvent, which is not discussed in any of Flash's documentation. This "initialize" is a legitimate movie event to use with onClipEvent, and it fires before the load movie event.
Creating the Component's Code
From our work so far, users can drag the component to the stage and edit all of its parameters. After that, these parameters are added as variables to the movie clip's Timeline. Now all that is left to complete our component is to use those newly added variables to produce a horde of random squares across the screen. This means we start coding the functionality of the component; this coding is always 99 percent of the work that goes into creating a component. Start by double-clicking the RandomSquares movie clip in the library and renaming the layer on which you'll place the actions to "Actions." Next, open the Actions panel on the first frame of the Actions layer, and you can begin with the fun.
Although it may not seem like an obvious thing to do, you must first set the component's x- and y-position to zero. This aligns the component's stage with that of the main stage. This is important because the main stage's width and height determine the viable area in which the squares can be rendered. Type the following code in the actions for the first frame in the Actions layer.
// align the component's stage with the main stage this._x = 0.0; this._y = 0.0;
Remember that the keyword this refers to the movie clip of the component.
Next you need a for loop to produce the number of squares the user specified in the parameters. Once in the for loop, you will need to calculate a random position, dimension, and color of the square being rendered. From our brainstorming and planning session, we already know how to do this; the only difference is using the variables from the parameters. The code that accomplishes this, shown in Listing 10.2, looks very similar to what we did before; take note of the conditional statement used to check whether the user wants random colors or not.
Listing 10.2: Calculating the Position, Dimension, and Color of the Square
// loop through the number of squares to create random squares for (var j = 0; j < this.num_squares; j++) { // calculate random position for the upper-left corner of the square var x = Math.random () * this.stage_dimensions.width; var y = Math.random () * this.stage_dimensions.height; // calculate a random dimension for the square var dim = Math.random () * (this.dimensions_range.max - this.dimensions_range.min) + this.dimensions_range.min; // check if we should calculate a random color if (this.color_type == "Random") { // calculate random colors for the fill and border this.fill_color = Math.round (Math.random () * 0xFFFFFF); this.border_color = Math.round (Math.random () * 0xFFFFFF); } // start the drawing process so we can draw the square this.lineStyle (this.border_thickness, this.border_color, 100.0); this.beginFill (this.fill_color, 100.0); { // set the vertices of the square to draw it this.moveTo (x, y); this.lineTo (x + dim, y); this.lineTo (x + dim, y + dim); this.lineTo (x, y + dim); } this.endFill (); } After the attributes of the square have been calculated, you are only left to render the square. Once again, our brainstorming has nearly completely taken care of this task. Using the variables from the parameters, and shifting the vertices of the rendered square by the variables x and y, you get the set of actions marked in Listing 10.2 by the "start the drawing process" comment.
Believe it or not, your first component is done!
| On the CD | In the Chapter 10 folder on the companion CD, we've added one extra thing to the Random-SquaresComponent.fla file. A movie clip with the text "Random Squares" inside has been added in the component's movie clip so that users can easily see where the component is on the screen. If the label were not there, then only a small white dot would appear in the component's place, reflecting that the component contains no visible graphics. In order to stay organized, the label movie clip is placed in the Assets folder. The label is used as a movie clip so that you can make it invisible once the component starts up. In the first frame of the label movie clip, we've added the following action to remove the label from sight:
this._visible = false; |
Take a minute to bask in all of this component's excellence. Look at Figure 10.6 to see what the component produces. Don't worry if you find this component a little elementary, or even quite simply useless; the next component, which exploits most of what components have to offer, is much cooler.
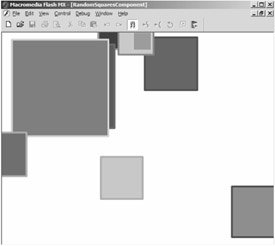
Figure 10.6: The RandomSquares component generates… just what it says.
|
|
EAN: 2147483647
Pages: 111