Select a Photo to Edit
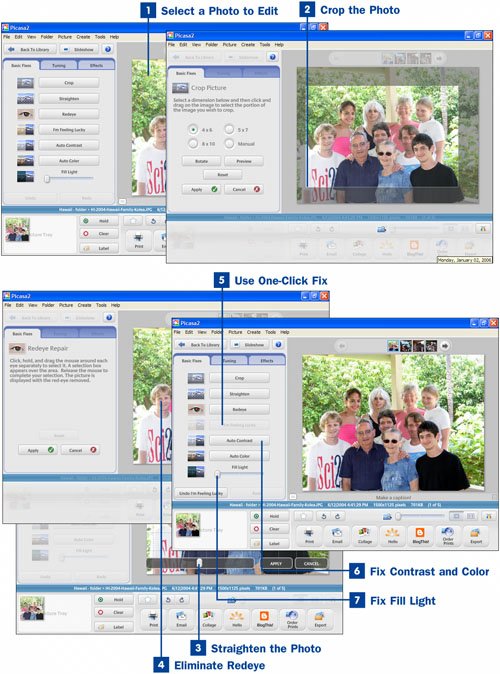
To select a photo to edit, double-click its thumbnail on the right side of the Picasa screen. You come to a screen that contains numerous editing tools. You can use the slider bar of image thumbnails above the large photo on the right side of the screen to edit the next photo or the previous photo in the current Picasa folder.
 Crop the Photo
If you want to resize the picture to a common photo size or to a custom size, click the Crop button on the left side of the screen. (If you don't see the Crop button, click the Basic Fixes tab to display a list of basic photo-editing options.) From the pane that opens on the left side of the screen, choose the desired photo size. Then use your mouse to drag the bright rectangle to define the portion of the picture you want cropped. The bright portion of the photo is resized to the standard photo size you chose. If you choose the Manual option, you can drag the edges of the bright crop area to encompass all of the picture that you want to include; the darker areas will be cropped away (discarded). Click Apply when you've made your choices.
Tip
Use the Rotate, Preview, and Reset buttons to help you better crop a photo. The Rotate button rotates the dimensions of the cropping area you've chosen. So, for example, if you choose 5 X 7 and you click Rotate, the cropping area changes to 7x5. Clicking the Preview button enables you to preview what the photo will look like after it's been cropped. And the Reset button undoes the cropping you've done.
 Straighten the Photo
Photos at times are taken at an angle, and you can easily straighten them in Picasa. Click the Straighten button in the Basic Fixes tab on the left side of the screen. A grid of straight horizontal and vertical lines appears over the selected photo. You can use these gridlines as guides for straightening your photo. Move the slider that appears in the lower-left corner of the image to the left to rotate the photo to the left; drag the slider to the right to rotate the photo to the right. When it is straight in comparison with the gridlines, click the Apply button. The image zooms in after you straighten it to eliminate the blank areas that would otherwise be pulled into the photo.
Tip
When you edit a photo with Picasa, the changes aren't made to the original photo. Instead, the edits you make are in effect only when you are viewing or working with the photos in Picasa. If you want to use the edited pictures with other programs, export the edited picture by clicking the Export button at the bottom-right corner of the screen, and following the directions for saving the picture.
 Eliminate Redeye
Redeye is the bugaboo of photographers everywhere, and no matter how advanced the camera, it always seems to manage to creep its way into photos. (Redeye refers to someone's eyes being red in a photo because they have reflected the flash from a camera.) To eliminate redeye in the selected photo, click the Redeye button in the Basic Fixes tab on the left side of the screen. You then come to a screen in which you need to drag a selection box around each red eye you want to fix. Then click Apply to fix the redeye problem.
 Use One-Click Fix
If you don't want to have to clean up the selected photo manually, click the I'm Feeling Lucky button in the Basic Fixes tab on the left side of the screen. The photo is automatically cleaned upredeye is eliminated, the photo is straightened, and contrast and color are adjusted. If you want to undo the changes, click the Undo I'm Feeling Lucky button at the bottom of the Basic Fixes pane.
 Fix Contrast and Color
If you think the contrast in the displayed photo could use some adjustment, click the Auto Contrast button, and the contrast is automatically optimized. If you want to undo the automatic fix, click the Undo Auto Contrast button at the bottom of the Basic Fixes pane. To fix the color, click the Auto Color button. If you want to undo the automatic fix, click the Undo Auto Color button at the bottom of the Basic Fixes pane.
 Fix Fill Light
The fill light of a picture, according to Picasa, is how light or dark the picture is overall. To change the fill light, move the Fill Light slider on the Basic Fixes tab on the left side of the screen. The further you move the slider to the right, the lighter the picture becomes. To undo your changes, click the Undo Fill Light button at the bottom of the Basic Fixes pane.