After you create your blog, you can begin posting. When you create a new post, the Post Editor opens a form in which you type the text of your post. Creating new posts for your blog is easy.
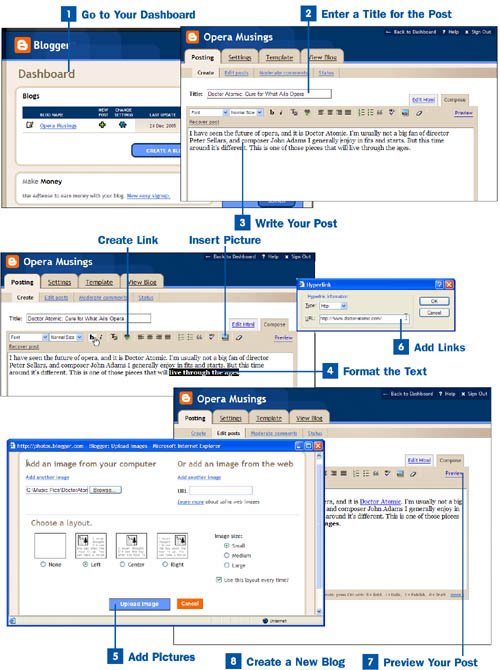
 Go to Your Dashboard
Command central for your blog is what Blogger calls the Dashboard, so get there to create a post. To get to the Dashboard, go to www.blogger.com and type your username and password at the top of the screen. You log in and are sent to your Dashboard for your blogthe title of the blog you created is on the Dashboard.
Note
If you create your first blog entry after creating your Blogger account, as outlined in  Create a Blogger Account, you won't have to first log into your Dashboard When you click Start Posting at the end of creating your account, you are sent to the posting screen.
 Enter a Title for the Post
To create a new post, click New Post next to your blog name. The Post Editor opens a new screen, which you fill out to create your post. At the top of the screen, next to Title, type the title of your post (you named the blog itself when you created your Blogger account). It's best to be pithy, descriptive, and to write a title that might draw readers in.
 Write Your Post
After writing your title, write the body of your post. Make it witty, moving, mundane…anything you want. The point of the blog is to write and express yourself.
 Format the Text
The toolbar just above your post enables you to format your text by using bold, italic, changing the font and size, adding color, and similar features. Highlight the text you want to change and select your action from the toolbar.
 Add Pictures
Blogger enables you to add pictures to your blog, choosing images either from files you have on your computer or from elsewhere on the Internet. Position the insertion point in the body of your post where you want to insert the picture and then click the image icon on the toolbar. A dialog box appears that enables you to insert the image and control its look and placement.
In the dialog box, click the Browse button, go to the folder where the image you want to use is stored, and select it. From the Choose a layout section of the dialog box, select how text should wrap around the image (if you'll have text wrapping around it). Next, choose the size in the Image size area at which you want the image displayedsmall, medium, or large.
If you plan to use this same layout every time you include a picture, check the box next to Use this layout every time?
If you're not uploading the image from your computer, and instead are pointing to an image that's already on the Web, type its location in the URL text box. Provide the entire URL, including the image name, like this: http://sfopera.com/images/2005/05-DoctorAtomic.jpg.
When you're done specifying image information, click Upload Image. The specified image is uploaded from your computer (if the image is already on the Web, Blogger creates a link to the image on the Web). When it's done, a screen appears telling you that the image has been sent (or the link created). Click the Done button to return to the post-creation page.
 Add Links
Blogger makes it easy to add links to your blog. Highlight the text you want to turn into a link and click the link icon in the toolbar. In the Hyperlink dialog box that opens, type the URL to which you want to link and click OK.
Note
If you're comfortable editing HTML yourself, you can edit the HTML directly on the page and add HTML tags. To do it, click the Edit HTML link on the post-creation page.
 Preview Your Post
Before posting, it's a good idea to preview your post so you can see what it looks like and test its links. Click the Preview link in the upper-right corner of the post-creation page. You see a preview of what your post will look like. If you want to publish what you see, click Publish Post. Blogger uploads all your files and tells you when the post is complete. To view your blog, click View Blog.
If you don't want to publish the post you are previewing, and instead want to edit it, click Save as Draft. You are brought back to your Dashboard page, and you see your post there. Click Edit. You are brought back to the page where you compose the post. Continue to edit it until it's what you want, and then publish it.
After your post is published, people can make comments about it by clicking Post a Comment underneath your post in the blog.
 Create a New Blog
You're not limited to having just a single blog with Blogger. You can create multiple blogs if you have multiple interests. So you might want to create one about knitting, another about your Godzilla fascination, and yet another about your love of opera.
To create another blog in addition to one you've already created, go to the Dashboard and click the Create a Blog button. You go through the same steps you did from step 4 onward in Create a Blogger Account.