Inserting Hyperlinks
![]()
Excel 2000 includes an enhanced feature that allows you to add hyperlinks to cells in your workbook, connecting them to other electronic documents on your hard disk, the Internet, or an attached computer network. Hyperlinks in Excel give you a handy way to combine a series of related workbooks or let you provide your users with on-demand access to supporting documents, Web pages, or other reference materials on the Internet. You create a hyperlink using the Hyperlink command on the Insert menu, and the command prompts you for the name of the supporting file or Web page and underlines the text in the worksheet cell that was selected when you ran the command. (The underlined word appears in a special color, and looks similar to linked topics that appear in the Office online Help.) After a hyperlink to another document has been established, you can activate it by clicking the underlined word in your worksheet.
Note that you can specify any supporting document for your hyperlink—provided that you have the application necessary to open the document on your computer. For example, if you have Microsoft Office Professional Edition installed, you can insert a hyperlink in your worksheet to any Office application—Word, Excel, PowerPoint, Access, Publisher, or Outlook—and Excel will open that document when you click the underlined hyperlink cell in your workbook. Similarly, if you have Microsoft Internet Explorer or another Internet browser, you can create a hyperlink to any resource on the Internet for which you have a proper address.
Creating a Hyperlink in Your Worksheet
The following steps show you how to add a hyperlink to your worksheet that opens a document on your hard disk, the Internet, or a network to which you're attached:
- In your worksheet, select the cell with which you want to associate the hyperlink. You can create a hyperlink in an empty cell, or in a cell containing information, artwork, or a formula.
- From the Insert menu, choose Hyperlink or click the Insert Hyperlink button on the Standard toolbar. The Insert Hyperlink dialog box appears, as shown in Figure 15-12. Excel 2000 now asks you two fundamental questions about your selection: what is the type of the hyperlink you are creating, and what content should the hyperlink contain?
- Answer the first question by clicking one of the four buttons on the left side of the dialog box. The Existing File Or Web Page Button creates a link in your worksheet to a file on your hard disk or a home page on the Web. On a day-to-day basis, this option will probably cover most of your hyperlink needs, because it is the fastest way to create links to useful files and Internet resources within your worksheet. (See Figure 15-12.)
- Fill out the dialog box options corresponding to the type of hyperlink you are creating.

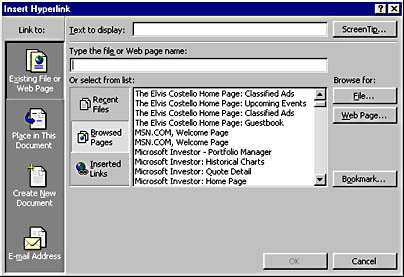
Figure 15-12. The Insert Hyperlink dialog box in Excel 2000 gives you several options when creating hyperlinks.
You also have three additional options. The second button, Place In This Document, creates a link to a different location in the current workbook. Use this option if you want to jump quickly from one location in a spreadsheet to another. (It works like the Go To command.) The third button, Create New Document, allows you to open a new Office document from within your worksheet, which can be another Excel spreadsheet, a Word document, a PowerPoint presentation, and so on. We use this option when we want to give our users a quick way to write notes or jot down estimates while using a worksheet. Finally, E-Mail Address (the fourth button on the left side) allows you to create a link in your worksheet that automatically sends an e-mail message to another user, complete with a custom subject header and a handy screen tip.
If you are identifying a particular document name or Web page that should be loaded when the user clicks the hyperlink, locate it on your system by using one of the Browse buttons (File or Web Page), and specify a descriptive label in the cell by typing it in the Text To Display text box. (This text box is available only if the cell is blank or contains a text label.) You can also use three buttons within the dialog box corresponding to frequently used documents: Recent Files, Browsed Pages, and Inserted Links.
TIP
Using a Web Page as a HyperlinkWhen you browse for a Web page link, Office 2000 opens your Internet browser and allows you to locate the Web page you want to use. After you locate the page you want to use, return to the Insert Hyperlink dialog box (with your Internet browser still running), select any additional options you want, and click OK. The trick here is to jump back to the Insert Hyperlink dialog box while your browser is still running, or you won't get the right Web page.
Activating a Hyperlink
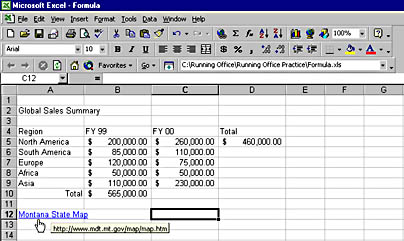
To activate a hyperlink in a worksheet, click the underlined cell containing the hyperlink, and Excel will start any necessary applications and load the linked document. If the hyperlink requires an Internet or other network connection, you might be prompted for a member ID (also called a username) and password when your browser activates the link.
The Web Toolbar
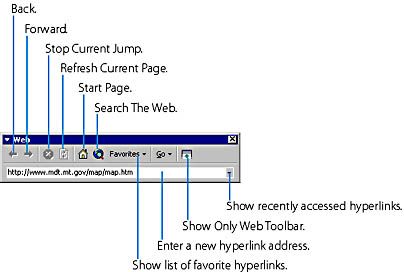
After you activate a hyperlink in Excel, a special Web toolbar appears on the screen, which lets you switch back and forth between open hyperlinks, establish additional Internet connections, or run special network-related commands. If the toolbar doesn t appear, click Toolbars on the View menu and select Web on the submenu. You don t have to use the Web toolbar when switching between hyperlinks (you can also use the Excel Window menu), but in many cases you ll benefit from doing so. To close the Web toolbar, click the Close button on the toolbar s title bar.The Web toolbar is shown here as a free-standing toolbar, which you can duplicate by dragging the toolbar from its default locked position beneath the Formatting toolbar.
TIP
If you're not sure whether an underlined word represents a hyperlink, place the mouse pointer directly over the cell and see if the mouse pointer changes shape. The mouse pointer over a cell containing a hyperlink resembles a hand with a pointing finger and often displays a descriptive label.

After a hyperlink has been activated, you can jump back and forth between the home document and any supporting hyperlinks by clicking the Back and Forward buttons, respectively, on the Web toolbar. If the hyperlink launched a separate Windows application to load the document—say, the hyperlink started Word or Internet Explorer—you can also use the Windows taskbar to move back and forth quickly between the applications. When you're finished viewing a hyperlinked Excel workbook, close it by choosing Close from the Excel File menu. When you're finished using documents associated with other applications, simply exit the application. (If you're using the Internet, this will end your connection.)
SEE ALSO
For more information about using Internet documents and the Web toolbar, see "Browsing Documents on the Web"
Editing and Removing Hyperlinks
To edit or remove a hyperlink from a worksheet cell, follow these steps:
- Right-click the cell containing the hyperlink to display a pop-up menu of commands used to manipulate spreadsheet cells.
- On the pop-up menu, point to the Hyperlink command to display a submenu of commands used to manipulate the hyperlink you have created. Choose Edit Hyperlink if you want to customize or alter the hyperlink in the cell you clicked. To remove the hyperlink, click Remove Hyperlink.
CAUTION
Don't left-click the cell containing the hyperlink or you'll activate it.
Saving the Workbook
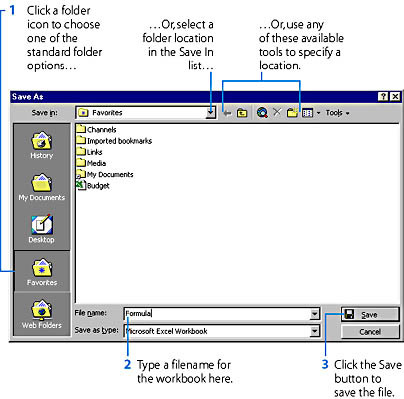
After you enter information into a new workbook, it's a good idea to save the data to disk—before you make some phone calls and get distracted or go to lunch! This way, you can protect the information and use it again later. Each workbook is stored in its own file on disk and is assigned a filename that is unique to the folder in which it is stored. To assign a new filename to a workbook, use the Save As command on the File menu. To save edits you have made to an existing workbook file, use the Save command on the File menu.
SEE ALSO
For more information about saving workbooks, see "Saving Documents and Web Pages" For information about saving summary information in workbooks, see "Working with Property Sheets"