You'll now learn how to create and modify running headers or footers that Word prints on each page of your document. If you have used the Page Numbers dialog box to create simple headers or footers consisting only of page numbers, you can use the techniques given here to edit or delete these headers or footers. If you're creating a Web-page document, keep in mind that headers and footers won't be displayed in a browser.
To create or edit headers or footers throughout the currently opened document, do the following:
Choose Header And Footer from the View menu. Word then:
Switches to Print Layout view.
Marks the header and footer areas of the page with dotted lines and activates these areas so that you can work within them.
Dims all text outside the header or footer area. (You won't be able to work on this text.)
Displays the Header And Footer toolbar, which provides commands for working on the headers and footers.
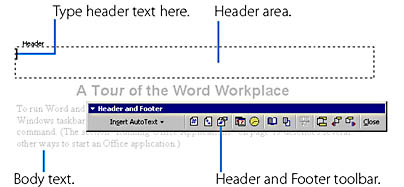
Figure 11-1 shows the header area in the Word window after the Header And Footer command has been chosen. The footer area at the bottom of the page is similar.
TIP If you're in Print Layout view and if the header or footer already contains text, you can work on the headers or footers by simply double-clicking this text rather than choosing the Header And Footer menu command.
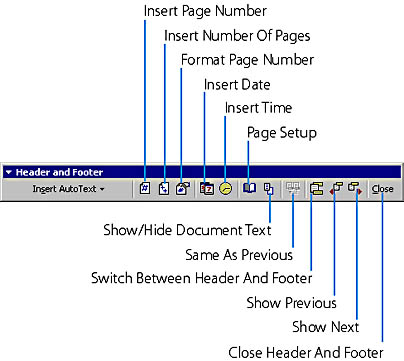
If necessary, move the insertion point to either the header area or the footer area by pressing the Down or Up arrow key, or by clicking the Switch Between Header And Footer button on the Header And Footer toolbar. (See Figure 11-2.)
NOTE Using the arrow keys or other navigation key combinations, you can move to the header or footer area on any page in the document. Usually, it doesn't matter which page you work on because the headers and footers are the same throughout the document. Later, however, you'll learn how to vary the headers or footers within the document (to reflect, for example, different part or chapter names in the document). In this case, you must move to the appropriate page before working on the header or footer.
Figure 11-1.The header area and the Header And Footer toolbar.
Figure 11-2.The Header And Footer toolbar.
Type the text for the header or footer into the header area or the footer area. You can enter one or more paragraphs of text into a header or footer, and you can edit and format the text in the same way that you edit and format text in the body of a document.
You can press the Tab key to align text on the two predefined tab stops; the first tab stop aligns text in the center of the header or footer, and the second tab stop right-aligns text at the right edge of the header or footer. (Note that the tabs might be set differently in documents based on certain templates.) To remove headers or footers, just delete all the text in the header or footer area.
TIP While working on headers or footers, you can completely hide the body text on the page by clicking the Show/Hide Document Text button. (Normally, when you work on headers and footers, document text is shown in a dimmed font.)
You can quickly insert the page number, the total number of pages in the document, the date, or the time into your header or footer text. To do this, place the insertion point at the position where you want the information, and click the Insert Page Number, Insert Number Of Pages, Insert Date, or Insert Time button on the Header And Footer toolbar, as shown in Figure 11-2. Note that when you print your document, the number of pages, the date, or the time that you insert will be updated to reflect the current value.
The Insert Page Number button adds automatic page numbering to your headers or footers, like that added by the Page Numbers command on the Insert menu described in the previous section. You can modify the format of the numbers or the starting number by clicking the Format Page Number button on the Header And Footer toolbar. This will open the Page Number Format dialog box, also described in the previous section.
You can also insert various types of information by clicking the Insert AutoText button and choosing an item from the submenu. For example, you can choose Filename to insert the name of the document; or you can choose "Author, Page #, Date" to insert your name, the page number, and the date. (The items on this menu are predefined AutoText entries provided with Word.)
When you have finished creating or modifying the headers or footers, click the Close button on the Header And Footer toolbar, or choose Header And Footer from the View menu to return to the view you were using previously.
TIPUse Styles to Format Headers, Footers, and Page Numbers Word assigns the Header paragraph style to header text, the Footer paragraph style to footer text, and the Page Number character style to automatic page numbers within headers or footers. You can therefore uniformly change the formatting of headers, footers, or page numbers throughout your entire document by modifying the corresponding style. Doing this will affect headers or footers in all document sections, even if the headers or footers vary from section to section. You might, for example, assign to a style borders or shading, distinctive character formatting (such as a font, style, size, color, or enhancement), or other formatting to emphasize your headers or footers and make them stand apart from the text in the body of the document.
Sizing and Moving Headers or Footers
The header or footer text you enter is normally confined within the header area or the footer area at the top or bottom of each page. You can change the size or position of these areas, however, or extend the header or footer text outside the header or footer area, by using one or more of the following techniques:
You can move the top or bottom boundary of the header or footer area by dragging a marker on the vertical ruler displayed in Print Layout view:
If the vertical ruler isn't currently visible, you can display it by choosing Options from the Tools menu, clicking the View tab, and selecting the Vertical Ruler option.
NOTE If the text or graphics you insert into a header is higher than the current header area, Word will move the bottom boundary of the header area down, so that the header won't overlap the main document text. Likewise, if the text or graphics you insert into a footer is higher than the footer area, Word will move the top boundary of the footer area up.
You can also adjust the height of the header or footer area by changing the measurements in the Header box or Footer box on the Margins tab of the Page Setup dialog box, which will be described later in the chapter (in "Adjusting the Page Setup").
SEE ALSO For information on the Margins tab of the Page Setup dialog box, see "Adjusting the Page Setup." For instructions on creating positive and negative indents, see "Applying Paragraph Formatting Directly."
To move text to the left or to the right of the header or footer area, assign a negative left indent or a negative right indent to one or more paragraphs of header or footer text. To do this, you can use the horizontal ruler or Paragraph dialog box, as explained in Chapter 7, "Formatting a Word Document"
You can insert some or all of the header or footer text into a Word text box, so that you can drag it to any position on the page. To do this, choose Header And Footer from the View menu, and then insert the text box. Text boxes—and the methods for inserting them—are discussed later in the chapter ("Using Text Boxes to Position Text on the Page" page ). Even though you can place such a text box anywhere on the page, it remains an integral part of the header or footer; therefore, it is displayed on all pages in the section or document, and you can modify it only after you choose the Header And Footer command. Note that a page number inserted by the Page Numbers dialog box is placed within a frame, which is an element similar to a text box, so that you can drag it wherever you want.
TIPOverlap Headings and Body Text to Create Special Effects Normally, if you extend the header or footer area beyond the current top or bottom margin area, Word adjusts the top or bottom margin so that the header or footer text doesn't overlap the text in the body of the document. However, if you enter a minus sign before the Top or Bottom margin setting on the Margins tab of the Page Setup dialog box (discussed in "Adjusting the Margins"), Word will not adjust the margins. This will allow you to extend the header or footer area into the area occupied by the body text and to enter text or graphics into the header or footer that overlaps the body text. You could do this to create a special effect, such as a watermark (faint text or graphics that overlaps the body text on each page of the document). You could also create a watermark or similar effect by adding a text box to a header or footer and dragging it over the body text, as discussed above.
Varying Headers or Footers Within the Document
Normally, the same header or footer is printed on every page in the document. There are, however, three ways that you can vary headers and footers within your document.
You can create a different header and footer on the first page of the document, or on the first page of a section if you have divided your document into sections that begin on a new page. (This procedure doesn't work for continuous section breaks.) You might want to do this, for example, to eliminate the header from the title page of a report, or to avoid placing a page number on the first page. The following are the steps:
If you have divided your document into sections, place the insertion point within the section for which you want to create a different first page header and footer.
Choose Header And Footer from the View menu.
Click the Page Setup button on the Header And Footer toolbar (see Figure 11-2), and click the Layout tab in the Page Setup dialog box.
Select the Different First Page option and click OK.
In addition, you can create different headers and footers on odd and even pages. You might do this, for example, if you're writing a book and want the book title at the top of the left page of facing pages (called the verso page by book designers), and the chapter title at the top of the right page (called the recto page). The following is the technique:
Choose Header And Footer from the View menu.
Click the Page Setup button on the Header And Footer toolbar, and click the Layout tab in the Page Setup dialog box.
Select the Different Odd And Even option, and click OK.
Note that on the Layout tab, you can create a different first page header or footer for the entire document, or for a specific section within a document, by choosing an appropriate option in the Apply To list box. Creating different odd and even page headers or footers, however, always affects the entire document, even if it has been divided into sections and regardless of your choice in the Apply To list box. (You'll see more about the Apply To list box in "Adjusting the Page Setup".)
Finally, if you have divided your document into sections, the headers or footers in separate sections can have different contents. Initially, the headers and footers in every section (except the first) are connected to the headers and footers in the previous section, meaning that they'll be exactly the same as those in the previous section. To create different headers and footers in different sections, do the following:
Move the insertion point to any position within the section where you want the headers and footers to be different from the previous section.
Choose Header And Footer from the View menu.
Click the Same As Previous button on the Header And Footer toolbar to toggle this setting off. This will remove the connection between the current section and the previous one. You can now modify the headers or footers for the current section without changing those of the previous section.
TIPModifying Automatic Page Numbering in a Specific Section If you have inserted automatic page numbering into your headers or footers, you can modify the format and starting number of the numbering within a particular document section. To do this, place the insertion point in that section, choose Header And Footer from the View menu, click the Format Page Number button on the Header And Footer toolbar that appears, and change the desired options in the Page Number Format dialog box, which was explained in "Adding Page Numbering". The options you set in this dialog box will apply only to the current document section. Most importantly, you can choose whether to continue the numbering sequence from the previous section, or to start numbering the current section with a specific page number.
If you have varied the headers and footers using any of the three methods just described, then you must, when you choose the Header And Footer command, move to an appropriate document page to enter or modify each of the different headers or footers. For example, if you have created a different first page header, you must move to the first page to enter or modify the first page header or footer; you must then move to any other page to enter or modify the headers or footers for the other pages. When headers and footers differ within a document, each header or footer is labeled appropriately, for example Header -Section 2- or First Page Footer:
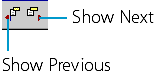
To quickly move to the header or footer on the appropriate page, you can click the Show Previous or Show Next button on the Header And Footer toolbar: