A Word table is a highly versatile tool for arranging text in rows and columns. Figure 9-4 shows a Word table as it appears on the screen. Using a table offers many advantages over using tab stops. For example, if a particular text item doesn't fit on a single line, Word creates a new line and increases the height of the row. (The table shown in Figure 9-4 would be difficult to create using tab stops.) Also, when you use tables you can easily rearrange and adjust the size of the rows and columns, and you can emphasize table items by using borders and background shading.
Figure 9-4.A Word table as it appears on the screen.
ON THE WEB The TableDemo.doc document file, used for the examples in this section, is on the Running Office 2000 Reader's Corner page. For information about connecting to this Web site, read the Introduction.
SEE ALSO For information on applying background shading to tables or adding or modifying borders, see "Using Borders and Shading".
Inserting a Table
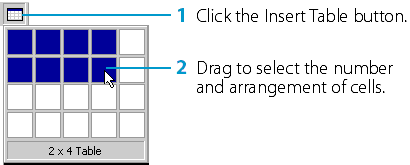
To construct a table at the position of the insertion point, use the Insert Table button on the Standard toolbar, as shown below:
The new table will consist of rows and columns of empty cells. The lines defining these cells are known as gridlines. Gridlines can be shown in a variety of different ways. The gridlines in a newly created table are marked with thin, solid borders. A border is a line that is visible both on the screen and on the printed copy of the document. (Borders can also be added to paragraphs and other objects.) Later in the chapter, you'll learn how to modify or remove one or more borders from a table. If you remove a border, the gridline will be marked with a light gray line that appears on the screen but is not printed; this line will appear, however, only if you select the Show Gridlines option on the Table menu.
TIPAdd New Rows to a Table by Pressing Tab
If you don't know how many rows you'll need when you insert a table, just choose a single row. As you'll see, it's easy to add new rows to the end of the table as you enter the table text by pressing Tab in the last cell. (You should, however, try to choose the actual number of columns, because inserting additional columns is not as easy.)
Entering Text into a Table
To add text to a cell in a table, click in the cell and type the text in the same way that you would in an ordinary paragraph. Notice that if you reach the right border of the cell, Word wraps the text down to the next line and increases the height of the entire row, if necessary, to accommodate the new text. If you press Enter while typing in a cell, Word will insert a new paragraph within the cell. (Each cell contains one or more entire paragraphs.) You can edit and format text within a cell using the standard Word editing and formatting techniques given in the previous chapters.
TIP You can insert a table within a cell of another table, creating a nested table. To do this, place the insertion point at the position in the cell where you want the nested table, and use any of the methods given in this chapter for inserting a table.
To move the insertion point to another cell, click in the cell or use the arrow keys. To move to the next cell (in row-by-row order) and select any text it contains, press Tab. To move to the previous cell and select any text it contains, press Shift+Tab. When you're in the last cell of the table, pressing Tab adds a new row to the end of the table.
TIPInsert Tabs in Tables
To insert a tab character into a table cell, press Ctrl+Tab. You can set the position of tab stops as described in the previous section. But watch for one oddity— when you set a decimal tab, the text in the cell is moved to that tab stop without your having to put a tab character in front of it.
Inserting and Deleting Rows, Columns, and Cells
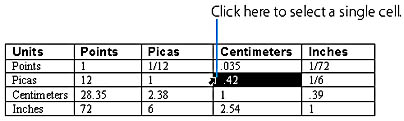
To insert or delete rows, columns, or groups of cells, you must first select the appropriate portion of the table. You can easily select a cell, row, or column as follows:
After you have selected a single cell, row, or column, you can drag to select additional cells, rows, or columns. Alternatively, you can select any block of cells by placing the insertion point within a cell and then pressing an arrow key while holding down Shift. You can select the entire table by placing the insertion point anywhere within it and pressing Alt+5 (the 5 on the numeric keypad with Num Lock off).
The following is a method for adding entire rows or columns to an existing table:
To insert rows at a particular position in a table, select existing rows just below that position; select the same number of rows as the number you want to add. For example:
To insert a single row, you can simply place the insertion point anywhere in the row. Likewise, to insert columns, select an equal number of columns to the right of the position where you want to add the new ones.
If you're inserting rows, click the Insert Rows button on the Standard toolbar. If you're inserting columns, click the Insert Columns button.
NOTE The Standard toolbar actually has only one button for table insertion. When table rows, columns, or cells are selected, the button's ScreenTip reads Insert Rows, Insert Columns, or Insert Cells. When the insertion point or selection is outside a table, the ScreenTip reads Insert Table, and the button inserts a new table. As the selection changes, the image on the button changes to indicate its function.
Alternatively, you can right-click the selection and choose Insert Rows or Insert Columns from the pop-up menu. (The command on the pop-up menu changes depending on whether you have selected rows or columns.)
After clicking the Insert Rows button or choosing Insert Rows from the pop-up menu, the example table shown above (under step 1) looks like this:
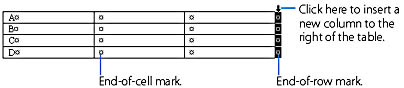
Word marks the end of each table cell with an end-of-cell mark and the end of each table row with an end-of-row mark. You can make these marks visible by clicking the Show/Hide ¶ button on the Standard toolbar. In step 1 above, if you want to insert rows, you should include the end-of-row marks in your selection whether they are visible or not. To insert a column at the right end of a table, select the entire column of end-of-row marks before clicking the Insert Columns button. (You can select these marks whether they're visible or not.):
As you learned earlier in this chapter, you can insert a row at the end of a table by pressing Tab when the insertion point is in the last cell.
To insert a block of one or more cells without inserting entire rows or columns, do the following:
Select a block of existing cells that has the number and arrangement of the cells you want to insert.
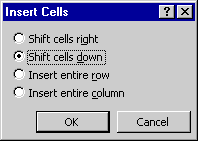
Click the Insert Cells button on the Standard toolbar. Word will display the Insert Cells dialog box, which you can see in Figure 9-5.
Figure 9-5.The Insert Cells dialog box.
Click Shift Cells Right to have Word move the existing cells to the right when it inserts the new cells, or click Shift Cells Down to have it move the cells down. You can also click Insert Entire Row or Insert Entire Column to insert complete rows or columns even though you didn't select complete rows or columns.
To delete table rows, columns, or cells, simply select them, right-click the selection, and choose Delete Rows, Delete Columns, or Delete Cells from the pop-up menu. (The command will be labeled according to the current selection.) Alternatively, you can point to Delete on the Table menu and choose Delete Rows, Delete Columns, or Delete Cells from the submenu that appears. (You can also choose Table from this submenu to remove the entire table.) If you have selected a block that doesn't include complete rows or columns and you choose Delete Cells, Word will display the Delete Cells dialog box, which lets you choose the way the remaining cells are rearranged after the deletion.
To delete the contents of rows, columns, or cells—that is, the text or graphics contained within them—without removing the cells themselves, select the rows, columns, or cells and press the Delete key.
Adjusting the Size of Table Cells
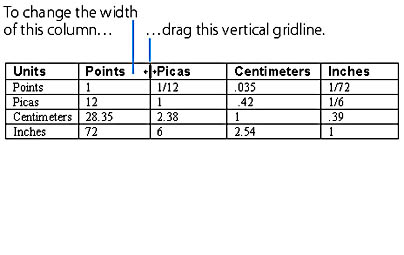
You can adjust the width of a table column by dragging its right vertical gridline:
To adjust the width of one or more specific cells in a column (rather than an entire column), select the cells before dragging. The cells in a single column can vary in width.
When adjusting the width of a column, you can modify the way Word changes the widths of the cells to the right of the column, if any exist, by pressing additional keys while dragging. (See Table 9-1.)
Of course, if you drag the rightmost vertical gridline in a table, you'll always change the overall table width. (And pressing Ctrl or Shift will have no effect.) Note that if you drag the leftmost vertical gridline in the table, you'll change the indent of the selected rows (or of the entire table if no rows are selected) from the left document margin.
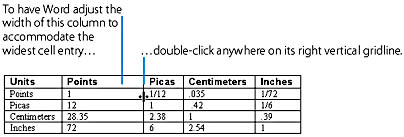
You can also rapidly adjust the width of one or more cells to accommodate the current contents of the cells. To do this, select the cell or cells and double-click the rightmost vertical gridline of the selection. To adjust one entire column of cells, you can simply double-click the right gridline without selecting cells. Here's an example:
And here's how the example looks after double-clicking:
(If Word adjusts more than one cell in a particular column, it resizes them equally to accommodate the widest block of text in a cell.) If you later change the contents of a cell, you'll have to readjust the cell or column width.
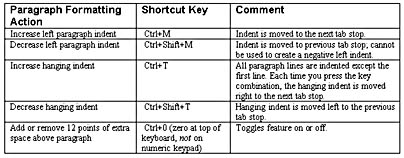
Table 9-1.Effects of Pressing Keys While Dragging Vertical Table Gridlines
Key
Effect on Cells to Right of Gridline
No key
Word changes the width only of the cells to the immediate right of the gridline, without changing overall table width.
Alt
Has the same effect on table as pressing no key, but Word displays the width of each column within the ruler.
Ctrl
Word changes the width of all cells to the right proportionately, without changing the overall table width. (For example, if the cells to the right have equal widths, they remain equal in width after you drag.)
Shift
Word does not change the width of cells to the right. Instead, it changes the overall table width.
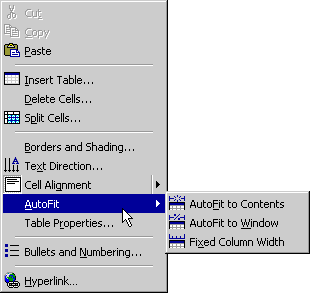
Alternatively, you can assign the new AutoFit feature to a table to have Word adjust the width of all columns in a table to fit the cell contents or the window width, and to dynamically maintain the adjustment as you change the contents or window width. To do this, right-click anywhere in the table, and on the pop-up menu that appears, point to AutoFit to display the submenu. (Alternatively, you can place the insertion point within the table and point to AutoFit on the Table menu.)
If you choose AutoFit To Contents, Word will adjust the width of each column in the table to accommodate the widest block of text in that column. And as you add or delete text from a column, Word will dynamically adjust the width to maintain the fit.
If you choose AutoFit To Window, the overall width of the table will be adjusted so that the table just fits within the window, and the width will be dynamically adjusted to maintain this fit if the window is resized. AutoFit To Window affects the table only when you view the document in the Web Layout view of Word, or when you view a Web-page document in a browser.
If you choose Fixed Column Width, the column widths will remain constant unless you manually adjust them using one of the techniques described previously in this section.
As you have seen, Word automatically adjusts the height of a table row to accommodate the text contained in the row. You can also manually adjust the height of a row by dragging the horizontal gridline at the bottom of the row. To do this, you must be in Web Layout or Print Layout view. Note that you can't adjust the height of selected cells within a row—you always change the height of all the cells in the row.
You can give two or more rows the same height by selecting them, right-clicking the selection, and choosing Distribute Rows Evenly from the pop-up menu that appears. Likewise, you can give two or more columns the same width by selecting them, right-clicking the selection, and choosing Distribute Columns Evenly from the pop-up menu. (Alternatively, after you make the selection, you can point to AutoFit on the Table menu and choose either of these commands from the submenu that appears.)
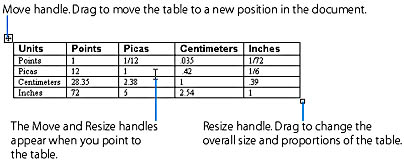
TIPQuickly Move or Resize a Table
In Web Layout or Print Layout view, you can move or resize an entire table by holding the mouse pointer over the table until the Move and Resize handles appear and then dragging a handle, as shown here:
When you resize a table by dragging the Resize handle, Word changes the sizes of all the cells in the table.
Moving and Copying Rows, Columns, and Cells
To move entire rows or columns within a table, select them, and then use the mouse to drag them to a new location. The rows or columns will be removed from their current location and inserted into the table at the new location. To copy rows or columns, press the Ctrl key while dragging. When you select rows, you must include the end-of-row marks. Otherwise, you'll merely move or copy the contents of the cells.
NOTE To use the techniques discussed in this section, the Drag-And-Drop Text Editing option must be selected. To locate this option, choose Options from the Tools menu, and click the Edit tab.
To move the contents of table cells, select the cells and drag to a new location in the table. Word will delete the contents of the cells you selected (leaving empty cells behind), and it will insert these contents into the cells at the target location, overwriting the current contents of the target cells. To copy the contents of table cells, press the Ctrl key while dragging. (To move or copy cell contents, you must not select entire columns. You can select entire rows as long as you don't include the end-of-row marks.)
You can also move or copy text from one cell to another without overwriting the contents of the second cell. To move text, select only the text within the first cell (rather than selecting the entire cell), and then drag it to the new location. (Press Ctrl while you drag to copy.) The moved or copied text will be added to the contents of the second cell.
Changing the Text Orientation and Alignment in a Table Cell
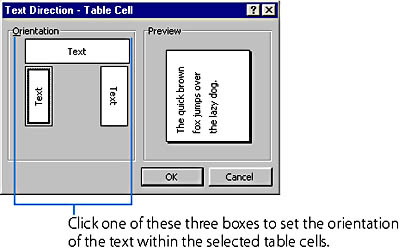
You can modify the orientation of the text in a table cell so that rather than the text reading from left to right, it reads from bottom to top or from top to bottom. You might want to do this to make information fit into a particular table, or to improve the appearance or readability of a table. To change the text orientation within a table, select one or more cells, right-click within the selection, and choose Text Direction from the pop-up menu. (To change a single cell, you can right-click within the cell without selecting it.) Then select the desired orientation in the Text Direction dialog box:
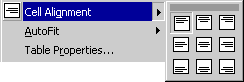
To change the alignment of the text within one or more cells, select them and right-click the selection. (To change a single cell, you can just right-click it.) Then point to Cell Alignment on the pop-up menu and choose an alignment style from the submenu that appears:
Note that Word creates the horizontal component of the alignment by assigning the Left, Center, or Right paragraph formatting attributes to the paragraph(s) in the cell.
Using the Table Menu Commands
The previous sections have focused on working with tables using the Standard toolbar, mouse, and pop-up menus. In general, these interactive methods are the fastest and most convenient. The Table menu provides alternative methods for inserting and modifying tables; it also allows you to perform some additional table operations not possible using the interactive techniques. Table 9-2 summarizes the use of these commands. Keep in mind that for many of these commands, merely placing the insertion point within a table, row, column, or cell is equivalent to selecting the table, row, column, or cell.
TIPOther Ways to Work with Tables
Some of the commands listed in Table 9-2 are also provided on the pop-up menu that appears when you right-click a table or a selection within a table. And keep in mind that the Tables And Borders toolbar, discussed in the next section, provides a variety of tools for working with tables that you have created using any of the available methods.
Table 9-2.Table Menu Commands and Their Effects
Command or Submenu
Description
Draw Table command
Allows you to "draw" a table. This command is discussed in the next section.
Insert submenu
Allows you to insert a new table into a document or into a table cell, to insert columns (to the left or right of the selection), to insert rows (above or below the selection), or to insert cells (specifying the direction in which the existing cells are shifted). The effects of these commands depend on the current selection or position of the insertion point.
Delete submenu
Lets you delete the selected cells, columns, rows, or the entire table.
Select submenu
Lets you select the column(s), row(s), cell(s), or the entire table containing the insertion point or selection.
Merge Cells command
Combines the selected adjacent cells into a single cell.
Split Cells command
Divides the single selected cell (or each cell in a group of selected cells) into two or more cells. You can specify the resulting number of rows and columns of cells.
Split Table command
Divides a table into two separate tables, and inserts a regular paragraph (Normal) between the two tables. The division occurs above the selected row.
Table AutoFormat command
Allows you to instantly modify the overall look of the selected table by choosing one of a set of predefined table formats.
AutoFit submenu
Lets you apply the AutoFit feature to the selected table, or to distribute rows or columns evenly. These features were described in "Adjusting the Size of Table Cells".
Heading Rows Repeat command
Marks the selected row or rows at the top of a table as a heading. If a page break occurs within a table, Word repeats the heading at the top of the next page.
Convert submenu
Lets you convert the selected table to text (removes the table and converts the text it contains to ordinary paragraphs), or convert selected text outside a table to a table (creates a new table and inserts the selected text into the table).
Sort command
Sorts the contents of the selected rows and columns within a table. If the selection is outside a table, the command sorts paragraphs of text. For information on this command, see "Sorting Lists and Tables".
Formula command
Inserts a formula into a table cell. A formula displays the result of a mathematical computation on numbers within table cells. This command lets you create a Word table that functions as a simple spreadsheet.
Show Gridlines command
Causes Word to mark the gridlines around cells in all tables using light gray lines. These lines are visible only on the screen (they don't print) and only where borders haven't been applied. Note that when the option is selected, it's labeled Hide Gridlines, and when it isn't selected, it's labeled Show Gridlines.
Table Properties command
Displays the Table Properties dialog box, which allows you to modify the size, alignment, indent, and text-wrapping style of the selected table; the height and page-breaking style of rows; the height of columns; and the width and vertical text-alignment style (top, center, or bottom) of the selected cell or cells. (By modifying the text-wrapping style, you can have adjoining text wrap around the table rather than staying above and below it.)