As you learned in Chapter 5, to enter text you simply move the insertion point to the location you want in the document and type the text.
SEE ALSO The methods you can use for moving the insertion point are discussed in the "Moving the Insertion Point" section of this chapter.
Word provides two editing modes: Insert and Overtype. In Insert mode (the most common mode), any existing characters beyond the insertion point are moved ahead in the document as you type. In Overtype mode, the new characters you type replace any existing characters. When Overtype mode is active, the OVR indicator on the status bar is darkened. To switch between the two modes, double-click the OVR indicator. You can also use the Insert key to do this, if the Use The INS Key For Paste option in the Options dialog box (Edit tab) is not selected.
TIPCreate a New Line Within a Paragraph by Pressing Shift+Enter
To create a new line within a paragraph, press Shift+Enter. "Why not just press Enter and create a new paragraph?" you might ask. Some paragraph formatting affects only the first or last line of the paragraph, such as an initial indent or additional space above or below the paragraph. By pressing Shift+Enter, you can create a new line without introducing this formatting. In the section "Formatting Text Boxes, Pictures and Drawing Objects" you'll learn how to add a text wrapping line break, which causes the following line to be moved below an adjoining text box, picture, or drawing object.
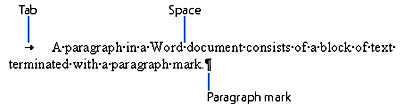
As you also learned in Chapter 5, you press Enter to create a new paragraph. Word marks the end of each paragraph by inserting a paragraph mark. A paragraph mark (¶) is one of the nonprinting characters that might be contained in a Word document. Nonprinting characters never appear on the final printed copy of the document. Normally, they are also invisible on the screen. You can, however, make them visible on the screen by clicking the Show/Hide ¶ button on the Standard toolbar.
The following is an example of some document text on the screen after nonprinting characters have been made visible:
You can also display or hide specific nonprinting characters by choosing Options from the Tools menu, clicking the View tab, and selecting the appropriate options in the Formatting Marks area.
CAUTION Avoid deleting a paragraph mark unintentionally. (It can be deleted whether it is visible or not.) Doing so will merge teh paragraphs on either side of the mark, and any paragraph formatting assigned to the second paragraph will be lost. (Paragraph formatting will be discussed in the next chapter.)
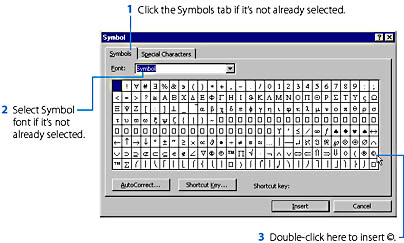
The Symbol dialog box displays all the characters belonging to the font selected in the Font list box at the top of the Symbols tab. If you don't immediately see the symbol you want, you might be able to find it by selecting various fonts. Note that selecting the (normal text) item at the beginning of the list of fonts displays the set of characters belonging to the font at the current position of the insertion point in your document. Also, if you click the Special Characters tab in the Symbol dialog box, Word will display some additional characters that you can insert.
SEE ALSO To learn how to rapidly insert text at any position on the page, having Word automatically add the required space and formatting, see "Using Click and Type."
Many of the symbols have default shortcut keys assigned to them. Word displays the available shortcut keys in the Symbol dialog box on the Special Characters tab, and at the bottom of the Symbols tab if you choose the (normal text) font. You can press the shortcut keys to quickly insert a symbol without opening the Symbol dialog box. For example, you can insert the copyright symbol by pressing Alt+Ctrl+C, and you can insert the foreign character á by pressing Alt+0225. (You must type the 0225 on your numeric keypad with Num Lock on.)
Figure 6-1.Inserting the copyright symbol using the Symbol command on the Insert menu.
TIPSet up Shortcut Keys for Symbols You Frequently Use
You can define your own shortcut key for a symbol by opening the Symbol dialog box, clicking the symbol, and then clicking the Shortcut Key button.
You can also define a character or group of characters—such as "(ae)"—that Word will automatically replace with a specified symbol such as æ. To do this, select the symbol in the Symbol dialog box and click the AutoCorrect button. The AutoCorrect feature will be discussed later in the chapter (in the section "Using the AutoCorrect Feature").
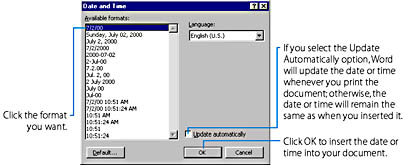
In addition, you can insert the current date, the current time, or both into your document by choosing Date And Time from the Insert menu, and in the Date And Time dialog box selecting the desired format. (See Figure 6-2.)
Figure 6-2.Inserting the current date or time using the Date And Time command on the Insert menu.
Automatic Writing
This section is not about a spiritualist activity, but rather discusses several ways that you can have Word automatically insert text into your document.
Using the Repeat Command
If you have just typed some text, you can have Word place that same text at any location in a document as follows:
Type the original text.
Move the insertion point to the location where you want to repeat the text (in the same or in a different document).
Choose Repeat Typing from the Edit menu, or press Ctrl+Y or the F4 key. Word will automatically insert the text that you originally typed. You can do this repeatedly to insert multiple copies of this text.
If you don't like the result, you can reverse it by immediately choosing Undo Typing from the Edit menu, by pressing Ctrl+Z, or by clicking the Undo button on the Standard toolbar. (The Undo command will be described later in the chapter.)
NOTE Repeat Typing is only one example of the Repeat command. The Repeat command repeats any editing or formatting action, not simply text that you have typed. Word indicates the action that will be repeated in the caption for the Repeat command on the Edit menu. For example, if you have deleted a word (by pressing Ctrl+Del), the menu caption will read Repeat Delete Word, and choosing the command will delete another word. As explained later in the chapter, this command will also redo an action that you have just reversed by using the Undo command.
Using the AutoText Feature
A second way to automate the insertion of text is to use the AutoText feature, which allows you to save commonly used blocks of text (or graphics) as AutoText entries and lets you quickly insert one of these blocks wherever you need it.
To create an AutoText entry, do the following:
Type into a document the block of text that you want to save. (Typing the text into a paragraph that has the same style as the paragraphs in which you'll later use the text can make it easier to insert the entry from the AutoText submenu, as you'll see later.)
Select (that is, highlight) the block of text. One way to select text is to hold down the Shift key while pressing the appropriate arrow key. Selection methods are discussed later in the chapter.
Point to AutoText on the Insert menu, and choose New from the submenu that appears. Alternatively, you can press Alt+F3. Word will display the Create AutoText dialog box.
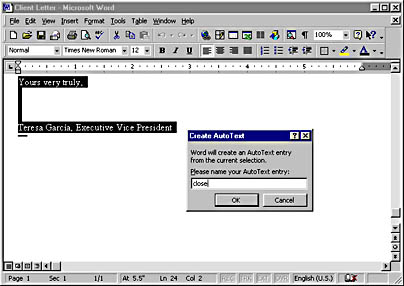
Type a name for your AutoText entry into the text box, and click OK. (Word proposes a name based on the selected text, but you'll probably want to invent a name of your own.) Make the name short because you'll need to type it (or at least part of it) every time you insert the entry. Note that if you type the name of an existing entry, Word will ask whether you want to redefine that entry; click Yes to replace the original text for the entry or No to choose a new name.
Figure 6-3 shows an example.
Figure 6-3.Storing a standard letter closing as an AutoText entry named close.
After you create an AutoText entry, it will be stored permanently. You can insert an AutoText entry into a document as follows:
Place the insertion point at the position in your document where you want to insert the text.
Type the name of the AutoText entry as a separate word. This means that you must type the name at the beginning of a line or following a space, tab, or punctuation symbol. The case of the letters you type doesn't matter. And you might not need to type the complete name—you need type only a sufficient number of characters to distinguish the name from the names of all other AutoText entries.
Press F3 or Ctrl+Alt+V. Word will immediately replace the entry name with the entry text. For example, if you had defined the AutoText entry shown in Figure 6-3, at the end of a letter you could simply press Enter, type the word close, and then press F3 or Ctrl+Alt+V:
Word would replace the word close with your standard letter closing:
TIPA Shortcut for Inserting AutoText Entries and Dates
If the Show AutoComplete Tip For AutoText And Dates option is enabled, as you begin typing an AutoText entry name into a document, Word will display the entry text (or part of the text) in a box near the insertion point. The box will appear as soon as you have typed enough of the name to identify the entry. You can then insert the entry text by simply pressing Enter (or the usual F3 or Ctrl+Alt+V key combination), without typing the complete entry name. When this option is selected, you can also have Word complete partially typed dates, using the same method. To select or deselect the option, point to AutoText on the Insert menu and choose AutoText from the submenu that appears. (Word will display the AutoText tab, which is discussed in the following section.)
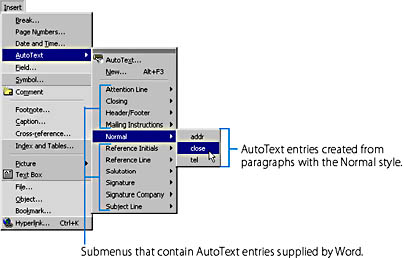
As an alternative to steps 2 and 3, you can insert an AutoText entry by choosing it from the AutoText submenu on the Insert menu.
The AutoText submenu lists all AutoText entries you have defined. Each entry is placed on a submenu labeled according to the style of the paragraph from which the entry was originally obtained; for example, if you created an entry by selecting text in a paragraph with the Normal style, the entry will be placed on a submenu labeled Normal. (This arrangement helps you locate entries that are relevant to the type of paragraph you're currently working on.) The AutoText submenu also displays a large collection of entries defined by Word, grouped on submenus according to their functions.
Note, however, that if the insertion point is currently in a paragraph with a style other than Normal, and if you created one or more AutoText entries from paragraphs having that style, the AutoText submenu will list only entries created from paragraphs with the same style. In this case, if you want to see all AutoText entries, hold down the Shift key when you open the AutoText submenu.
TIPChange an AutoText Entry
To modify the contents of an AutoText entry (without having to delete it and reenter it), insert the entry text into the document (using one of the methods just described), make the changes you want, and then use the procedure given at the beginning of this section to save the text again as an AutoText entry, using its original name. You must answer yes when Word asks whether you want to redefine the entry.
Using the AutoText Tab of the AutoCorrect Dialog Box
You can use the AutoText tab of the AutoCorrect dialog box to create AutoText entries, to view their contents, or to delete them. You can select this tab using either of the following methods:
Point to AutoText on the Insert menu and choose AutoText from the submenu.
Choose AutoCorrect from the Tools menu and click the AutoText tab in the AutoCorrect dialog box. (The other tabs in the AutoCorrect dialog box will be discussed later in the book.)
To create an AutoText entry using the AutoText tab, do the following:
Select the document text you want to save.
Display the AutoText tab using one of the methods given above.
Type a name for the AutoText entry into the Enter AutoText Entries Here box. Note that if you type the same name as an existing entry, the existing entry will be overwritten.
In the Look In list box, select the template in which you want to store the AutoText entry. If you select All Active Templates or Normal.dot (Global Template), the Normal template will store the entry and all Word documents will have access to it. If the current document is attached to a template other than Normal, and if you select the name of that template in the Look In list box, then the attached template will store the entry and it will be available only to documents attached to this same template.
Chapter 8 explains how templates are attached to documents and shows how to copy AutoText entries from one template to another as well as how to rename them. Note that your selection in this list will also affect the location where AutoText entries are subsequently stored when you create entries using the New command on the AutoText submenu, as described in the previous section.
Click the Add button.
Figure 6-4, shows the completed AutoText tab just before clicking the Add button.
To view the contents of an AutoText entry or to delete an entry, do the following:
Display the AutoText tab using one of the methods given above.
Figure 6-4.Creating an AutoText entry using the AutoText tab of the AutoCorrect dialog box.
Select a template in the Look In list box. Word will list only the AutoText entries that are stored in the template you select. Note that if you choose All Active Templates, Word will list all entries stored in the Normal template, in the template attached to the document (if other than Normal), and in any other loaded templates.
Your selection in the Look In list box will also affect the AutoText entries that are subsequently displayed on the AutoText submenu of the Insert menu, as well as those that are displayed by the AutoText toolbar that is described in the next section.
Select the name of an AutoText entry in the Enter AutoText Entries Here list. You can now do one of the following:
You can view the current contents of the entry in the Preview area.
You can delete the entry by clicking the Delete button.
You can insert the entry into your document by clicking the Insert button. (This is a useful feature because it allows you to preview the contents of any entry immediately before inserting it.)
Displaying the AutoText Toolbar
If you use AutoText frequently, you can save time by displaying the AutoText toolbar, which is shown in Figure 6-5. To display it, point to Toolbars on the View menu or right-click the menu bar or a toolbar, and then choose the AutoText option from the submenu that pops up. You can also display the toolbar by clicking the Show Toolbar button on the AutoText tab.
Figure 6-5.Using the AutoText toolbar.
NOTE If the insertion point is currently in a paragraph with a style other than Normal, and if you created one or more AutoText entries from paragraphs having that style, the middle button on the AutoText toolbar will be labeled with the name of the paragraph style rather than All Entries, and it will list only entries created from paragraphs with the same style. If you want to see all AutoText entries, hold down the Shift key while clicking the button.
Using the AutoCorrect Feature
A final way to automate text insertion is to use the AutoCorrect feature, which is similar to the AutoText feature. The primary difference between the two is that after you've typed the name of an AutoCorrect entry followed by a space or a punctuation symbol, Word automatically replaces the name with the entry text; you don't need to press a special key or issue a command. Thus, you might want to use AutoCorrect rather than AutoText for text that you insert frequently. Also, you can have AutoCorrect perform certain general text replacements; for example, you can have it automatically capitalize the first letter of a sentence if you fail to do so.
The following are the steps for enabling AutoCorrect text replacements and for defining one or more AutoCorrect entries:
If the text you want to save in the AutoCorrect entry has already been entered in a document, select it. (This step is optional because you can type the text later.)
Choose AutoCorrect from the Tools menu to open the AutoCorrect dialog box, and then click the AutoCorrect tab if it isn't already displayed.
Make sure the Replace Text As You Type option is selected to activate the AutoCorrect entries.
In the Replace text box, type a name for the AutoCorrect entry you want to define
NOTE Make sure that the name you choose for an AutoCorrect entry is not a word that you might need to type into a document; for example, if you assigned the name a, each time you tried to enter a into a document, Word would insert the associated AutoCorrect entry.
If you selected text prior to opening the AutoCorrect dialog box, that text will already be contained in the With text box. If you didn't select text, type the text for the entry into the With box.
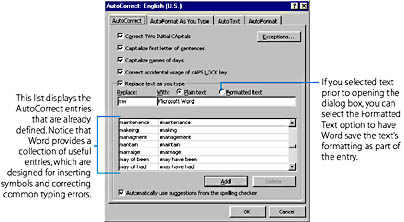
Click the Add button to define the new entry and add it to the list. Figure 6-6 shows the AutoCorrect dialog box after you have defined a new entry.
To define an additional entry, repeat steps 4 through 6. When you're finished adding AutoCorrect entries, click the OK button to save your entries and close the dialog box.
TIPCreating an AutoCorrect Entry for a Symbol
As mentioned previously in "Inserting Special Characters" in the Symbol dialog box (which you can open by choosing Symbol from the Insert menu), you can select a symbol and then click the AutoCorrect button to quickly create an AutoCorrect entry for that symbol.
After you have performed these steps, Word will immediately replace the name of an AutoCorrect entry with the entry text whenever you type the name followed by a space, tab, punctuation character, or line break (inserted by pressing Enter or Shift+Enter). Note that you must type the entry name as a separate word; that is, the word must immediately follow a space, tab, or punctuation character, or be typed at the beginning of a line. For example, if you had defined the entry shown in Figure 6-6, typing mw followed by a space would cause Word to erase the mw and insert Microsoft Word in its place.
Notice also that you can have Word perform several kinds of general text replacements by selecting one or more of the four options at the top of the AutoCorrect dialog box. For example, if you select the first option (Correct TWo INitial CApitals), whenever you type a word beginning with two capital letters (and the rest of the characters are lowercase), Word will automatically correct the error by converting the second letter to lowercase. If you select the second option (Capitalize First Letter Of Sentences), Word will automatically capitalize the first letter of a sentence if you fail to do so.
Figure 6-6.The AutoCorrect tab after adding a new entry named mw.
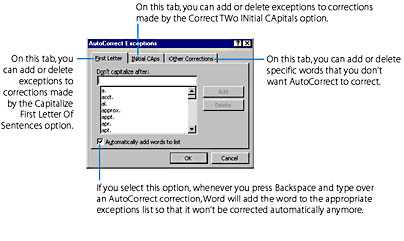
To add or delete exceptions to corrections made by the Capitalize First Letter Of Sentences or Correct TWo INitial CApitals options, or to add or delete specific words you don't want AutoCorrect to alter, click the Exceptions button in the AutoCorrect dialog box. Word will display the dialog box shown here:
TIPUsing AutoCorrect to Correct Your Spelling
The collection of AutoCorrect entries defined by Word includes many that correct common misspellings (such as accomodate, acheive, and embarass). Additionally, when you use the Spelling And Grammar command to check your spelling, whenever Word finds a spelling error, you can quickly create an AutoCorrect entry that will automatically correct that error in the future.
If you select the Automatically Use Suggestions From The Spelling Checker option on the AutoCorrect tab (see Figure 6-6), whenever you misspell a word, Word will immediately replace it with a word from the spelling checker's suggestion list rather than simply marking the misspelling with a wavy red underline. This feature works, however, only if there is a single word on the suggestion list.
For information on the spelling checker and using its suggestions for AutoCorrect, see "Checking Your Spelling"