Working with Outlook Items
Once you have opened a particular Outlook folder, such as Inbox, Calendar, or Contacts, you can change the view (the way the information is displayed); you can sort, filter, or group the items contained in the folder; and you can open, edit, create, or delete individual items.
Using Different Views
You can work with an Outlook folder using a variety of different views, which vary— often radically— in the way the information is organized and in the amount of detail that is shown in the Information Viewer of the Outlook window. For example, Figure 26-1 shows the Calendar folder in the Day/Week/Month view, which displays all days and appointments in a typical calendar or appointment book format, while Figure 26-2 shows the Calendar folder in the Active Appointments view, which displays a table listing all future appointments.

Figure 26-1. The Calendar folder in the Day/Week/Month view.
Each folder has available a set of default views that are appropriate for the type of information stored in that folder. To change the view of the opened folder, simply select another item in the Current View list box on the Advanced toolbar:
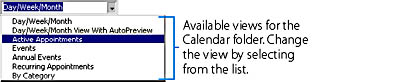
Alternatively, you can choose the view from the Current View submenu of the View menu.
For certain views, such as the Day/Week/Month view of the Calendar folder and the Message Timeline view of the Inbox folder, you can control the number of days shown on the screen by choosing the Day, Week, or Month option from the View menu, or by clicking the Day, Week, or Month button on the Standard toolbar. Some views (such as the Day/Week/Month view of the Calendar folder) also have a Work Week option. Notice that the Day/Week/Month view of the Calendar folder shown in Figure 26-1 has the Day option selected.
![]()
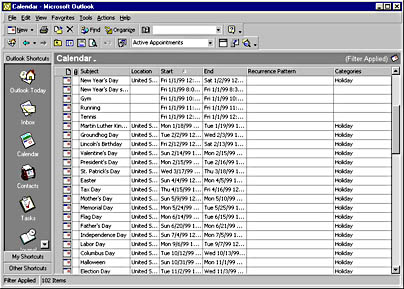
Figure 26-2. The Calendar folder in the Active Appointments view.
You can modify any view by pointing to Current View on the View menu and then choosing Customize Current View from the submenu. Choosing this command displays the View Summary dialog box, which contains a set of buttons you can click to change various features of the current view. Note that in certain views, some of these buttons are disabled because the corresponding features don't apply to that view. For example, if Day/Week/Month is the current view of the Calendar folder, the Group By, Sort, and Automatic Formatting buttons are disabled. Also, the information displayed to the right of each button depends on the particular view that's active and the options that have been selected for that view. This information either gives the current settings or describes the type of settings you can make by clicking the button. Figure 26-3 shows the View Summary dialog box as it appears when the Messages view of the Inbox folder (with default settings) is active.
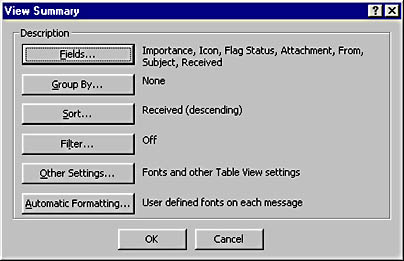
Figure 26-3. The View Summary dialog box.
Modifying Columns
In many of the views, the information is arranged in a table consisting of rows and columns (for instance, the Messages view of the Inbox folder shown in Figure 25-3, and the Active Appointments view of the Calendar folder shown in Figure 26-2). Each column displays the values of a given field of information. A field is an individual unit of information within an Outlook item— for example, the subject or date received of a message in the Inbox folder.
In a table view, you can modify the columns in a variety of ways. For example, you can change the width of a column by dragging the right border of the column heading (the button-like bar, containing a label, at the top of the column). You can move a column by dragging its heading to a new position in the column heading row. And you can remove a column by dragging the heading anywhere on the screen outside the column heading row. (When the mouse pointer turns into an X, releasing the mouse button will remove the column.)
You can add, remove, or rearrange columns in a table view by choosing options in the Show Fields dialog box. To open this dialog box, point to Current View on the View menu, choose Customize Current View from the submenu, and then click the Fields button in the View Summary dialog box (shown in Figure 26-3).
You can also modify a column from within a view by right-clicking its heading and choosing commands from the pop-up menu:
The Remove This Column command provides another way to delete a column. The Field Chooser command displays a dialog box that lets you add a new column by simply dragging a field name from the dialog box to the desired position in the heading row. The Alignment submenu lets you apply left (the default), right, or centered alignment to the contents of the column. The Best Fit command makes the column just wide enough to display the column contents. The Format Columns command allows you to change the format, label, width, or alignment of one or more columns in the table. And the Customize Current View command provides an alternative way to display the View Summary dialog box.
For detailed instructions on modifying columns in a table view, see the Outlook online Help book "Customizing Tables."
You can click the Other Settings button of the View Summary dialog box to change the fonts used in the view and to modify other features, which vary according to the current view. In some views, you can click the Automatic Formatting button to apply distinguishing formatting to certain items; for example, in the Messages view of the Inbox folder, you could have the headings for all unread messages displayed in an italic, red font. (In "Organizing Messages," you'll learn how to use the Organize tool to quickly color-code certain messages.)
The features set by the Fields button are discussed in the preceding sidebar ("Modifying Columns"), while those set by the Group By, Sort, and Filter buttons are discussed in the next section.
Finally, you can point to Current View on the View menu and choose Define Views from the submenu to modify any of the views available for the current folder, to restore any of these views to its default settings, to rename a view, or to create a new custom view.
For complete information on the views available for each of the Outlook folders and detailed instructions on working with views, see the Outlook online Help book "Changing Views," which is within the "Organizing and Viewing Items in Outlook" book.
Sorting, Filtering, and Grouping Items in Outlook Folders
You can further refine the way information is displayed in a particular view by sorting, filtering, or grouping the items in the folder.
NOTE
You can sort, filter, or group items in any table view (that is, any view consisting of rows and columns with a row of column headings at the top). You can also perform one or more of these operations in certain other views. For example, in the Address Cards view of the Contacts folder, you can sort or filter items, and in the By Type view of the Journal folder, you can filter or group items. You can tell which operations are possible when a particular view is selected by the buttons enabled in the View Summary dialog box (These buttons are discussed next.)
To sort, filter, or group items, point to Current View on the View menu, and then choose Customize Current View from the submenu to open the View Summary dialog box (shown in Figure 26-3). Alternatively, you can open this dialog box by right-clicking anywhere in the heading row of a table view, or in a blank area of any type of view, and then choosing the Customize Current View command from the pop-up menu.
To sort the items in an Outlook folder, click the Sort button in the View Summary dialog box. This will open the Sort dialog box, which lets you sort the items by the values of one or more fields, in either ascending or descending order. Alternatively, you can sort the items in a table view by the values in one of the columns, by simply clicking the heading above that column. Each click of the heading toggles between an ascending and a descending sort. An arrow is displayed in the heading of a column currently used for sorting— an up arrow for an ascending sort or a down arrow for a descending sort.
When you open a folder, Outlook normally displays all items stored in that folder. However, you can click the Filter button in the View Summary dialog box to open the Filter dialog box, where you can set conditions to determine which items will be displayed. For example, you could display only those messages in the Inbox that contain the word manuscript in the message text, or only those messages that are marked as high importance. The criteria you can select are the same as those displayed in the Advanced Find dialog box. This dialog box is discussed in "Finding Outlook Items or Disk Files"
You can click the Group By button in the View Summary dialog box to open the Group By dialog box, which enables you to group items by the values of one or more fields, rather than displaying the items in a simple list. For example, if you grouped the messages in your Inbox by the Importance field, Outlook would list all high-importance messages in one group, followed by all normal-importance messages in a second group, followed by all low-importance messages in a third group. You can define groups within other groups, creating up to four levels of nested groups. For instance, in the previous example, within each importance group you could group the messages by their sensitivities.
![]()
Outlook provides two alternative ways to group items in a table view. First, you can group the items by the values in a column by right-clicking the column's heading and choosing Group By This Field from the pop-up menu. And second, you can choose Group By Box on this same menu (or click the Group By Box button on the Advanced toolbar) to display the Group By box at the top of the Information Viewer. Once this box is displayed, you can drag one or more column headings into the box to group the items by the associated field or fields. You can change the order of the groupings by dragging the field names within the Group By box.
You can use the Categories command on the Edit menu to assign categories to items in your Outlook folders. For example, you might assign some messages the Business category and others the Personal category. (As you'll learn in the next two chapters, you can also assign a category to an item when you create or edit it in a form.) You can then sort, filter, or group the items based on their categories. You can also locate and display items that belong to a given category using the Advanced Find command, covered in "Using Advanced Find"
For complete details on the techniques discussed in this section, see the Outlook online Help books "Sorting Items," "Filtering Items," "Grouping Items," and "Assigning Items to Categories," all within the "Organizing and Viewing Items in Outlook" book.
Opening, Editing, Creating, and Removing Outlook Items
The amount of information that the Information Viewer of the Outlook window displays for each Outlook item depends on the current view and the view options you have chosen. Some views allow you to enter or edit selected fields of information directly within the Information Viewer. For example, in the Day/Week/Month view of the Calendar folder, you can enter or edit text in the Subject field of an appointment.
To view all the information belonging to an item and be able to edit the contents of any field, however, you need to open the item. The quickest way to open an item is to double-click it. You can also right-click the item and choose Open from the pop-up menu. Or you can click the item to select it and press Ctrl+O. The item will then be shown within a separate window known as a form, which displays and lets you modify all the item information. The next two chapters describe the standard forms used for the different types of Outlook items, such as e-mail messages, appointments, and tasks.
You can create a new Outlook item of any type regardless of the folder that's currently opened. To do this, choose the type of item you want to create from the New submenu on the File menu or from the menu that drops down when you click the arrow on the New button. (This is the leftmost button on the Standard toolbar. Its icon and ScreenTip text change to match the open folder, such as "New Mail Message" or "New Contact.")
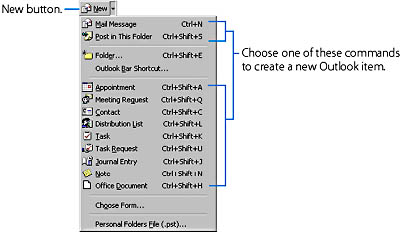
This graphic shows the New Message button and the menu that's displayed when the Inbox folder (or another folder containing mail items) is open. The contents of the menu vary slightly, depending on which folder is open.
Alternatively, you can create a new item by pressing the appropriate key combination. The key combinations are listed on the menu shown above. Note, however, that the type of item created by clicking the main part of the New button (not the down arrow) or by pressing Ctrl+N depends on the folder that's currently open. For example, if a folder containing mail items (such as Inbox or Outbox) is open, a new message is created; if the Contacts folder is open, a new contact description is created; and if the Journal folder is open, a new journal entry is created. (To create a new message when a mail-item folder isn't currently open, press Ctrl+Shift+M.)
TIP
Use the Actions MenuYou can also add a new item to the folder that's currently open by choosing an appropriate command from the Actions menu. Typically, the Actions menu provides more choices than the New submenu or New button, but you have to first open the appropriate folder before these choices become available. For example, if your Calendar folder is open, the Actions menu lets you directly create an appointment, an event, a meeting, or a recurring appointment or meeting. (These Outlook items are discussed in the section "Calendar").
Creating a new item will open a blank form for you to fill in. The blank form is the same as the form you use when you open an existing item of the same type, to view or edit it. When you finish entering the information and close the form, the new item is saved in the appropriate Outlook folder.
When you edit an existing item or create a new one, the commands that the form provides for entering, editing, and formatting text, as well as those for checking your spelling, are similar to commands available in Word and other Office applications. For detailed instructions, see the Outlook online Help book "Formatting Text and Checking Spelling."
You can insert an Outlook item into a field of another item. To do this, choose Item from the Insert menu of the form. Alternatively, you can simply drag an item from another folder to the field. (You can insert an item into a Notes item only by dragging.)
TIP
Quickly Create a New Item from an Existing OneYou can use the Outlook AutoCreate feature to rapidly create a new item based on an existing item from a different folder. To do this, simply drag an item from one folder to the Outlook Bar shortcut for a different folder. (You can also drag it to the destination folder's name in a permanently displayed Folder List.) For example, dragging an e-mail message from the Inbox folder to the Contacts shortcut on the Outlook Bar creates a Contact item containing the name and e-mail address of the person who sent you the message. Similarly, dragging an item from the Contacts folder and to the Inbox shortcut creates a new e-mail message addressed to the contact. (You can then fill in the subject and message text.) If the shortcut you want isn't visible, while you drag you can hold the pointer over a group button to open that group, or you can hold it over the top or bottom of a group to scroll through the shortcuts.
Likewise, you can insert or attach a file in some of the fields of an Outlook item by choosing File from the Insert menu of the form, or by dragging the filename from Windows Explorer or a file folder displayed in Outlook to the field where you want to add it. Attaching files is common for e-mail messages, which are explained in Chapter 27. (You can't insert or attach a file in a Notes item.)
TIP
Include Hyperlinks in Your Outlook ItemsA hyperlink is a block of text containing an Internet or e-mail address, which you can click to access the address— that is, to display the Web page in your browser, send an e-mail message, or perform another action, according to the type of the address. You can insert a hyperlink into the large text box of a message form, Contact item, or Calendar item. To do this, simply type the full Internet address (URL), such as http://www.microsoft.com/ or mailto:msporder@msn.com, and Outlook will automatically convert it to a blue, underlined hyperlink. Alternatively, when you create or edit a message, you can insert a hyperlink by choosing Hyperlink from the form's Insert menu. (This command, however, isn't available if you're using the Microsoft Outlook Rich Text or Plain Text e-mail format with the Outlook message editor. E-mail formats and editors are discussed in Chapter 27.)
You can save a copy of an Outlook item in a disk file. To do this, select the item in the Information Viewer, or open the item in a form, and choose Save As from the File menu of Outlook or of the form. Before saving the item, select the desired format from the Save As Type list box in the Save As dialog box.
Finally, you can export an entire Outlook folder to a disk file in a choice of formats, and you can import data from a variety of file types (such as an Access database or another Outlook Personal Folders file) to an Outlook folder. To import or export items, run the Import And Export Wizard by choosing Import And Export from the File menu of Outlook.
Removing Items
You can remove an item from an Outlook folder by selecting it in the Information Viewer of the Outlook window (just click it) and then choosing Delete from the Edit menu, clicking the Delete toolbar button, or pressing Ctrl+D. If you have opened the item in a form, you can remove it by clicking the Delete button on the form's toolbar or pressing Ctrl+D.
![]()
TIP
Remove Several Items at OnceYou can quickly remove a group of items by selecting them all in the Information Viewer prior to issuing the Delete command. To select several adjoining items, click the first one, and then click the last one while pressing Shift. To select nonadjoining items, click the first one, and then press Ctrl while clicking each additional one. To select all items in a folder, choose Select All from the Edit menu or press Ctrl+A. (This command isn't available in all folders.)
When you remove an item, it's not permanently deleted right away. Rather, it's initially moved to the Deleted Items folder. If you want to permanently delete the item, remove it from the Deleted Items folder using any of the methods just described.
You can also permanently delete all items in the Deleted Items folder by choosing Empty "Deleted Items" Folder from the Tools menu. Or, you can have Outlook permanently delete all items in the Deleted Items folder each time you exit the program by choosing Options from the Tools menu, clicking the Other tab in the Options dialog box, and selecting Empty The Deleted Items Folder Upon Exiting. To see a message before an item is permanently deleted, click the Advanced Options button on the Other tab, and select Warn Before Permanently Deleting Items.
If you archive your Outlook folders, you can have Outlook permanently delete all items in the Deleted Items folders that are older than a specified age. (See the following tip on archiving.) And if you're using Outlook as an Exchange Server client, the server might delete older items from the Deleted Items folder. (The server administrator sets the length of time items are stored in Deleted Items.)
TIP
Reduce Clutter by ArchivingYou can clean up your Outlook folders by archiving. Archiving removes Outlook items either by moving them to an archive file— a separate Personal Folders (PST) file— or by permanently deleting them. You can archive manually, or you can have Outlook do it automatically at specified intervals. For information on archiving, see the Outlook online Help book "Archiving Items."
As long as an item is still contained in the Deleted Items folder, you can restore it to the folder that originally contained it. To do this, just drag the item from the Deleted Items folder to the Outlook Bar shortcut for the original folder. (You can also drag it to the original folder's name in a permanently displayed Folder List.) If the shortcut for the original folder isn't visible, while you drag, you can hold the pointer over a group button to open that group, or you can hold it over the top or bottom of a group to scroll through the shortcuts.
SEE ALSO
The techniques for moving and copying items from one Outlook folder to another are discussed in "Organizing Messages".
Using the Organize Tool
The Organize tool is a Web-style page that you can display in a separate pane at the top of the Information Viewer and that you can use for working with Outlook items. Although it doesn't let you do anything that you can't do by using the program's conventional commands, it provides fast and easy alternative methods for performing some of the more common tasks. For example, you can
- Move selected items in the folder to another folder. For some folders, you can also have Outlook automatically move items in the future, according to rules that you specify. For example, you could have all future e-mail messages that your boss sends automatically moved to a specific folder.
- Assign categories to items (such as Business or Personal), and create new categories.
- Change the current view.
- Organize messages by color-coding certain messages. Or, automatically color-code, move, or delete junk e-mail or adult-content e-mail. These features are discussed in "Organizing Messages".
![]()
To use the Organize tool, open the folder you want to work with, and choose Organize from the Tools menu or click the Organize button on the Standard toolbar. The Organize page will then be displayed in a separate pane at the top of the Information Viewer. The features that the Organize tool provides vary depending on the current folder. Figure 26-4 shows the Organize tool for the Contacts folder.
You can remove the Organize tool by choosing the Organize command or clicking the Organize button again.
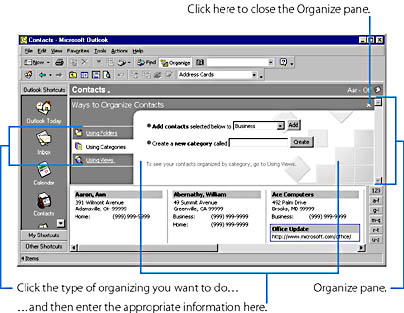
Figure 26-4. Using the Organize tool for the Contacts folder.
EAN: 2147483647
Pages: 228